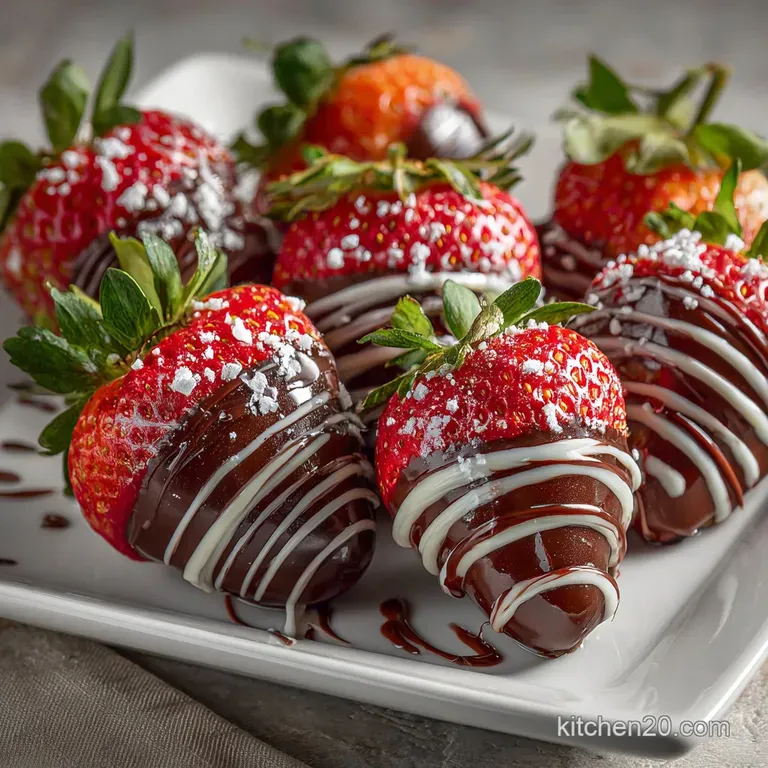
Chocolate Covered Strawberries
- Time: Active 15 minutes, Passive 15 minutes, Total 30 minutes
- Flavor/Texture Hook: Glossy, shatter crisp dark shell with a juicy, velvety center
- Perfect for: Romantic surprises, upscale dinner parties, or thoughtful handmade gifting
- Achieve Snap with Chocolate Covered Strawberries
- Specs for Your Covered Strawberries
- Components for Valentine Dipped Berries
- Essential Gear for Smooth Coating
- Technique for Seamless Dipping Results
- Fixing Typical Dipping Mistakes
- Flavor Twists for Custom Batters
- Proper Care and Storage Habits
- Perfect Presentation and Pairing Ideas
- Recipe FAQs
- 📝 Recipe Card
Have you ever wondered why that first bite of a boutique strawberry shatters with a loud crack, while the ones we make at home sometimes feel soft and tacky? It's a question that plagued my kitchen for years.
I used to think it was just about the quality of the fruit, but it turns out the secret is actually hidden in how we handle the fat molecules in the coating.
We've all been there, standing over a bowl of seized, grainy mess or watching our beautiful creations "sweat" on the platter. It's frustrating when you're trying to build a special moment and the food doesn't cooperate.
I've spent countless afternoons testing temperatures and drying methods to find a platform that actually works for home cooks like us.
This guide is going to change how you look at Day Chocolate Covered Strawberries. We are moving away from messy, guesswork dipping and moving toward a streamlined, tech inspired method that guarantees a glossy finish every single time.
Let's crack on and look at why these techniques are revolutionizing the way we treat fresh fruit.
Achieve Snap with Chocolate Covered Strawberries
Getting that professional finish is all about the science of crystallization. When we melt chocolate, we break down its internal structure, and if we don't help it reform correctly, it stays soft or develops those weird white streaks.
Trust me on this, a little bit of patience during the cooling phase makes all the difference in the world.
The Science of Why it Works Crystallization of cocoa butter ensures the fat molecules align in a stable "Form V" structure, creating a glossy finish and a firm snap. The addition of coconut oil lowers the surface tension, allowing for a thinner, more even coating that doesn't overwhelm the fruit.
1. The Power of Seeding
By adding solid chocolate chips back into the melted liquid, we provide a "template" for the crystals to follow. This is like giving the liquid chocolate a set of instructions on how to harden. Without this, the coating often stays dull and tacky even after hours in the fridge.
2. Hydrophobic Surface Tension
Strawberries are basically tiny water balloons. Since oil and water don't mix, even a single drop of moisture on the skin will cause the chocolate to slide right off or "seize" into a clump. This is why the bone dry prep is the most critical step in the whole process.
3. Latent Heat Management
If you dip a cold berry into hot chocolate, the temperature shock creates condensation. We need to manage the "thermal gap" by letting the berries come to room temperature while keeping the chocolate just above its melting point. It’s all about maintaining that delicate thermal connection.
| Component | Science Role | Pro Secret |
|---|---|---|
| Dark Chocolate (283g) | Structural Base | Use chips with at least 60% cacao for a firmer set. |
| Coconut Oil (5ml) | Viscosity Reducer | Refined oil stays liquid longer, creating a thinner, sleeker shell. |
| Fresh Strawberries (454g) | Cellular Moisture | Keep stems on to act as a natural handle and moisture seal. |
Selecting the right fruit is the foundation of this dish. Look for berries that are firm to the touch and have a deep red color all the way to the top. If they have white shoulders near the stem, they won't be as sweet, and the higher acid content can sometimes interfere with how the chocolate adheres to the skin.
Specs for Your Covered Strawberries
When we talk about precision in the kitchen, people often get intimidated, but it’s actually our best friend. It takes the "maybe" out of the equation. If you follow these three numeric checkpoints, you won't have to worry about whether your Valentines Day Chocolate Covered Strawberries will turn out right.
- Checkpoint 1: Ensure your chocolate never exceeds 46°C (115°F) during melting to avoid burning the milk solids.
- Checkpoint 2: The berries must air dry for at least 30 minutes after washing; even "towel dry" isn't enough to remove microscopic moisture.
- Checkpoint 3: Set the fridge to a standard 4°C (40°C) for the "flash set" to lock in the gloss before the sugar starts to bloom.
If you are looking to expand your dessert repertoire, this technique of managing fat and sugar is very similar to what I use in my Chocolate Fudge recipe. Both require a deep understanding of how temperature affects the final bite.
Components for Valentine Dipped Berries
We only need a few high-quality elements to make this work. Since there are so few ingredients, the quality of each one really stands out. Don't even bother with the "mock" chocolate coatings found in the baking aisle; they usually contain palm oil instead of cocoa butter and won't give you that velvety mouthfeel.
- 1 lb (454g) Large Fresh Strawberries: Keep the green tops on! Why this? Stems prevent juice from leaking and seizing your melted chocolate.
- 10 oz (283g) Dark or Milk Chocolate chips: Use a high-quality brand. Why this? Better chocolate has more cocoa butter, which leads to a superior snap.
- 1 tsp (5ml) Refined Coconut Oil: This is our secret weapon. Why this? It thins the chocolate so it flows into every nook of the berry.
- 4 oz (113g) White Chocolate melting wafers: For the contrast drizzle. Why this? Wafers melt more smoothly than chips for decorative work.
Right then, let's talk about swaps. If you can't find dark chocolate, milk chocolate works, but it is softer due to the higher milk fat content. You might need to keep those in the fridge until the very second you serve them.
Essential Gear for Smooth Coating
You don't need a high tech lab to get these results, but a few specific tools will make the process much more connected and less chaotic. I personally prefer using a small, deep bowl for dipping rather than a wide, shallow one. A deeper pool of chocolate allows you to submerge the berry in one fluid motion.
1. The Double Boiler Setup
You can buy a specific pot for this, but a glass bowl over a simmering pan of water works perfectly. Just make sure the bottom of the bowl doesn't actually touch the water. We want the steam to do the work, not direct contact with the heat source.
2. Micro Perforated Parchment
Or just regular parchment paper! This prevents the berries from sticking to the tray. If you use a wire rack, the chocolate will pool around the wires and tear the skin of the berry when you try to lift it later.
| Method | Heat Control | Risk Level |
|---|---|---|
| Stovetop (Double Boiler) | Constant and gentle. | Low, provided no steam enters the bowl. |
| Oven (Low Temp) | Hard to monitor. | High; chocolate can dry out or grain quickly. |
Using the stovetop method is generally the gold standard for home cooks because you can see exactly when the chips start to lose their shape. If you’re in a rush, the microwave is a platform that works, but it requires 15 second intervals and a lot of stirring to prevent hot spots.
Technique for Seamless Dipping Results

Now we get to the fun part. This is where the magic happens and we see all that prep pay off. If you are gifting these, consider making a batch of my How to Make recipe for a Godiva style presentation that really wows.
- Wash the berries. Rinse them in cold water but do not remove the green stems.
- Dry thoroughly. Lay them on a clean towel for 15 minutes, then pat each one again with a paper towel. Note: Moisture is the enemy of chocolate.
- Melt the base. Place 8 oz (225g) of the dark chocolate and the coconut oil in a bowl over simmering water.
- Seed the mixture. Remove from heat and stir in the remaining 2 oz (58g) of chocolate until completely smooth and glossy.
- The 45 degree dip. Hold a berry by the stem and dip it into the chocolate at an angle, swirling it slowly.
- Drain the excess. Lift the berry and shake it gently over the bowl until the dripping slows to a stop.
- Place on parchment. Lay the berry down and slide it forward about half an inch to prevent a large "foot" of chocolate from forming.
- Melt the drizzle. Melt the white chocolate wafers in 10 second bursts in the microwave until they flow like honey.
- The final touch. Use a fork or a piping bag to flick the white chocolate across the berries in a rapid side to side motion.
- Flash set. Place the tray in the fridge for 15 minutes until the shell is firm to the touch.
Wait, I almost forgot a mistake I once made: never cover the berries while they are setting in the fridge. This traps moisture and leads to that dreaded "sweating." Leave them uncovered so the air can circulate around the chocolate.
Fixing Typical Dipping Mistakes
Even with the best plan, things can go sideways. I’ve had my fair share of lumpy chocolate and sliding shells. The key is knowing how to pivot when you notice the texture changing.
1. Thick and Lumpy Chocolate
This usually happens because a tiny bit of water got into the bowl or the chocolate got too hot. It loses its silky flow and starts to look like paste. This is what we call "seizing," and it’s a common hurdle when making Covered Strawberries.
2. Sweating Berries
If you see little beads of water on the surface of your finished chocolate, it's usually because the temperature shift was too drastic. Bringing them from a very cold fridge to a warm room causes the moisture in the air to condense on the cold surface.
| Problem | Root Cause | Solution |
|---|---|---|
| Chocolate is thick/grainy | Overheating or moisture. | Stir in 1/2 tsp of vegetable oil to smooth it out. |
| Coating slides off | Berry was damp. | Use a blow dryer on "cool" to dry berries before dipping. |
| White streaks appear | Improper tempering. | Add more "seed" chocolate and stir vigorously to reset crystals. |
If you want a thicker shell, do two thin dips instead of one thick one. If you want a matte finish, skip the coconut oil. If you want a faster set, place the berries in front of a small fan before putting them in the fridge.
Flavor Twists for Custom Batters
Once you've mastered the basic Day Chocolate Covered Strawberries, you can start treating the chocolate as a platform for other flavors. I love experimenting with textures to create something truly unique. You can even try applying these ideas to the coating techniques found in my How to Make recipe for a multi layered dessert experience.
| Original Ingredient | Substitute | Why It Works |
|---|---|---|
| Dark Chocolate | Ruby Chocolate | Adds a natural berry/tart flavor. Note: Melts at a lower temp. |
| White Drizzle | Crushed Toffee | Adds a salty crunch to the velvety shell. |
| Coconut Oil | Cocoa Butter | Provides a firmer, more "professional" snap. |
Adding a pinch of flaky sea salt to the dark chocolate while it's still wet is a total game changer. It bridges the gap between the sweetness of the fruit and the bitterness of the cacao.
Chocolate Covered Strawberries for Him
For a more "masculine" or savory twist, try rolling the wet chocolate in crushed smoked almonds or even a dusting of espresso powder. It adds a layer of complexity that pairs brilliantly with a glass of bourbon or a dark stout.
dairy-free Vegan Modification
You can easily make these vegan by using a high-quality dairy-free dark chocolate (like 70% cacao or higher). Most dark chocolates are naturally vegan, but always check the label for milk solids. The coconut oil already fits the diet perfectly!
Proper Care and Storage Habits
Chocolate and fresh fruit have different shelf lives, which makes storage a bit of a challenge. Ideally, you want to eat these the day they are made. The strawberry continues to release moisture even after it's dipped, which eventually breaks down the bond between the fruit and the shell.
Storage: Keep the berries in a single layer in a container lined with paper towels. Do not seal the lid tightly; leave it cracked open so moisture can escape. They will stay fresh for about 24 hours in the fridge.
Freezing: Honestly, don't even bother freezing them. Strawberries have a high water content, and when they thaw, they turn into a mushy mess. The chocolate will also likely crack and fall off.
Zero Waste: If you have leftover melted chocolate, don't throw it out! Pour it onto a piece of parchment paper, sprinkle on some nuts or dried fruit, and let it harden into a quick chocolate bark. It’s a great way to use up every bit of that liquid gold.
Perfect Presentation and Pairing Ideas
Presentation is where you can really show your creative connection to the food. Think of the platter as a platform for the berries to shine. A simple white marble slab or a dark wooden board can make a huge difference in how the colors pop.
1. The Valentine Charcuterie
Instead of just a plate of berries, build a dessert board. Surround your DIY chocolate covered strawberries valentine with small bowls of honeycomb, some brie cheese, and maybe some lightly toasted baguette slices. The mix of sweet and savory is addictive.
2. The Champagne Pairing
There’s a reason this is a classic. The bubbles in a dry sparkling wine help "scrub" the palate of the heavy cocoa butter, making every bite of the fruit feel fresh and vibrant. If you prefer something non alcoholic, a cold glass of sparkling hibiscus tea offers a similar acidic balance.
When you're ready to serve, take the berries out of the fridge about 15 minutes beforehand. This allows the chocolate to soften just enough so it doesn't shatter into a million pieces when you bite into it, while the berry remains crisp and refreshing.
It’s all about finding that perfect temperature connection to make the experience truly memorable.

Recipe FAQs
Why do people give chocolate covered strawberries on Valentine's Day?
It's a classic romantic gesture. Strawberries symbolize love and passion, and chocolate adds a decadent, indulgent touch, making them a perfect pairing for expressing affection.
How do I get chocolate to stick to my strawberries?
Ensure strawberries are completely dry. Even a tiny bit of moisture on the surface will prevent the chocolate from adhering properly, causing it to slide or seize.
What is the secret to perfect chocolate covered strawberries?
Proper chocolate tempering and berry preparation. The secret lies in melting and cooling the chocolate correctly to achieve a glossy snap, and ensuring your strawberries are bone dry. If you enjoyed mastering temperature control here, apply the same precision to achieving perfect crystallization in our Classic Creamy Dark Chocolate Fudge recipe.
Why can't you put chocolate covered strawberries in the fridge?
Condensation can ruin the shell. Placing them in the fridge can cause moisture to form on the chocolate's surface when brought back to room temperature, leading to a dull finish or "sweating." They are best stored at cool room temperature.
How do I melt chocolate for dipping without it seizing?
Use a double boiler or microwave at low power and avoid water. Gentle, indirect heat is key. Stir frequently and remove from heat just before it's fully melted, letting residual heat finish the job to prevent scorching or seizing.
Can I substitute the coconut oil in chocolate covered strawberries?
Yes, you can use cocoa butter or vegetable oil. Coconut oil thins the chocolate for a smooth coating. Cocoa butter provides an even firmer snap, similar to professional applications. Vegetable oil is a common substitute that also helps with fluidity.
Why do my chocolate covered strawberries look dull or have white streaks?
This is usually due to improper tempering. White streaks, or "bloom," indicate that the cocoa butter crystals haven't set uniformly. For a glossy, shatter crisp shell, ensure the chocolate is melted and cooled carefully. If you found the technique for creating a smooth shell interesting, you might enjoy the principles of dough handling in our Classic Vanilla Pound Cake Recipe: A Slice of Timeless Delight.
Chocolate Covered Strawberries

Ingredients:
Instructions:
Nutrition Facts:
| Calories | 418 kcal |
|---|---|
| Protein | 5.3 g |
| Fat | 25.3 g |
| Carbs | 38.8 g |
| Fiber | 4.8 g |
| Sugar | 26.4 g |
| Sodium | 25 mg |
