Classic British Victoria Sponge Cake

A Slice of History and Happiness: The Classic British Victoria Sponge Cake
Oh my gosh, have you ever taken a bite of a cake that just makes your heart sing? i remember the first time i had a slice of victoria sponge cake .
I was at a friend’s afternoon tea party, and this fluffy beauty was sitting right there, practically winking at me.
The moment i tasted that light cake, sandwiched between raspberry jam and whipped cream, i knew i had to recreate it in my own kitchen.
It's like a sweet hug in dessert form!
So, let’s dive into why sponge cake recipes especially this one are such a big deal in baking. it's not just about flavor, but also the history.
Did you know that queen victoria herself was a fan of this delightful cake? she would enjoy a slice during her afternoon tea, making it a royal favorite.
It’s funny to think about how something so simple became synonymous with british culture. today, the victoria sponge cake recipe has become a staple in many households and even made a splash on the british bake off recipes .
Now let’s break it down. if you’ve got about 45 minutes , you’re all set. seriously, this is an easy recipe that’ll have your kitchen smelling heavenly.
It's economical too meaning you don't have to break the bank to put a smile on everyone’s face. and cut a slice, and you'll find it can serve 8 hungry folks !
Why You’ll Love the Victoria Sponge Cake
Now, why should you jump on the sponge cake train? oh, let me tell you about the benefits! first off, it’s light and fluffy.
That airy texture? yes, please! full of taste, but not too heavy it's perfect for those warmer days when you still want something sweet.
With just a few ingredients (think butter, sugar, and eggs), you can create a cake that's both classic and comforting.
Plus, it’s packed with some heart healthy fats from the butter and a bit of fiber from the jam and cream.
Feeling fancy? this cake is perfect for special occasions! birthdays, anniversaries, or even just a friday night treat, it fits right in.
It's great for impressing your friends or just enjoying on a cozy day with a cup of tea. and let's not forget about versatility.
You can swap out the raspberry jam for strawberry or even lemon curd if you’re feeling zesty. honestly, it opens the door to so many flavors!
Have you ever heard of japanese cotton cake recipes ? they also have that light, fluffy texture, but let’s be real there’s nothing like the classic sponginess of a victoria sponge.
Compared to other cake recipes, this one is straightforward and uncomplicated. you don't need any fancy techniques; it’s all about loving those basic ingredients.
Let’s Get Ready to Bake!
So now that i’ve gotten you all pumped up about this delightful cake, get ready for the next part the ingredients! i can’t wait to share the creamy goodness and sweet delight of this recipe with you.
Trust me, your taste buds will thank you when you dig into this classic british treat!
What are you waiting for? grab your apron, and let’s make some magic happen in that kitchen of yours! from all the fluffy vanilla cake adventures to the insane popularity on shows like the british baking show , it’s time we honored this little slice of history.
You're going to love it!
Essential Ingredients Guide
Alright, friends! let’s dive into the essential ingredients guide you need for the kitchen whether you're whipping up a classic victoria sponge cake , trying your hand at fluffy vanilla cake, or exploring those delightful japanese sponge cake recipes .
I'll walk you through everything from core components to smart substitutions, making sure you feel totally equipped to bake like a pro (or at least like mary berry on her best day).
Premium Core Components
First off, let's talk about the core ingredients . You’re gonna want these in your pantry:
Unsalted butter : 8 oz (225g), softened. Look for that rich yellow color. If it feels soft to the touch (not melting), you’re golden.
Granulated sugar : 8 oz (225g). You can’t go wrong with the basic white sugar.
All-purpose flour : 8 oz (225g). Check for that fine texture no lumps here!
Eggs : 4 large, at room temperature. Fresh is best! You want to see a nice, round yolk when you crack it.
Baking powder : 1.5 tsp. Don’t let it gather dust in your pantry; check the expiration date!
Salt : Just 1/4 tsp. It doesn’t sound like much, but it helps balance all the sweet goodness.
Storage wise ? keep your butter in the fridge, eggs can chill on the countertop, and those dry ingredients are best stored in a cool, dry place.
Most of these babies last a good while typically several months.
Signature Seasoning Blend
Don’t forget your flavor enhancers! If you’re aiming to master your pairing game, check out these combos:
Raspberry Jam : For the filling, it’s a must. You could even switch to strawberry if that’s more your jam (pun intended).
Heavy Cream : 1 cup (240ml) to whip it good! Make sure it’s cold when you whip it for fluffy peaks.
Powdered sugar : 1 tbsp for that sweetness in the whipped cream makes it sing!
Herbs and spices? You could toss in a dash of vanilla extract (or a bit of almond) if you wanna customize things a bit. It never hurts to get creative!
Smart Substitutions
Alright, so life happens. Sometimes you’ve got to improvise. A few quick substitutions can rescue a potential baking disaster!
Butter : Don't have unsalted? Use salted, but cut back on the salt in your recipe.
Heavy Cream : Try coconut cream for a dairy-free twist. It gives a lovely tropical vibe!
Eggs : If you're in a pinch, a flaxseed slurry (1 tbsp ground flaxseed + 3 tbsp water) can replace one egg in most baking recipes.
Feeling adventurous? If you're craving something fresh, you could branch out into Japanese sponge cake recipes for that airy, melt-in-your mouth texture and trust me, it’s as easy as pie!
Kitchen Equipment Essentials
Time to gather the gear! Your kitchen tools make a huge difference:
Two 8 inch round cake pans : Make sure they’re well greased. Nothing’s worse than a stuck cake!
Electric mixer : If you want to save those arm muscles, go for the electric route.
Mixing bowls and a spatula : You can't have too many, am I right?
Cooling rack : To let your cakes breathe. Trust me, they’ll appreciate it.
Don’t have all that? No worries any mixing bowl will work, and a fork can substitute for the mixer. Just put in a little elbow grease!
So, are you ready to get into some delicious Victoria Sponge Cake Recipes ? This cake is so versatile and perfect for any occasion. Trust me, it’s easier than it seems!
With all these tips and tricks in your back pocket, let’s move on to some step-by-step instructions on how to whip up this crowd pleaser in your own kitchen! Happy baking, y’all!
Mastering the Art of Professional Cooking: Sponge Cake Unlocked!
So, you’re thinking about diving into the world of professional cooking? maybe you're daydreaming about whipping up a classic british victoria sponge cake ? oh my gosh, you’re in for a treat!
Honestly, there’s something so satisfying about baking a bit like alchemy, turning simple ingredients into something magical.
But before we get into those fluffy layers, let’s roll up our sleeves and get to some essential prep steps.
Essential Preparation Steps
First off, let’s talk mise en place . i promise you’ll never love this french term more! it just means having everything in its place.
You know, like before a big party when you lay out all the snacks and drinks? do the same with your ingredients! measure out your 8 oz of butter , 8 oz of sugar , and so on.
This way, when it's time to bake, you’re not scrambling around!
Now, here’s my golden nugget of wisdom: time management . think of it like multi tasking at a practice round for the great british bake off .
While your cake bakes (around 20- 25 minutes ), you can start prepping the filling whipped cream and raspberry jam.
Just don’t forget to set a timer! (trust me, burnt cake is no one’s friend.)
Inspect your workspace too. a little organization can go a long way. put everything you’ll need mixing bowl, spatula, and your cake pans where you can grab them easily.
And safety first! always keep that oven mitt handy, especially if you’re reaching for those hot pans.
Step-by-step Process
Alright, let’s dive into the nitty gritty. Here’s how to get from batter to that gorgeous Victoria Sponge:
Preheat your oven to 350° f ( 175° c) . this is crucial, folks! if you start mixing before this, your cake could be a flop instead of that fluffy wonder we’re aiming for.
Grab your cake pans and grease them up. Trust me, you don't want a situation where your cake sticks.
In a mixing bowl, cream 8 oz of softened butter with 8 oz of sugar until it’s light and fluffy. You want that airy texture!
Add 4 eggs , one at a time, mixing well after each. It’s like nurturing a tiny sponge cake family!
Sift in 8 oz all-purpose flour , 1.5 tsp baking powder , and 1/4 tsp salt . Now, fold it in gently, like you’re cradling a sleeping baby.
Pour in 2 tablespoons of milk . This little addition makes everything smoother and silkier.
Divide your batter between the pans and smooth the tops.
Pop them in the oven for about 20– 25 minutes . They'll be done when they start to look golden brown. If a toothpick comes out clean, you've hit the jackpot!
The Secret Sauce: Expert Techniques
Now, let’s get a bit fancy with our techniques. one critical aspect? knowing your cake's doneness! touch the top gently; if it springs back, it’s ready.
And hey, if it’s a little domed, don’t fret. just level it off with a serrated knife after it cools.
Remember, less is more when mixing the batter. overmixing leads to a dense cake, and we are shooting for fluffy , not brick ish.
If you encounter any issues, maybe the batter is too thick? a splash more milk can help.
Success Strategies
Let me drop some wisdom bombs. common mistakes? forgetting to let your cakes cool before adding the filling is a biggie.
You’ll have a melty mess on your hands. aim for a complete cool down. patience, my friend!
Also, check for quality at each step. you want your butter fresh and your eggs at room temp. for a little twist, consider brushing your cakes with a simple syrup for an extra moist sponge .
And if you want to prep ahead, you can freeze those cake layers. Just wrap them tightly in plastic wrap. When you're ready, let them thaw and fill 'em up!
The mary berry victoria sponge is surely a crowd pleaser. you can adapt classic sponge cake recipes to your heart's content, whether you're looking for a japanese cotton cake or even a japanese jiggly cake .
If you're feeling adventurous, search for those fascinating japanese sponge cake recipe videos and get inspired!
Additional Information...
If you're curious to learn more about variations on this timeless victoria sponge cake or need some mary berry recipes for a different occasion, stick around! there's always more deliciousness to explore in the world of baking.
Happy baking, friends!
Additional Recipe Information for Classic British Victoria Sponge Cake
Creating the perfect victoria sponge cake is like a rite of passage for bakers! seriously, there’s something so charming about making this classic treat.
Grab your mixing bowls and let’s dig into some pro tips and secrets to make it even better!
Pro Tips & Secrets
Chef's personal insights
oh my gosh, i learned the hard way that your butter needs to be super soft.
No one likes a dense sponge, right? use room temperature butter so it creams beautifully with sugar. trust me!
Time saving techniques
if you’re in a hurry, mix all your dry ingredients ahead of time. also, while your cake layers are baking, clean up! you’ll feel like a baking ninja, and you might even have time for a cuppa tea while waiting.
Flavor enhancement tips
here’s a little insider secret: sprinkle a pinch of salt in your whipped cream. it brings out the sweetness.
Also, consider adding a splash of vanilla extract to the batter. it’s like giving your cake a hug!
Presentation advice
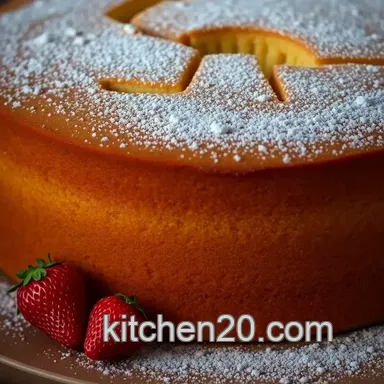
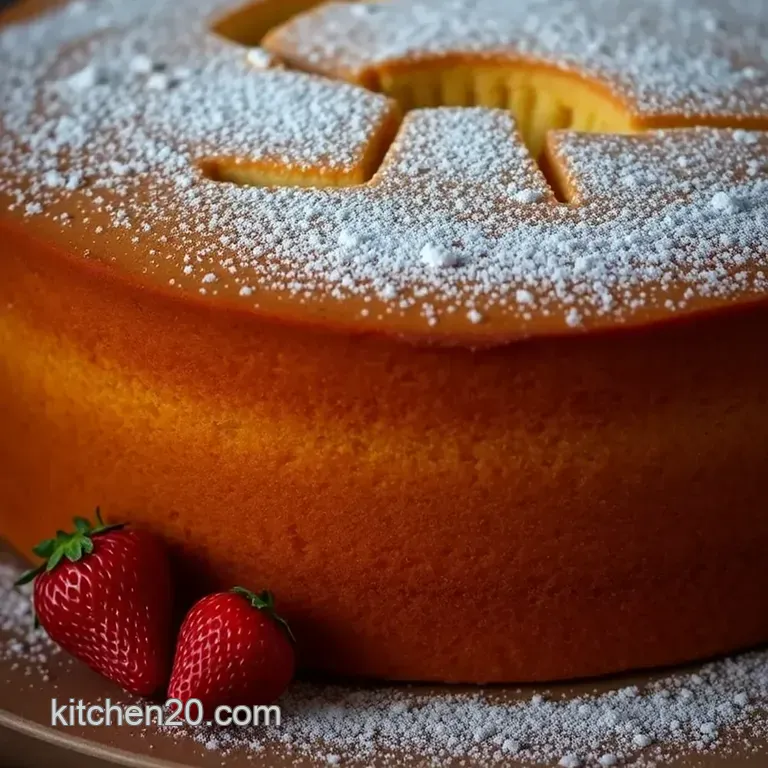
presentation is key! use a serrated knife to level off the tops of your cake layers. then, dust with powdered sugar for that instagram worthy look.
Everyone loves a good cake sandwich , right?
Perfect Presentation
Plating Techniques
For a classic touch, place the cake on a beautiful serving platter. A pretty plate elevates any dessert! Spreading the jam and cream evenly helps keep the layers neat.
Garnish ideas
fresh raspberries on top scream celebration! sprinkle them around the cake for color contrast and a pop of freshness.
You could even add mint leaves for a touch of greenery.
Color Combinations
Pair this fluffy vanilla cake with deep red raspberry jam or even bright lemon curd for springtime vibes. The colors not only look good, they taste divine!
Visual Appeal Tips
When you cut into it, the layers should reveal that gorgeous cream and jam. Slice with a quick motion to avoid squishing the layers down nobody wants a melty mess!
Storage & make-ahead
Storage guidelines
if you’ve got leftovers (unlikely, but we can dream!), you can store this beauty in an airtight container.
It’ll be fine for about 2-3 days, if it lasts that long!
Preservation Methods
To keep your cake fresh, avoid stacking it. Each layer needs its personal space. Consider storing the jam and cream separately for better longevity.
Reheating Instructions
Honestly, if you’re microwaving leftover sponge cake, you might be doing it wrong. Heat for about
10-15 seconds
if you must; just ensure it doesn’t dry out.
Freshness duration
for the best texture and flavor, eat it within the first couple of days. that’s when it’s at its fluffiest.
It loses that magical sponge feel after a few days, but it’s still delicious!
Creative Variations
Flavor Adaptations
Swap that raspberry jam for peach preserves or even chocolate hazelnut spread for a unique twist. Versatile? Absolutely! You could even turn it into a Japanese Cotton Cake Recipe , which has that jiggly goodness!
Dietary Modifications
Want a dairy-free version? Use coconut cream instead of heavy cream it’s divine! And oh, if you go vegan, flax eggs can replace the regular eggs just fine.
Seasonal Twists
Baking in the fall? Try adding spices like cinnamon or nutmeg to the batter. You could even layer it with apple butter during apple season!
Regional Variations
Feeling adventurous? Try the
Mary Berry Victoria Sponge
by adding a splash of elderflower cordial. It’s a lovely British twist sure to impress.
Complete Nutrition Guide
If you’re curious about the numbers...
This
Classic Victoria Sponge Cake
packs around
330 calories
per slice. Lots of carbs to fuel your day, but remember, it’s all about balance!
Health Benefits
Let’s be real, cake isn’t
health food
. But if you pair it with fresh fruit, you’re adding some vitamins to the sugar party.
Dietary Considerations
Keep an eye on sugar intake. If you're tweaking, use honey or agave syrup for a different sweetness that fits your goals.
Portion Guidance
Each serving is about 1 slice. Enjoy in moderation, but ain't nobody punishing themselves for a slice of happiness!
In Conclusion
Baking this victoria sponge cake is not just about creating a dessert; it’s about creating memories. so when you have friends over, or just treat yourself, remember to enjoy the process.
Everyone can master sponge cake recipes with a little patience and practice. you got this! happy baking, and may your cakes be fluffy and your spirits high!
Frequently Asked Questions
What are some common challenges with sponge cake recipes?
One of the most frequent hurdles is achieving the right texture. Overmixing can lead to a dense cake, while undermixing can result in a gritty texture. Make sure to fold in the flour gently until just combined, and always check that your baking powder is fresh for proper rising!
Can I make sponge cake recipes ahead of time?
Absolutely! You can bake and cool the cake layers in advance. Just wrap them tightly in plastic wrap and store them at room temperature for up to 2 days, or freeze for longer storage. Make sure to thaw completely before adding your filling and frosting for the best texture.
How do I store leftover Victoria sponge cake?
To keep your remaining cake fresh, store it in an airtight container at room temperature for up to three days. If you’ve filled it with whipped cream, it’s best to keep it in the fridge, where it’ll last for about two days. Just make sure to cover it well to prevent it from drying out!
What can I substitute for eggs in sponge cake recipes?
If you're looking for a substitute, you can use unsweetened applesauce (1/4 cup per egg) or a mashed banana. Alternatively, commercial egg replacers work well too! Just bear in mind that these may slightly alter the flavor and texture of your sponge cake, giving it a unique twist!
Can I add flavors to my Victoria sponge cake?
Definitely! You can fold in some lemon zest or vanilla extract to enhance the flavor of the cake. If you're going for a chocolate twist, consider replacing a third of the flour with cocoa powder, which will make for a rich delight without overpowering the classic sponge!
Is there a healthier version of sponge cake recipes?
Yes, you can make a healthier sponge by using whole wheat flour and reducing the sugar. Additionally, you can substitute some of the butter with natural yogurt or applesauce to cut down on fat. Just remember, the texture might change a bit, but it'll still be delicious!
Classic British Victoria Sponge Cake