Green Bean Casserole from Scratch: the Festive Classic Reborn
- Elevating the Classic: The Ultimate Green Bean Casserole (From Scratch)
- Mastering Texture and Flavor: The Science Behind a Perfect Casserole
- Essential Components for Your Best Homemade Green Bean Casserole
- The Method: A Step-by-Step Guide to Assembling Your Casserole
- Achieving Perfection: Expert Tips and Troubleshooting Your Green Bean Casserole
- Make-Ahead Mastery: Storage, Freezing, and Reheating
- Festive Pairings: What to Serve Alongside This Classic Side Dish
- Recipe FAQs
- 📝 Recipe Card
Elevating the Classic: The Ultimate Green Bean Casserole (From Scratch)
You know that scent, right? That warm, savory cloud of creamy richness mingled with something deeply caramelized, floating out of the kitchen during the holidays. It is pure, unadulterated comfort food, and it smells exactly like a proper, homemade Green Bean Casserole should.
We are finally ditching that infamous canned soup to create a version that is incredibly rich, utterly silky, and tastes like you spent all day in the kitchen.
But here is the real secret: this scratch made classic is actually a lifesaver. Because we are using fresh ingredients and building flavor from the ground up, the texture is miles better, and most of the work can be done ahead of time.
This Green Bean Casserole is a traditional side dish, but honestly, it steals the show; it's easy on the wallet but tastes ridiculously indulgent.
Trust me when I tell you that once you try the flavor depth of a real mushroom velouté paired with perfectly tender crisp fresh green beans, you will never look back. This is the ultimate Green Bean Casserole recipe you’ve been waiting for, balancing that cozy nostalgia with genuinely great cooking.
Let's crack on and make this Thanksgiving staple truly shine.
Mastering Texture and Flavor: The Science Behind a Perfect Casserole
Ditching the Cans: Why Fresh Ingredients Matter
Look, the canned version has its place in history, but we are aiming for culinary superiority here. Canned green beans are often mushy and khaki colored, leaching flavor into the water they swim in.
Using fresh green beans, especially the slender haricots verts, ensures a vibrant color and that wonderful snap tender bite we crave. This simple upgrade takes this traditional Green Bean Casserole from duty to delight.
A History of Comfort: Understanding the Green Bean Casserole's Appeal
This recipe became a phenomenon because it was easy, accessible, and deeply satisfying a truly classic dish. The genius of the original was combining a creamy base with an intense, crunchy topping; our goal is simply to replicate that appealing texture contrast using better components.
We honor the flavor memory while ensuring every spoonful tastes deliberate, not manufactured.
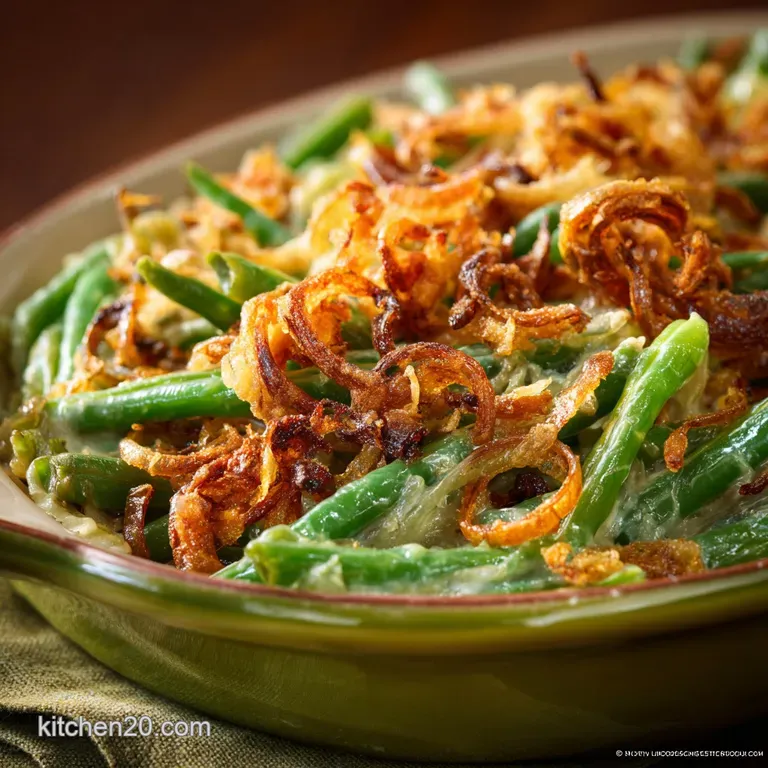
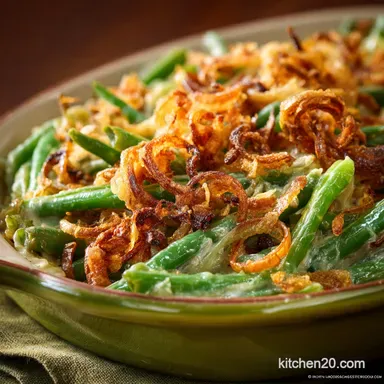
The Texture Secret: Tender Beans Meet Silky Sauce
The trick to avoiding a watery, gluey casserole is twofold. First, we must aggressively blanch the fresh green beans. Second, we must build a stable, emulsified sauce base (a proper velouté, which is really just a fancy gravy).
The combination delivers tender beans suspended in a sauce that clings beautifully, without separating or getting thin.
The Blanching Advantage: Achieving Tender Crisp Beans
You must shock your beans! Blanching them in boiling, salted water for exactly three minutes, then plunging them into an ice bath, stops the cooking immediately. This preserves the chlorophyll, locking in that brilliant green color and maintaining that desirable al dente crunch.
If you skip this, the beans will overcook into oblivion during the baking phase.
Building a Better Base: Crafting the Rich Velouté Sauce
A velouté is a sauce thickened with a roux (butter and flour). We sauté the mushrooms first until they are deeply browned, concentrating their umami flavor before adding the roux. This crucial step is what makes the sauce taste earthy and complex, not just like flour and cream.
The dry sherry adds enormous depth, making the Green Bean Casserole taste truly special.
The Maillard Reaction: Browning for Depth of Flavor
The Maillard reaction, which is fancy for browning things, is essential in two places. Browning the mushrooms significantly before building the sauce creates an intense flavor foundation.
We also want that beautiful golden color on the casserole surface, achieved when the fat, dairy, and starch bubble up and caramelize during the final minutes of baking.
Essential Components for Your Best Homemade Green Bean Casserole
Selecting the Best Fresh Green Beans (Haricot Verts vs. Standard)
I strongly prefer haricots verts (French green beans) because they are thinner and cook more quickly, staying consistently tender crisp. Standard fresh green beans work perfectly well, but make sure they are trimmed nicely.
You want bright, snappy beans, not wilted ones; if they are starting to look sad, use them for something else and grab a fresh bag.
Dairy Decisions: Cream, Milk, and Butter Fat Content
For the ultimate creamy Green Bean Casserole, use heavy cream (double cream, 35% fat) in the sauce. The high fat content prevents the sauce from breaking or looking grainy during baking.
If you are aiming for a slightly lighter texture, you can swap out half of the heavy cream for whole milk, but keep that full fat butter for the roux!
The Flavor Foundation: Aromatics and Seasoning Profile
We rely on two main aromatics here: the crispy shallots and the dried thyme in the sauce. Thyme pairs beautifully with the earthy mushrooms. Don't forget to season the sauce generously!
I always use a tiny splash of dry sherry or Madeira because it adds a wonderful, nutty dimension that cuts through the creaminess.
Ingredient Swaps: Making the Recipe dairy-free or gluten-free
| Ingredient | Substitute | Why it Works |
|---|---|---|
| Heavy Cream | Full Fat Coconut Milk (Canned) | Adds richness without dairy; the slight coconut flavor is masked by the mushrooms. |
| All-Purpose Flour | gluten-free Flour Blend or Cornstarch | Use a GF blend for the roux. Use cornstarch dissolved in cold water for the slurry if thickening a finished sauce. |
| Butter | Vegan Butter Sticks or Olive Oil | Use an equal amount of firm vegan butter for the roux base. |
| Buttermilk (for Shallots) | Water + 1 Tbsp White Vinegar | This acid mix mimics buttermilk, helping the flour stick to the shallots. |
The Method: A step-by-step Guide to Assembling Your Casserole
Phase 1: Prepping the Beans and Aromatics
First things first: get your green beans blanched and shocked, draining them immediately after. Next, the crispy shallots need attention. Soaking the shallots in buttermilk for 20 minutes softens them and gives the flour dredge something to cling to, resulting in those spectacular, crunchy bits. If you want an even deeper dive into achieving that perfect crispy topping, check out my other post: Green Bean Casserole: Best Ever Creamy Bake Crispy Shallot Topping .
Chef’s Note: Make your crispy shallots early! They store perfectly for days in an airtight container at room temperature. Frying them right before a big meal is too much stress.
Phase 2: Cooking the Velouté Base to Perfect Consistency
Melt the butter and brown the mushrooms thoroughly with thyme; this usually takes about 10 minutes and should fill your kitchen with a nutty aroma. Sprinkle in the flour, stirring constantly for one minute to cook out the raw taste this is your roux.
Slowly, slowly whisk in the stock until the mixture is thick and smooth, then reduce the heat and stir in the heavy cream and that glorious sherry. The sauce should be thick enough to coat the back of a spoon beautifully.
Phase 3: The Assembly and Initial Baking Process
Preheat the oven to 375°F (190°C). Gently fold the blanched, drained green beans into the finished sauce until every bean is coated in that creamy goodness. Transfer the whole mixture into your baking dish.
Bake the casserole for 18– 20 minutes, just until the edges are bubbling fiercely and the sauce has settled.
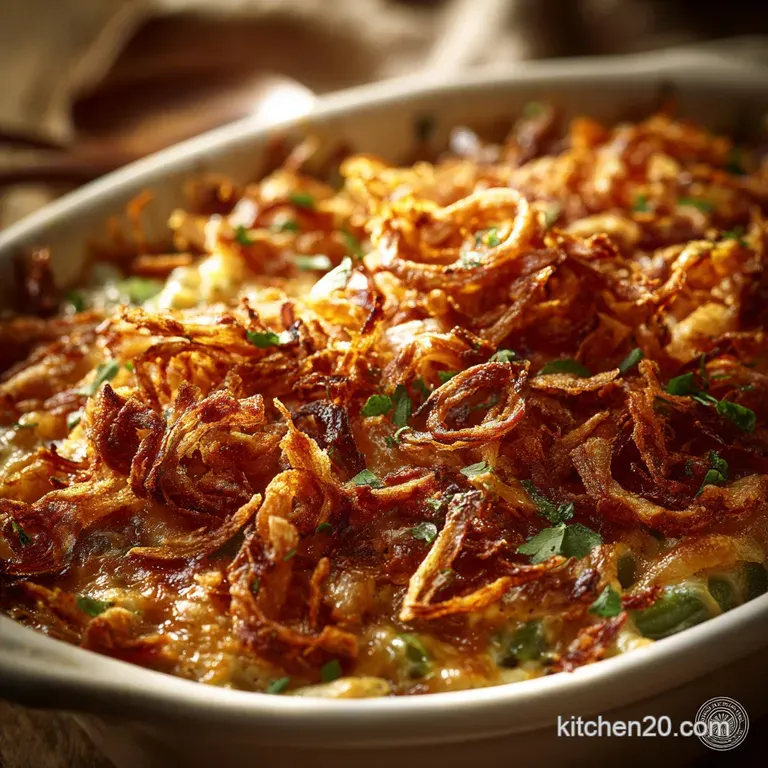
Phase 4: Achieving the Golden, Crisp Topping
The mistake I once made was adding the topping too early; it will burn and turn acrid before the casserole is fully heated through. Instead, reserve the crispy shallots until the casserole comes out of the oven, or add them only during the final 5 minutes if you want them warm.
Serving immediately, while those crispy shallots are still fresh and crunchy, is mandatory.
Achieving Perfection: Expert Tips and Troubleshooting Your Green Bean Casserole
Preventing a Watery Casserole Base
A watery base usually means two things: either your beans weren't drained well after blanching, or your sauce wasn't thick enough initially. Ensure the green beans are patted dry before mixing.
More importantly, when making the velouté, let the sauce come to a full simmer after adding the stock so the starch activates and thickens properly before you stir in the cream.
Dealing with Overcooked or Soggy Beans
This is the ultimate casserole crime! If your beans are soggy, you cooked them too long in the blanching stage, or you skipped the ice bath. Remember: three minutes maximum in the boiling water. The beans should still offer firm resistance when you bite them; they will soften slightly more during the short bake time.
The Importance of Seasoning Layer by Layer
Salt is your friend. Season the water when you blanch the beans. Season the mushrooms as they brown. Taste the final sauce and season it again aggressively before the beans go in. Green beans need a lot of salt to truly shine, and a bland sauce equals a bland casserole.
Can I Assemble It Ahead? (The Night Before Method)
You absolutely can, and it makes holiday cooking so much easier! Complete Phase 3 (mixing the sauce and beans) and transfer the mixture to the baking dish. Cover tightly and refrigerate for up to 24 hours. When ready to bake, add 5– 10 minutes to the baking time since you are starting from cold. Do not add the crispy shallots until just before serving. If you're looking for other great make-ahead strategies, I love the method in this recipe: Green Bean Casserole: The Ultimate Recipe, From Scratch with Fresh Beans .
make-ahead Mastery: Storage, Freezing, and Reheating
Freezing Baked vs. Unbaked Casserole
I highly recommend freezing the casserole unbaked . Assemble the full green bean and sauce mixture in a disposable aluminum pan, cover it tightly with foil, and freeze for up to 3 months.
Thaw it overnight in the fridge and bake as directed (you might need an extra 10– 15 minutes). Freezing a baked casserole risks textural degradation, resulting in a slightly grainy sauce upon reheating.
Best Practices for Reheating Leftovers
Leftovers keep beautifully in the fridge for 3 4 days. The key to reheating is gentle heat. For small portions, microwave gently. For the best result, transfer leftovers to a small, oven safe dish, cover loosely with foil, and bake at 325°F (160°C) until heated through (about 15 minutes).
If the topping has gone soft, sprinkle a few fresh crispy shallots on top right before serving.
Festive Pairings: What to Serve Alongside This Classic Side Dish
This ultimate Green Bean Casserole recipe is rich and robust, making it the perfect companion for any substantial roast. It pairs wonderfully with classic holiday proteins, like a stunning prime rib or a succulent glazed ham. Don't forget the mash!
The creamy texture is ideal next to a mountain of roasted garlic mashed potatoes. I also think the savory depth works perfectly alongside a tart cranberry sauce, balancing out the richness of the creamy bake.

Recipe FAQs
How far in advance can I assemble the casserole?
You can fully assemble the base of the casserole (beans and sauce) up to 24 hours ahead of time. Combine them in the baking dish, cover tightly, and refrigerate until ready to bake.
Crucially, you must keep the crispy topping separate and only add it during the last 10 minutes of baking to ensure maximum crunch and freshness.
My casserole seems too thick or dry after baking. What went wrong?
This common issue usually occurs if the dish baked for too long or if the mushroom sauce was too thick to begin with. The green beans absorb a lot of the sauce's moisture during the cooking process.
To fix a dry casserole, gently stir in a splash of warm chicken or vegetable stock until the desired creamy consistency returns. Next time, ensure your homemade sauce is slightly thinner than you think it needs to be before baking.
Can I use frozen or canned green beans instead of fresh?
Frozen green beans can be substituted if absolutely necessary; thaw them completely and pat them very dry before mixing with the sauce, skipping the initial blanching step.
We strongly recommend avoiding canned green beans for this scratch recipe, as their high moisture content and mushy texture will lead to a watery, inferior result.
How can I adapt this recipe to be vegan or dairy-free?
To make this dish vegan, substitute the butter in the roux with olive oil or a plant based butter, and use a rich, unsweetened oat milk or cashew cream instead of whole milk or heavy cream for the sauce base.
For enhanced umami depth typically provided by dairy, increase the amount of fresh mushrooms and add a teaspoon of nutritional yeast or a dash of tamari to the sauce.
I want a scratch made topping. What is a good alternative to the standard fried onions?
A superior, homemade topping can be created by shallow frying thinly sliced shallots or fresh onions until crisp, then tossing them with panko breadcrumbs and melted butter.
Alternatively, toasted slivered almonds, mixed with a little fresh grated Parmesan cheese and butter, provide an excellent nutty crunch and flavour profile.
How do I ensure my green beans remain "tender crisp" and not soggy?
The secret lies in precise blanching: plunge the beans into boiling water for no more than 3 to 4 minutes, then immediately shock them in an ice bath to halt the cooking process.
This quick treatment ensures the beans are tender enough to absorb the sauce flavor but remain firm enough to withstand the final baking time without turning soft or mushy.
What is the best way to reheat leftovers without drying them out?
The preferred method for reheating is to cover the casserole dish tightly with aluminum foil and place it in a 300°F (150°C) oven until warmed through, which typically takes about 20 25 minutes.
Avoid reheating in the microwave, as this tends to dry out the delicate sauce and makes the crispy topping chewy rather than crunchy.
Classic Green Bean Casserole From Scratch
Ingredients:
Instructions:
Nutrition Facts:
| Calories | 330 calories |
|---|---|
| Fat | 24 g |
| Fiber | 4 g |
