The Crunchy Kraut Project Classic Caraway Sauerkraut for Beginners

- The Gateway Ferment: Demystifying Lacto-Fermentation for Beginners
- Essential Toolkit and Minimalist Ingredients List
- From Shredding to Brine: Your Step-by-Step Preparation Guide
- The Waiting Game: Monitoring Temperature and Fermentation Time
- Troubleshooting and Expanding Your Fermented Foods Repertoire
- Recipe FAQs
- 📝 Recipe Card
The Gateway Ferment: Demystifying Lacto Fermentation for Beginners
The simple act of making sauerkraut is the perfect initiation into the world of Fermented Foods . This ancient preservation method doesn't rely on heat or chemicals; instead, we harness the power of microscopic allies to transform humble cabbage into a brilliant, tangy, and gut-supportive condiment.
Forget the shelf stable, vinegary versions you may have encountered; true lacto fermentation yields a depth of flavor and nutritional profile that is unmatched.
The Science of Sour: How Cabbage Transforms Itself
The magic behind this transformation is called lacto fermentation, a natural process that requires only three things: vegetables, salt, and time. When we salt and shred the cabbage, we create an environment where undesirable spoilage bacteria cannot thrive, but the beneficial strains, primarily Lactobacillus species, flourish.
These natural bacteria, already present on the cabbage leaves, consume the sugars in the vegetable matter and produce lactic acid as a byproduct. This acid acts as a perfect natural preservative, keeping the cabbage crisp, developing its signature sour flavor, and significantly boosting its status as a Probiotic Food .
Sauerkraut vs. store-bought: Understanding the Probiotic Difference
One of the greatest Fermented Foods Benefits lies in the living bacteria they contain, providing potent Fermented Foods for Gut Health . Unfortunately, most store-bought sauerkraut has been pasteurized heated to stabilize it for shipping and long shelf life.
While this kills potentially harmful pathogens, it also eradicates the beneficial Lactobacillus cultures that make the kraut a true powerhouse. Our homemade method ensures that every spoonful is teeming with living cultures.
On top of that,, incorporating homemade Fermented Vegetables into your diet has been linked to potential support for balancing gut flora, which can have positive ripple effects, including managing Fermented foods and inflammation and potentially aiding in Fermented foods for weight loss .
Why Caraway is the Classic Flavor Pairing
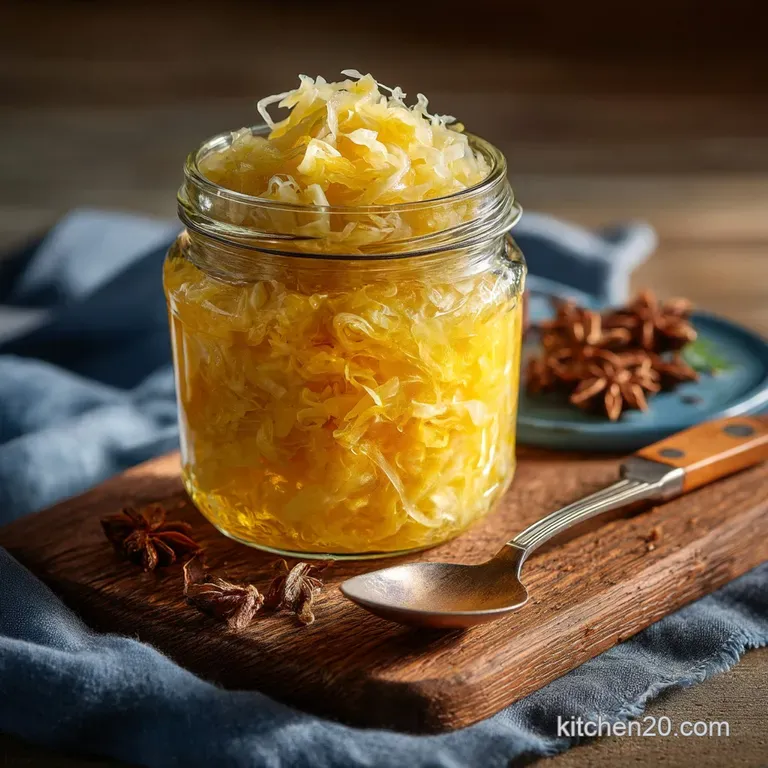
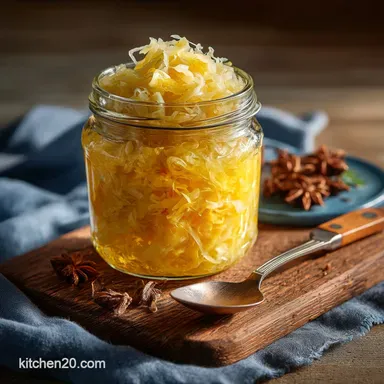
While the basic recipe requires only cabbage and salt, the addition of caraway seeds is what elevates this recipe to a classic Central European standard. The warm, slightly peppery, and earthy profile of caraway balances the intense tanginess of the lactic acid, adding a comforting complexity.
This traditional pairing is one of the most beloved Fermented Vegetables Recipes because it provides a foundational flavor that integrates seamlessly into a huge variety of meals.
Essential Toolkit and Minimalist Ingredients List
Successful fermentation relies on preparation, precision, and patience. The equipment required is surprisingly simple, but adherence to specific ingredient quality, especially salt, is non-negotiable for producing safe and delicious Fermentation Recipes .
Selecting the Perfect Cabbage: Weight and Quality Matters
For a batch yielding approximately two liters (or two quarts) of finished sauerkraut, you will need a firm head of green cabbage weighing about 2 kilograms (4.5 pounds). It is highly recommended to select organic produce, as this minimizes exposure to pesticides.
Remember to gently peel off two to three of the outermost leaves before shredding; these will be reserved and used later to form a protective seal within the fermentation vessel.
The Right Salt Makes the Difference: Why Iodine is the Enemy
Salt is not just for flavor; it controls the environment, allowing beneficial bacteria to thrive while inhibiting molds and other spoilage organisms. Precision is key. We measure our salt by weight (40 grams), ensuring it represents roughly a 2% salinity ratio relative to the cabbage weight.
Crucially, the salt must be non-iodized and free of anti caking agents. Iodine and caking agents actively inhibit the delicate microbial action necessary for lacto fermentation, effectively killing your culture before it starts. Use pure fine sea salt or kosher salt.
Basic Fermentation Equipment: Jars, Weights, and Air Locks
Before beginning, strict sanitation is paramount. All equipment, including your mixing bowl and utensils, should be thoroughly cleaned and air-dried. You will need a large, non-reactive mixing bowl (stainless steel or glass), a sharp knife or mandoline for uniform shredding, and a sturdy 2-liter wide mouth jar or ceramic crock as your vessel.
To ensure safety, the shredded cabbage must remain submerged beneath the brine throughout the process. This requires a weight a glass fermentation weight, a small ceramic plate, or even a water filled, sterilized zip-top bag can serve this purpose.
Finally,, while not strictly required, an airlock system allows gases to escape without letting fresh oxygen (which promotes mold growth) in, making the process much easier for beginners.
Sourcing Clean Water: Chlorine Considerations
While the natural brine from the cabbage usually suffices, you may occasionally need to top up the liquid to guarantee full submergence. If this is necessary, always use filtered or dechlorinated water.
Tap water often contains chlorine, which, like iodine, can interfere with or outright kill the Lactobacillus bacteria we are depending on for a successful ferment.
Related Recipes Worth Trying
- Simply Brilliant Homemade Sauerkraut The Easy Fermented Recipe — Tired of pale shopbought cabbage Master the Basic Homemade Sauerkraut recipe using just two ingredients for a probiotic powerhouse Easy to make in a jar
- Philly Cheesesteak Wontons Best Game Day Finger Foods — Upgrade your spread with these Game Day Appetizers Finger Foods Crispy Philly Cheesesteak Wontons with a creamy spicy dip Easy to assemble and crowdpleasing
- Classic Mini Corn Dogs The Best American Finger Foods Recipe — Forget sad fair food These classic mini corn dogs featuring a sweet honey cornbread batter are the ultimate American Finger Foods Perfect party nibbles for...
From Shredding to Brine: Your step-by-step Preparation Guide
The active preparation phase, lasting about 30 to 40 minutes, is where you build the foundation for your crunchy, delicious kraut. Pay close attention to texture and liquid formation during this stage.
The Fine Art of Salting and Massaging the Cabbage
Once the 2-kilogram head of cabbage is finely and uniformly shredded (aim for 1 2 mm thickness), transfer it to your mixing bowl. Sprinkle the precise measurement of non-iodized salt (40 grams) and the 2 teaspoons of whole caraway seeds evenly over the cabbage.
Now, the fun begins: using clean hands, vigorously massage and squeeze the salted cabbage. This active process takes anywhere from five to ten minutes. The goal is to bruise the cabbage fibers, causing the salt to draw out internal moisture and create the natural brine.
You will notice the cabbage volume shrink by about half as a significant puddle of liquid forms at the bottom of the bowl.
Packing the Kraut: Eliminating Air Pockets and Ensuring Submersion
Carefully transfer the limp, massaged cabbage mixture into your clean fermentation vessel, working in small handfuls. After each handful, use a clean wooden pounder, rolling pin, or your fist to press down firmly.
This tamping action is critical for two reasons: it further releases liquid and, most importantly, it eliminates trapped air pockets, which are breeding grounds for undesirable yeasts and molds. When the jar is full, pour any remaining brine from the mixing bowl over the packed cabbage.
The shredded cabbage must be entirely covered by liquid. If the level is insufficient, add a few tablespoons of filtered water until everything is submerged.
Establishing the Airlock: Sealing the Jar for Optimal Anaerobic Conditions
To maintain an ideal environment, place the reserved whole outer cabbage leaves on top of the shreds, folding them to fit the diameter of the vessel. This creates an extra barrier between the fermenting cabbage and any oxygen exposure.
Next, place your chosen fermentation weight directly on top of the leaves, ensuring the brine remains above the entire vegetable mass. Finally, seal the jar. If using an airlock system, affix it securely.
If using a standard lid, screw it on loosely; you must allow the carbon dioxide gases produced during fermentation to escape a process known as 'burping' otherwise, pressure will build up, potentially leading to jar breakage.
The Waiting Game: Monitoring Temperature and Fermentation Time
With the jar sealed and set, the passive phase of your Fermentation Recipes begins. Store the vessel in a cool, dark location. The ideal temperature range is between 18° C and 22° C ( 65° F and 72° F).
Temperature profoundly influences the final texture and flavor: cooler temperatures slow the bacterial activity down, resulting in a crunchier, more complex flavor profile over several weeks. Warmer temperatures accelerate the process, but often yield a softer kraut.
You should allow a minimum of 10 days for basic fermentation to occur, though many experts prefer to let their Fermented Veggies mature for up to four full weeks before refrigerating for peak flavor development and maximized Fermented Foods Benefits .
Troubleshooting and Expanding Your Fermented Foods Repertoire
Monitoring your batch daily is essential, not just for safety, but to witness the fascinating biological process underway. Knowing what to look for and what to dismiss will build your confidence in creating high-quality Fermented Vegetables .
Identifying Success: What Proper Bubbling Should Look Like
Within two to five days of setting the jar, you should observe the first signs of success: small, consistent bubbles rising through the brine. This is carbon dioxide being released by the active Lactobacillus bacteria, signaling that the acid production is underway.
If you are using a water airlock, you will see it actively bubbling. If using a standard lid, you will need to unscrew it briefly (burp the jar) to release the pressure. Minimal or no bubbling after a week may indicate the temperature is too cold or the salt ratio was incorrect.
When is it Done? Tasting and Moving the Kraut to Cold Storage
The decision of when your kraut is "done" is purely a matter of personal preference regarding tanginess and texture. Begin tasting around Day 10. If the flavor is sharp, sour, and the texture is satisfactory, it is ready.
Once you are pleased with the flavor, remove the weight, secure the lid tightly, and transfer the jar to the refrigerator. The cold temperature significantly slows or effectively halts the fermentation process, preserving the texture and flavor profile you achieved.
Properly stored in the fridge, your finished sauerkraut can last for many months.
Addressing Mold and Kahm Yeast: Safety Checks
It is not uncommon to see a white, film like substance forming on the surface of the brine, especially if the cabbage is not fully submerged. This is usually Kahm yeast a harmless, naturally occurring surface yeast that thrives in early fermentation.
While unpleasant, it is safe to carefully skim off with a clean spoon. If, however, you see fuzzy, dark, or green spots, that is mold, and unfortunately, the entire batch must be discarded. Always ensure the cabbage is pressed beneath the brine level to prevent this surface exposure to oxygen.
Next Level Fermentation: Flavor Variations Beyond Caraway
Once you’ve mastered the classic caraway kraut, the world of Fermented Vegetables Recipes opens wide. To expand your Fermented Veggies pantry, consider experimenting with variations.
For a vibrant visual appeal and sweeter earthiness, try a Ruby Kraut by incorporating shredded red cabbage and carrots. Alternatively, if you prefer heat, infuse your next batch with 1 2 finely minced jalapeños during the salting phase for a Hot & Spicy Kraut.
Or, for a sharper, more complex flavor that pairs beautifully with smoked meats, swap the caraway for a mix of whole juniper berries and black peppercorns.

Recipe FAQs
Crikey, is that fuzzy stuff mould? How do I know if my Fermented Foods have gone off?
Right then, don't panic! A thin, white, powdery film known as Kahm yeast is harmless and extremely common; simply skim it off with a clean spoon, ensuring the kraut remains submerged below the brine.
However, if you spot anything green, blue, pink, or black, or if it smells truly rotten like a sock left under the sofa then sadly, it's time to compost the batch, as safety must come first.
I’ve massaged until my arms ache, but the brine isn't covering the cabbage. What's the spot of bother here?
It's absolutely crucial that the cabbage remains under the liquid level, as exposure to air encourages mould growth. If your cabbage is still shy of releasing enough brine, let it sit for another hour or two, covered, as this gives the salt more time to draw out moisture naturally.
If that fails, mix a supplemental brine (one cup of filtered water with 1 teaspoon of the specified non-iodized salt) and top up the jar just enough to cover the weights.
How long should I leave it fermenting for that perfect tangy crunch?
That depends entirely on your taste, but generally, the colder the storage location, the slower and crunchier the results will be. Most people find the flavour hits the sweet spot between 2 and 4 weeks (at around 68°F / 20°C).
Start tasting small samples after 10 days; once it reaches a pleasant tartness that makes your cheeks pucker, transfer it straight to the fridge, as the cold halts the fermentation process.
Can I play around with the flavours, or should I stick religiously to the recipe?
Absolutely, fermentation is a brilliant vehicle for creativity! This base recipe is incredibly versatile; try substituting caraway seeds with juniper berries for a complex, wintry flavour, or adding grated carrot and ginger for a nutritional boost and a bit of a kick.
Just remember that the salt ratio must remain consistent (2% by weight) to ensure a safe fermentation environment, regardless of the spices or vegetables you add.
Why do I have to use non-iodized salt? Is regular table salt really that bad?
Yes, unfortunately, regular iodized table salt can be a real party pooper when it comes to fermentation. The iodine and anti caking agents added to these salts can inhibit or even kill the beneficial Lactobacillus bacteria that you are trying to cultivate.
Always opt for pure sea salt or kosher salt, measured carefully by weight, to ensure your brine environment is perfect for the helpful microbes to thrive.
Classic Sauerkraut Fermented Foods Starter
Ingredients:
Instructions:
Nutrition Facts:
| Calories | 695 kcal |
|---|---|
| Protein | 10.4 g |
| Fat | 7.4 g |
| Carbs | 28.1 g |
| Fiber | 19.0 g |
| Sodium | 20917 mg |
