Crispy Homemade Fries: Your Perfect Homemade Snack
- Serving Up the Ultimate Crisp: How to Make Homemade Fries
- Essential Ingredients Guide: Your Kitchen Besties
- Spice It Up: Signature Seasoning Blend
- Kitchen Equipment Essentials: Tools of the Trade
- Mastering the Art of Cooking with Professional Techniques
- Sizzling Secrets & Tips for Perfect Fries
- Frequently Asked Questions
- 📝 Recipe Card
Serving Up the Ultimate Crisp: How to Make Homemade Fries
Oh my gosh, let me tell you about the first time i attempted how to make homemade fries . i was in my college dorm, craving something salty and crunchy.
You know the feeling, right? it was one of those late night munchies that just wouldn’t quit. i thought, "how hard could it be?" spoiler alert: i learned the hard way that frying is an art! but trust me, the effort is totally worth it when you bite into that perfectly crispy goodness.
So, let’s get into the scoop on homemade fries where they came from and why they should be a staple in your kitchen.
Believe it or not, these bad boys have origins tracing back to belgium. they call them "frites," and honestly, it's hard to argue with their crispy magnificence.
In today’s world, they’re a must have for barbecues, game days, or just because you deserve a treat.
When you’re thinking about fries, you might be surprised by how easy it can be. with just 45 minutes of your time , plus a little soaking, you can whip up these beauties.
It suits beginners just fine but also lets seasoned cooks flex their creative muscles. your total output? about four servings great for sharing or keeping all to yourself!
The Golden Goodness of Homemade Fries
Now, let’s chat about some key benefits. first, let’s be real a plate of homemade fries beats frozen any day .
You’ve got control over the ingredients. no weird preservatives or additives here, just fresh russet potatoes, salt, and maybe a sprinkle of garlic powder.
That’s it!
Nutritionally , they may have a bad rep, but when served in moderation and made the right way, they'll make a tasty addition to your meal.
Plus, you can adjust seasonings to match any occasion. think backyard cookout or movie night. homemade fries fit right in!
And if you’re having a party? perfect! these crispy nuggets can hold their own alongside burgers, tacos you name it. oh, and don’t forget, you can get creative! sticking to a classic? just go with salt.
Want a little flair? sprinkle on some cayenne for a kick!
Why Make Your Own?
One of the coolest aspects of making fries at home is the unique twist you can put on them. the experience feels like a culinary dance where you orchestrate every step.
Plus, there’s something just plain satisfying about the double fry technique. you first blanch the fries, let them chill out (like we all need sometimes), and then fry them until they're golden.
It’s the perfect way to get that crispy outside while keeping a fluffy inside.
Let’s not forget the thrilling aroma drifting through your kitchen as they fry. seriously, if i could bottle that scent, i’d be living the dream! your friends and family will be circling like vultures, and for good reason.
They won’t be able to resist, trust me.
What’s Next?
Alright, i’ve got you hyped, so let’s get to the ingredients you’ll need for turning those humble potatoes into crispy perfection.
Grab your russet potatoes, salt, and oil. and if you want to kick it up a notch, gather some optional seasonings like garlic powder and cayenne.
Ready to transform a few simple ingredients into a snack that’ll have everyone begging for more?
In just a few steps, you’ll learn how to make homemade fries that are not just tasty; they’re an adventure in your own kitchen.
Get ready to dive into the wonderful world of homemade fries, where crispy dreams do come true! let's go!
Essential Ingredients Guide: Your Kitchen Besties
Cooking can seem overwhelming, but trust me, it starts with just a few premium core components . a solid ingredient list is like a recipe for success pun totally intended! let’s dive right into the essentials you need in your kitchen.
Get the Right Measurements
First things first, measuring. whether you're using us cups or metric , it's crucial to get this right. for example, when i make my famous banana nut muffins (seriously, they’re raved about), i always use 1 cup of mashed bananas that’s about 2-3 ripe bananas.
And if you’re more on the metric side? that’s roughly 240 ml . keep a kitchen scale handy for precise measurements, especially when it comes to baking.
Quality Check What to Look For
Now, how do you know what to pick up off the shelves? look for key quality indicators ! fresh herbs should be vibrant and fragrant, nuts should be crunchy and not too oily, and spices? they should have a strong aroma and clearly not be past their prime.
Make a habit of reading labels; you’d be surprised at what’s hiding in your pantry after a few months!
Storage Secrets
Next up, let’s talk about storage. most pantry staples like nuts, flours, and spices have a shelf life, so don’t just toss them in and forget about them! ideally, nuts should be stored in the fridge for longevity.
Anyone else get bummed when they realize their walnuts are stale right when they want to make banana nut bread muffins? trust me; freshness matters!
And while you’re at it, why not soak those dried beans overnight for extra flavor? It’s a little extra step but totally worth it in the long run.
Spice It Up: Signature Seasoning Blend
Ah, spices! this is where you can really let your culinary personality shine. for a foolproof signature seasoning blend , think about the classics.
A pinch of garlic powder and a dash of cayenne can elevate pretty much anything, including your banana oat nut muffins .
The right combination will tickle your taste buds and make ordinary dishes extraordinary.
Herbs and Other Flavor Magic
If you’re not sure about spices, start with herbs. Think rosemary and thyme perfect for savory dishes but don’t forget the regional flair! For example, if you’re in the mood for something like Southern style , toss in some paprika and cayenne to kick up the heat!
The Backup Plan: Smart Substitutions
Life is unpredictable; sometimes, you run out of certain ingredients. No biggie! Here are some smart substitutions. If you don’t have walnuts for your banana nut muffins with pecans , just use any nuts on hand cashews, almonds…even chocolate chips when you’re feeling wild!
Need to go dairy-free? swap out regular milk for almond milk it works like a charm in most recipes. are you in a pickle but craving homemade fries? if you don’t have russets, yukon golds do the job without sacrificing too much texture.
Kitchen Equipment Essentials: Tools of the Trade
Now, let’s get into the kitchen equipment essentials . You don’t need to break the bank for a fancy kitchen some must have tools do wonders.
Must Have Tools and Alternatives
Grab a sharp knife and cutting board they’re your best buddies for prep work. if you don’t have a heavy bottomed pot for frying, any deep pan can work, just keep an eye on the temperature.
When i’m frying, a thermometer is a lifesaver to keep that oil around 375° f ( 190° c) . trust me on this; nobody wants soggy fries!
Prep & Store Smartly
After cooking, how you store leftovers is crucial, too. Invest in some good airtight containers! This way, your fried goodies or those delicious banana nut muffins —stay fresh for days without going stale.
As you get ready to cook, remember, having a solid grasp of your essential ingredients can turn meal prep from a chore into a jubilant experience! plus, if you're wondering how to make homemade fries , knowing your ingredients and tools will make it a snap.
Ready to whip up something delightful? Stay tuned for my step-by-step instructions coming up next!
Mastering the Art of Cooking with Professional Techniques
Hey there! let’s talk about how to get your cooking game on with some professional techniques. i wouldn't call myself a michelin star chef, but over the years, i've picked up tips and tricks that make cooking an absolute breeze.
If you stick with me, i'll share how to make homemade fries, and trust me, they're a total game changer.
Essential Preparation Steps
Before you even think about throwing food in a pan, you gotta prep like a pro! first off, mise en place is your new best friend.
That fancy french term just means getting everything ready chopped, measured, and organized. it’s like laying out your clothes the night before.
You don’t want to be scrambling for the salt when your chicken is frying, am i right?
Time management is key! set a timer on your phone. seriously, it’s super useful. good time management can make or break your meal.
If you're wondering why those restaurant chefs seem so calm, it's ‘cause they've nailed this one.
Staying organized is also crucial. keep your workspace clear, and clean as you go. trust me, there's nothing worse than looking for that stray spatula when you’re deep in a cooking frenzy.
Oh, and don’t skimp on safety! always use a cutting board and watch those knife skills. you want to chop veggies, not fingers!
Step-by-step Process
Ready to dive in? Here’s your guide to cooking bliss:
- Prep the Potatoes: Start by washing 4 large russet potatoes. Peel them if you’re fancy, then slice ‘em into ½ inch thick rods.
- Soak Time: Throw those bad boys into a big bowl of cold water and let them soak for 30 minutes . This step? Absolute GOLD. It gets rid of the excess starch so you can achieve that crispy texture.
- Heat It Up: After you've drained and dried the potatoes, heat up oil in a heavy bottomed pot (you want it at 325° F ). Can't stress enough how important to get that oil hot enough.
- Blanching: Fry your potato strips in batches for 4- 5 minutes until soft but not browned. Remove and let 'em chill on some paper towels.
- Get Hot Again: Now bump that oil temperature up to 375° F .
- Crisp it Up: Time for round two fry those potatoes for another 4- 5 minutes until they’re golden brown and crispy!
- Season and Enjoy: Don’t forget to hit ‘em with salt while they’re hot. Serve them piping hot for that crunchy perfection!
Expert Techniques
So you’ve got the foundation down; now let’s kick it up a notch. you’ll want to keep an eye on the temperature throughout.
Too hot and you’ll burn your food; too cold and it'll turn into a soggy mess. no one wants sad fries!
Quality checkpoints? You can visually tell if your fries are done when they have an all-over golden color and look crispy. If they’re not there yet, keep testing!
Oh, and if things go sideways, don't stress. Maybe the fries are a little too oily? Toss them in the oven at 400° F for a few minutes to dry out!
Success Strategies
Now let’s chat about making everything smooth sailing. Here are common mistakes to steer clear of:
- Don’t skip that soaking step! It’s like a cheat code for crispy fries.
- Keep your oil at the right temperature. Check it regularly; you don’t want to turn those beautiful potatoes into mush.
- Not interested in frying the day of? You can prep your potatoes ahead of time! Slice and soak them, then stash ‘em in the fridge until you’re ready to fry.
To get your homemade fries just right and to guarantee you're crushing it in the kitchen, practice makes perfect. The more you make these fries, the better they’ll get!
Oh my gosh, it’s super helpful to have a reliable recipe for banana nut muffins up your sleeve too! no kidding, those babies are a crowd pleaser, just like fries.
What better way to use up ripe bananas than whipping up a batch of easy banana nut muffins recipe ? whether you're into banana muffins walnut or fancy banana oat nut muffins, you can really mix and match to keep it fresh!
As we wrap up these cooking tips, don’t forget that practice makes perfect. so get your skillet ready and let's move on to some more helpful nuggets in our additional information coming right up.
..
Sizzling Secrets & Tips for Perfect Fries
Alright, my friends, let’s get down and dirty with some kitchen secrets to how to make homemade fries that’ll knock your socks off! we’re diving into pro tips, perfect presentation, storage hacks, and even a nutrition rundown.
Grab a seat, sip on some soda, and let’s chat about fry greatness.
Pro Tips & Hidden Gems
First off, let’s talk about those chef’s secrets . if you want fries that are crunchy on the outside and fluffy on the inside, you gotta pay attention to your potatoes.
Russets are the way to go! they’ve got the magic combination of starch and moisture.
Now, before you toss those beauties in hot oil, don’t skip the soaking step. this removes excess starch, which is the key to that coveted crispy texture.
Soak ‘em for at least 30 minutes . think of it like giving your fries a mini spa day who doesn’t love that, right?
Time saving tip? if you want to prep ahead, feel free to slice those potatoes the night before. just keep ‘em in water in the fridge.
You’ll save a step later, and you can impress your pals with your next level fry game!
Presenting Like a Pro
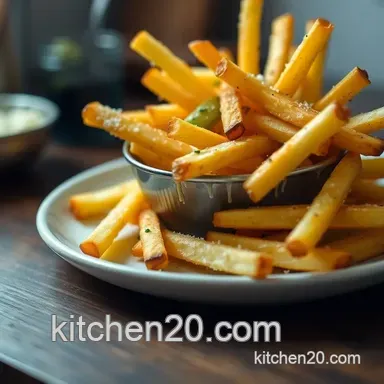
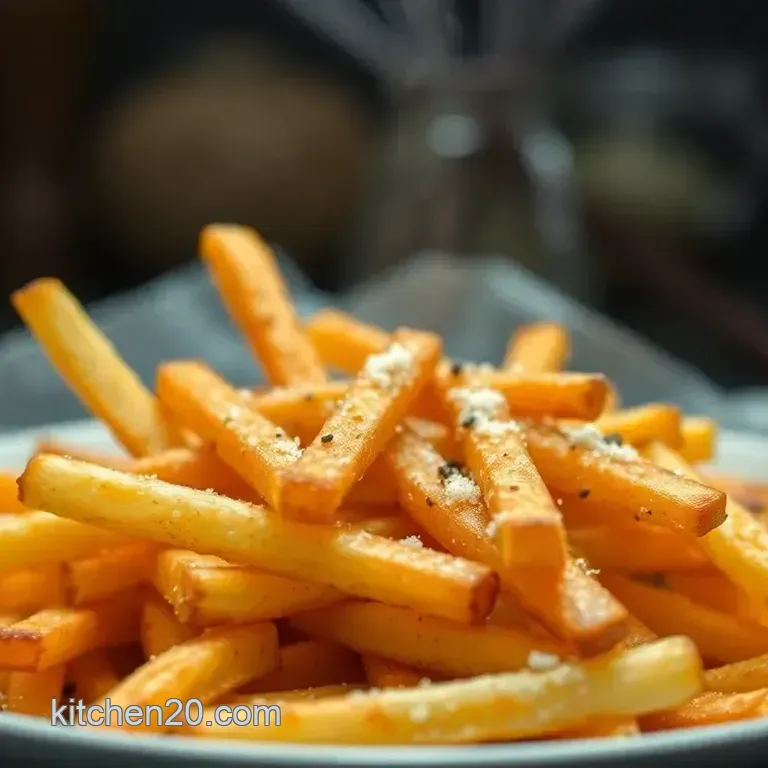
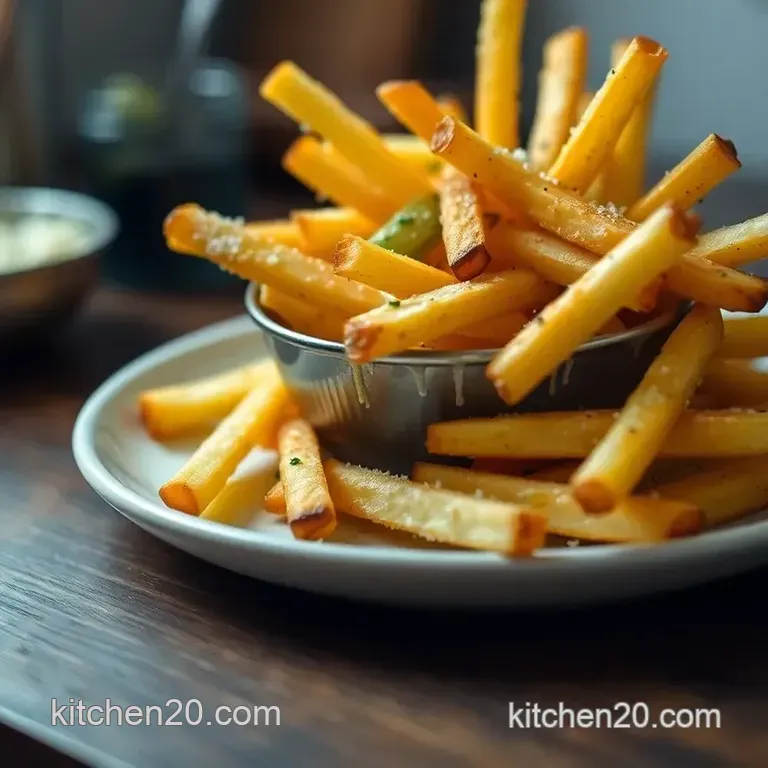
Now, let’s be honest presentation matters. when you make crispy homemade fries , you want them to look as good as they taste.
After frying, toss your fries onto a clean wire rack instead of a plate. this keeps them crispy and lets that steam escape.
For a quick garnish, try sprinkling some fresh parsley or even a dash of paprika on top. it not only adds color but kicks up the flavor.
Speaking of color, consider pairing those fries with vibrant dipping sauces like marinara or zesty garlic aioli. it’s all about those visual vibes , my friends.
Storing & make-ahead Tips
If by some miracle you have leftovers (i wish!), here’s how to store them. keep your fries in an airtight container, and they’ll last about 3-4 days in the fridge.
Just a heads up reheating in the oven at 400° f ( 200° c) will help them regain their crispiness. no soggy fries on my watch!
Creative Variations to Spice Things Up
Bored with plain fries? let’s remix! you could try sweet potato fries , which gives a nice sweet twist. or, go wild with loaded fries topped with cheese, bacon bits, and a drizzle of ranch.
It’s like having a party on your plate!
And hey, don’t just think traditional. Think regional! Get inspired by flavors like Cajun seasonings or even Italian herb blends. Your fries can take a little vacation without ever leaving the kitchen.
Your Nutrition Cheat Sheet
So you’re wondering about the nutritional rundown? a serving of these crispy fries packs around 365 calories and a decent amount of fiber.
Plus, they’re fresh and free from all those mystery ingredients you find in fast food. you’re in control here!
Now, keep in mind, including fries in your diet is all about balance. Pair them with a fresh salad or grilled chicken for a complete meal. Remember, moderation is key!
Wrap-up: look into Into Fry Freedom!
So there you have it, my fellow fry ensoiasts! from mastering the art of how to make homemade fries to presenting them like a michelin star award winner, you’ve got all the tools you need.
Get in the kitchen, experiment a little, and make it your own. it’s all about having fun with food!
And while you're at it, if you're in the mood for something sweet, try how to make banana nut muffins next! those muffins are a treat that's got all the flavor and none of the fuss.
Trust me. now, go get your fry on, and share your crispy creations with friends and family. happy frying!
Frequently Asked Questions
How to make homemade fries that are crispy?
To achieve crispy homemade fries, ensure you soak the cut potatoes for at least 30 minutes to remove excess starch. Double frying is also essential; the first fry cooks them through at a lower temperature, and the second fry at a higher temperature crisps them up nicely.
Can I use other types of potatoes for making fries?
While russets are the preferred choice due to their high starch content, you can use Yukon Golds for a slightly creamier texture. They may not be as crispy, but they offer a unique and delicious flavour.
How do I store leftover homemade fries?
It's best to enjoy homemade fries fresh, but if you have leftovers, let them cool to room temperature and then store them in an airtight container in the fridge for up to 2 days. To reheat, bake them in the oven at 400°F (200°C) for about 10-15 minutes to restore some crispiness.
What are some variations for seasoning homemade fries?
You can try sprinkling your fries with garlic powder, cayenne pepper, or even Parmesan cheese for an Italian twist. For a classic British touch, experiment with malt vinegar or pair them with curry sauce for that lovely chippy experience!
Can I make homemade fries without frying?
Absolutely! You can make baked fries by tossing the cut potatoes with a bit of oil, salt, and seasoning, then spreading them on a baking sheet and cooking them in a preheated oven at 425°F (220°C) for about 25-30 minutes, turning halfway through for an even crunch.
What are some nutritional considerations for homemade fries?
While homemade fries can be a delightful treat, it's good to note they are higher in calories and fat due to the oil used for frying. You can reduce calories by opting for baking, and using less oil overall, or substituting sweet potatoes for a healthier alternative packed with vitamins!
Crispy Homemade Fries Your Perfect Homemade Snac