Roasted Green Beans: Crispy, High-Heat Finish
- Escaping the Soggy Side Dish: Mastering over High heat Roasted Green Beans
- The Science of Crispy: Why High Heat Is Essential for Perfect Bean Texture
- Essential Components for Zesty Roasted Green Beans
- Step-by-Step: Achieving the Perfect Roasted Bean Texture
- How to Make Roasted Green Beans Step-by-Step
- Troubleshooting and Expert Tips for Roasting Success
- Making Ahead: Practical Guide to Storing Roasted Green Beans
- Pairing Perfection: What to Serve Alongside These Beans
- Recipe FAQs
- 📝 Recipe Card
Escaping the Soggy Side Dish: Mastering over High heat Roasted Green Beans
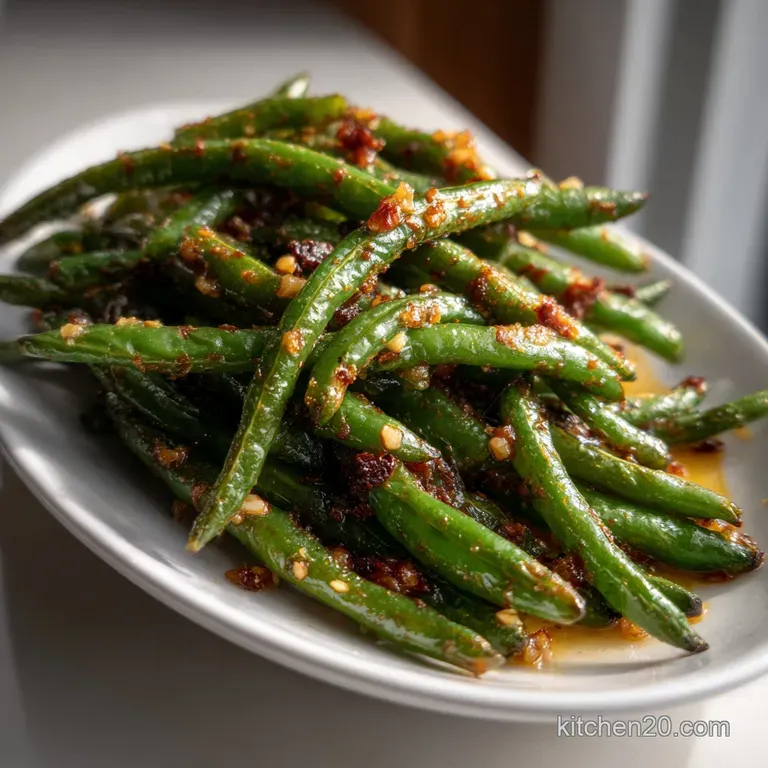
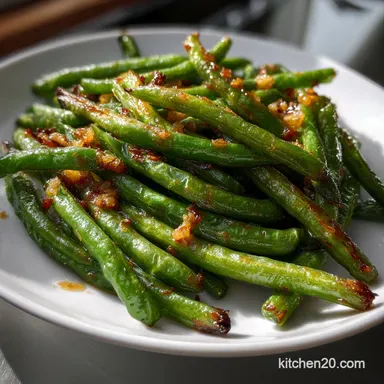
That wonderful, nutty aroma, mingled with bright lemon and sharp garlic, is the first signal that you’ve done it right. This recipe for Roasted Green Beans is the antithesis of the sad, pale, watery things your grandmother probably boiled for far too long.
We are going for crisp tender results here, with satisfyingly blistered edges and a vibrant green interior.
Honestly, green beans are often the forgotten side dish, relegated to supporting roles that no one really cares about. But when prepared properly, these beans become a superstar, adding texture and brightness to any heavy main course.
They are fast, cheap, and require almost zero complicated technique, making them a weeknight lifesaver.
Forget boiling, steaming, or microwaving these beautiful runners; we are harnessing the power of high heat. We're going to transform the humble haricot vert using my proven method, ensuring you get the perfect char every time.
Let’s ditch the sogginess forever and crack on with how to make truly exceptional Roasted Green Beans .
The Science of Crispy: Why High Heat Is Essential for Perfect Bean Texture
We aren’t just baking the beans here; we are aggressively roasting them to maximize flavour. The key difference between a good side dish and a magnificent one lies in heat management. If your oven temperature is too low, the beans slowly leak their moisture and end up steaming themselves into limp submission.
What Makes This over High heat Preparation Different?
We roast the green beans in oven at a searing 400°F (200°C), which causes the exterior moisture to evaporate immediately. This process concentrates the sugars and allows the natural starches to caramelize, giving you those coveted browned, slightly wrinkled patches.
Trust me, the result is completely addictive.
The Allure of the Blistered and Caramelized Bean Surface
Those little brown spots aren't burns; they are flavor bombs created by the Maillard reaction. By ensuring the beans have direct contact with the hot air and the metal pan, we activate this chemical reaction, turning simple raw green beans into complex, nutty morsels.
This is why properly prepared Roasted Green Beans taste so much richer than steamed ones.
Prep Time and Yield Overview for Quick Meals
One of the best parts is how quickly this dish comes together. You only need about 10 minutes for active prep mostly just snapping off the ends, which is admittedly a bit of a faff.
The actual cook time is so short, you can pop these in the oven right before your main protein finishes cooking. This whole process takes less than 25 minutes, start to finish, for four generous servings.
Preventing Steaming: The Key to Crisp Tender Results
Moisture is the absolute enemy of crispiness. This is the single most important rule: wash your beans, then pat them bone dry with a clean tea towel. If you skip this critical step, the water on the surface creates steam, guaranteeing a softer texture. Remember, we want caramelization, not a sauna effect.
Activating the Flavor: The Maillard Reaction on Vegetable Surfaces
When cooking Roasted Green Beans at 400 , you’re aiming for that beautiful, slightly bitter, and sweet caramelization on the skin. We use a small portion of the garlic and oil at the start of the roast to mellow those flavors, giving the beans a beautiful aromatic base.
Infusing Post Roast: Maximizing Lemon Zest and Garlic Aroma
Here is the secret weapon for this roasted green beans recipe : the double dose of aromatics. Roasting all the garlic dulls its sharp edges. By adding a generous portion of raw minced garlic and fresh lemon zest after the beans come out of the oven, you achieve a bright, pungent pop that cuts through the richness of the oil and the deep char of the roasting process.
Essential Components for Zesty Roasted Green Beans
You don't need much to make spectacular Roasted Green Beans , but quality matters here. Use decent olive oil and, if you can, fresh garlic the dried stuff just won't give you the same punch.
| Ingredient | Amount (1 lb beans) | Why it’s crucial | Viable Substitution |
|---|---|---|---|
| Fresh Green Beans | 1 pound (450g) | Must be firm, bright green, and snappy. | Asparagus (use a shorter cook time) or snap peas. |
| Olive Oil | 3 Tbsp (divided) | Serves as the heat conductor and flavor base. | Avocado oil or melted coconut oil (neutral flavors). |
| Kosher Salt | ¾ tsp | Essential for drawing out flavor and aiding browning. | Fine sea salt (use slightly less as it's saltier). |
| Fresh Garlic | 4 cloves (divided) | Gives aromatic depth. | 1 small shallot, very finely minced. |
| Lemon | 1 medium | Provides the crucial final acid lift and brightness. | 1 Tbsp White Wine Vinegar or Balsamic Glaze. |
Crucial Note on Dividing Garlic: Two cloves go in the oven; two cloves go on the hot beans right after they come out.
Chef's Note: When preparing the beans, don’t just rinse them. Throw them in a salad spinner or aggressively pat them dry with towels. Damp beans mean sad beans.
step-by-step: Achieving the Perfect Roasted Bean Texture

We are going to focus on achieving that perfect snap the ideal crisp tender texture that avoids being raw while remaining beautifully firm. This involves high heat and careful observation.
Selecting the Perfect Fresh Green Beans (Snap and Color)
When you buy them, give a few a gentle snap. They should break cleanly and easily, with a satisfying noise. Avoid beans that look dull, rubbery, or have any brown spots already. Haricot Verts, the thin French variety, are magnificent for this, but standard green beans work perfectly too.
Oil and Seasoning Ratios for Maximum Coverage
You need enough oil to lightly coat every single bean without pooling on the tray. We use 2 tablespoons initially. Toss the beans, oil, salt, pepper, and the roasted portion of garlic in a large bowl. Use your hands! It ensures every bean gets equal attention.
Detailed Notes on Fresh Lemon Zest vs. Dried Seasoning
Do not substitute dried lemon pepper for fresh zest in this roasted green beans with garlic recipe. The oils in the fresh zest provide an incomparable brightness and aromatic kick that dried seasonings just can’t replicate.
We add the zest after roasting so the delicate oils don't burn off in the oven.
Preparation and Trimming: Getting Beans Oven Ready
Once washed and dry, trim off only the stem end (where the bean attached to the plant). I often leave the little tail on the other side; it just looks pretty, but you can certainly trim both if you prefer neatness. While the oven preheats to 400°F (200°C), put your empty sheet pan inside.
The Crucial Single Layer: Spreading for Optimal Blistering
When the pan is smoking hot, carefully pour the seasoned beans onto it. This is the most critical step : spread them out into a single, uncrowded layer. If the beans touch too much, they steam. If you have too many, use a second sheet pan.
Overcrowding is the number one reason why green beans in oven fail to crisp.
Monitoring the Roast: Recognizing Caramelization Cues
Roast for 12 to 15 minutes, depending on the thickness of the beans. Set a timer to flip them halfway through, around the 7 8 minute mark. Look for intense, bright green color and patches of dark brown blistering. The edges should look slightly shriveled, giving off a nutty, warm aroma.
How to Make Roasted Green Beans step-by-step
This method guarantees that perfect flavor profile, balancing the sweet char of the oven with the sharp tang of fresh garlic and lemon.
Preparation Steps
- Heat Up: Preheat your oven to 400°F (200°C). Place your clean sheet pan inside to get screaming hot.
- Dry Them Out: Wash and thoroughly dry 1 pound of trimmed beans. Mince your four cloves of garlic and divide them into two piles (2 cloves for roasting, 2 cloves for finishing).
- Toss for Roast: In a bowl, toss the dry beans with 2 Tbsp olive oil, salt, pepper, and the first half of the minced garlic.
- Zest Prep: Zest the entire lemon, reserving the zest in a small bowl.
Cooking Process
- Spread and Roast: Carefully remove the hot pan. Spread the seasoned beans across the pan in a single layer. Return the pan to the oven.
- Flip: Roast for 12– 15 minutes total. Flip the beans at the halfway mark to ensure even blistering. They should look slightly tender but still have a snappy bite.
- The Finish: Immediately transfer the hot Roasted Green Beans back into the mixing bowl.
- Aromatics Explosion: Add the remaining 1 Tbsp raw olive oil, the remaining raw garlic, and the reserved lemon zest. Toss vigorously for 30 seconds.
- Serve: Squeeze the juice of half the lemon over the top and season again with flaky sea salt. Serve immediately while the beans are still sizzling hot.
Expert Tips for Success
Don't Fear the Hot Pan: Starting the roast on a sheet pan that has preheated with the oven is crucial. It speeds up the browning process immediately upon contact, guaranteeing those delicious blisters.
Common Mistakes to Avoid
- Using Cold Oil: If you put the beans on a cold pan, the oil just sits there until the pan heats up, allowing the beans to start steaming first.
- Not Flipping: If you don't flip the beans, the side facing the pan will caramelize nicely, but the top will just dry out, resulting in an uneven texture.
- Overcrowding: This is the death of crispy beans in oven . If you try to cram too many beans onto one tray, they become soft and lifeless.
Troubleshooting and Expert Tips for Roasting Success
The Rattle Test: Ensuring Even Heat Distribution
If you shake your tray halfway through the roasting process, the beans should rattle sharply against the metal. If they sound soft, heavy, or squishy, they are steaming, likely because the oven temp is too low or the pan is overcrowded.
Common Mistakes When Seasoning Roasted Vegetables
People often under salt the beans initially. Remember, as the water evaporates, the salt concentration intensifies, but you need enough salt upfront to draw out that moisture. A good pinch of flaky sea salt at the very end enhances texture and overall flavor.
Adjusting Roast Times for Thicker vs. Thin Beans
If you have those beautiful, thin Haricot Verts, your total cook time might be closer to 10– 12 minutes. For very thick, mature green beans, you might need up to 18 minutes. Taste test them around the 10 minute mark; they should be slightly firm, but not squeaky.
Reheating Without Losing the Crisp (Avoiding the Microwave)
If you have leftovers of these glorious Roasted Green Beans , don't put them in the microwave unless you enjoy mush. The best way to reheat is to spread them back on a sheet pan and place them in a 350°F (175°C) oven for about 5 minutes until they sizzle again.
Freezing Roasted Beans: Is It Worth It?
Short answer: No, please don't. Roasting fundamentally changes the cell structure of the bean. Freezing and thawing them will result in a mushy texture that completely undermines the beautiful work we did to achieve that crisp tender snap. Only roast what you plan to eat within a few days.
Making Ahead: Practical Guide to Storing Roasted Green Beans
You can absolutely prep these beans ahead of time, which is helpful if you’re hosting a dinner party. You can trim and dry the beans up to 24 hours in advance and store them, unseasoned, in an airtight container in the fridge.
Once cooked, leftover beans will keep nicely in the fridge for 3 to 4 days. Remember my warning about the microwave; use the oven or a quick sizzle in a hot pan to bring them back to life.
Pairing Perfection: What to Serve Alongside These Beans
These zesty, caramelized beans are so versatile they go with everything from a simple pan-seared piece of fish to a hearty holiday roast. They also pair wonderfully with other root vegetables.
If you’re building a roasted vegetable spread, I highly recommend serving these alongside my super crispy Roasted Sweet Potatoes: Caramel Crunch Ultra Crispy Edges or my silky smooth oven-roasted Peppers: The Chefs Guide to Silky Perfection . The contrasting textures are just divine! This is the ultimate roasted green beans in oven experience, pairing bright flavors with rich, savory mains.
Matching Textures: Complementary Side Dishes
We have texture covered with the crisp tender beans, so pair them with something creamy or soft. A smooth mash or a rich, hearty main course provides a fantastic contrast. For a truly classic meal, serving this roasted green beans recipe next to a creamy risotto is pure heaven.
I promise you, once you taste the vibrant snap and caramelized depth of properly made Roasted Green Beans , you will never boil them again. Enjoy, and remember: dry, hot, and spread out! That is the winning trifecta.

Recipe FAQs
Why did my roasted green beans turn out soggy instead of crispy?
Sogginess is usually the result of overcrowding the pan, which causes the beans to steam rather than roast. Ensure your beans are spread in a single, thin layer so moisture can escape quickly, allowing for proper caramelization and crisping.
When should I add the garlic and lemon zest to prevent burning?
Garlic burns very quickly at high temperatures due to its low sugar content. Toss the minced garlic and lemon zest with the beans immediately after removing them from the oven, or add them only during the last 3-5 minutes of roasting time.
Do I need to blanch the beans before roasting them?
Absolutely not; blanching adds unnecessary moisture and heat that works against the desired crispy texture. The high heat of the oven is sufficient to cook the beans thoroughly to a crisp tender finish without any pre-boiling.
What is the best oil to use for high heat roasting?
Always choose a high smoke point oil, such as avocado, grapeseed, or a light olive oil, when roasting above 400°F. Extra virgin olive oil has a lower smoke point and can sometimes burn or smoke excessively at these high temperatures.
Can I make these ahead of time, and how should I store leftovers?
While best served immediately for optimal crispness, leftovers can be stored in an airtight container in the refrigerator for up to 3 days. To reheat, spread them on a hot sheet pan in the oven for a few minutes to regain some texture, avoiding the microwave.
What are some easy flavor variations I can try?
For savory depth, try adding a tablespoon of smoked paprika and a pinch of chili flakes before roasting. Alternatively, toss the roasted beans with toasted slivered almonds, shaved Parmesan cheese, or a dash of balsamic glaze for complexity.
Does using parchment paper affect the final crispiness?
Parchment paper provides convenience for cleanup but can slightly impede maximum crisping compared to a bare metal pan. Bare metal conducts heat more aggressively, allowing for better direct contact and more efficient caramelization of the beans.
Crispy Roasted Green Beans With Lemon
Ingredients:
Instructions:
Nutrition Facts:
| Calories | 137 kcal |
|---|---|
| Protein | 2.2 g |
| Fat | 10.7 g |
| Carbs | 9.6 g |
