Thanksgiving Turkey: the Sunday Best Dry-Brined Showstopper
- The Ultimate Thanksgiving Turkey: Simplified Dry-Brine Method
- The Science Behind the 'Sunday Best' Technique
- Essential Ingredients and Prep Notes for Your Thanksgiving Turkey
- Step-by-Step Directions for a Flawless Roast
- Troubleshooting Your Roast: Expert Tips and Common Mistakes
- Storing and Reheating Leftover Turkey Safely
- Perfect Pairings: What to Serve Alongside Your Thanksgiving Turkey
- Recipe FAQs
- 📝 Recipe Card
The Ultimate Thanksgiving Turkey: Simplified Dry-Brine Method
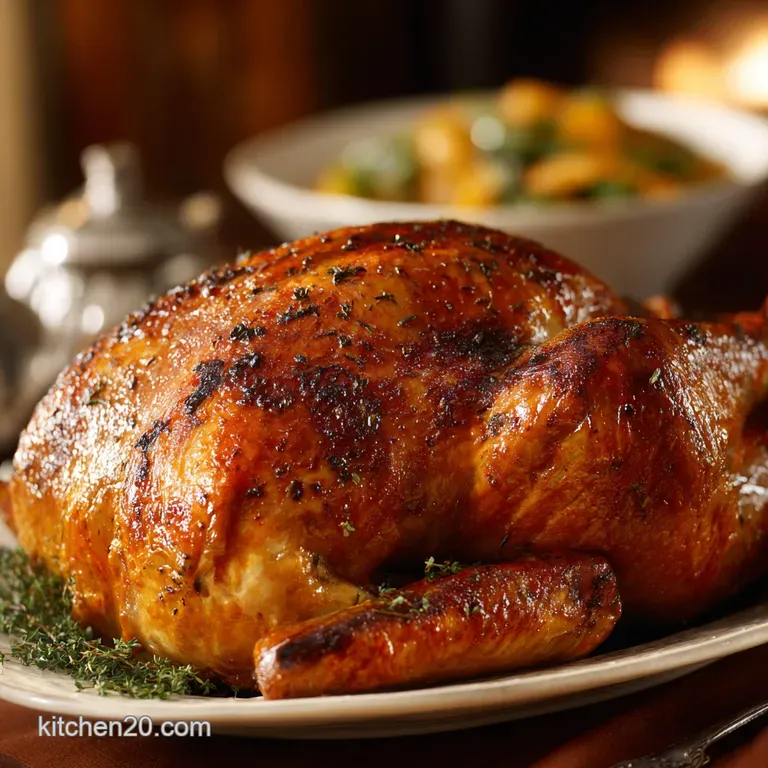
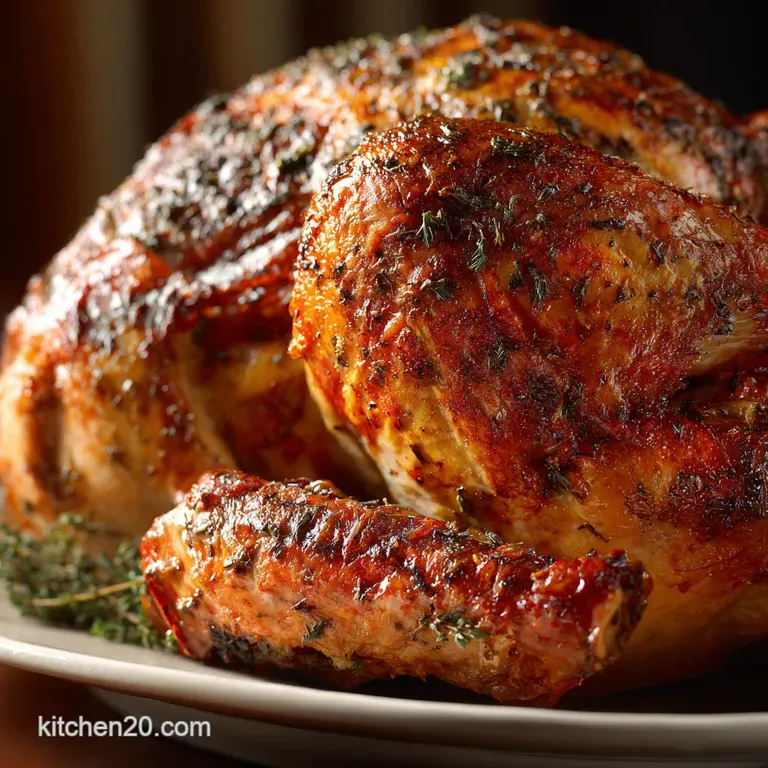
That golden brown, glistening, perfectly carved turkey centerpiece is the dream we chase every November. When the oven door opens and you’re hit with the dizzying aroma of sage, roasting garlic, and deep, savoury turkey drippings, you know you’ve won. That crisp skin is the trophy we are all aiming for.
Honestly, people treat cooking the Thanksgiving Turkey like it's a chemistry final, but it doesn't have to be overwhelming. My dry-brine method is stupid simple, requiring minimal active prep time and zero frantic, unnecessary basting on the big day.
You will save so much stress, and the results are consistently perfect for everyone, even beginner cooks.
Forget the huge, messy cooler full of salty water that defines wet brining and complicated trussing techniques. We are using basic salt and simple science to deliver the moistest bird you have ever tasted. Let’s dive into exactly how we achieve that perfect, easy Thanksgiving Turkey done right this year.
The Science Behind the 'Sunday Best' Technique
Why Traditional Turkey Methods Often Fail
People worry incessantly about roasting time, but the real enemy of a good roast is inconsistent seasoning and poor moisture management. Traditional methods often rely on butter slapped onto a still wet turkey, which just steams the skin instead of crisping it beautifully.
Plus, basting is the absolute worst: it lowers the oven temperature every time you open the door, significantly delaying the crisping process.
The Magic of the Dry Brine vs. Wet Brining
A wet brine is a huge faff, requiring gallons of water, and can actually result in a watery, spongy, flavourless turkey, even if it feels "moist." The dry brine, however, uses salt to draw moisture out of the turkey cells initially.
Then, over 48 hours, that salty liquid is reabsorbed, fundamentally changing the muscle structure to hold onto juices during the intense heat of the oven. This ensures your turkey seasoning penetrates deep, deep into the meat.
How the Dry Brine Guarantees Moisture Retention
When the turkey sits uncovered on a rack in the fridge for two days, two awesome things happen simultaneously. First, the salt works its internal magic, guaranteeing flavour and moisture retention throughout the meat. Second, the cold, circulating air totally dehydrates the skin’s surface.
Dry skin + high heat = maximum crispiness.
Compound Butter: The Secret to Crispy Skin
We tuck the fragrant herb compound butter directly under the breast skin, which is the key to preventing the breast from drying out. As the turkey roasts, the butter melts straight into the delicate white meat.
Simultaneously, the rendered butter fat drips over the outside of the skin, promoting that gorgeous golden crust. It's a fantastic, dual action secret weapon for achieving a perfectly cooked turkey.
Chef's Note: Don't skip placing the compound butter under the skin. Rubbing it only on the outside doesn't offer the same level of moisture protection to the breast meat.
Essential Ingredients and Prep Notes for Your Thanksgiving Turkey
Choosing Your Turkey: Fresh vs. Frozen (And Thawing Time)
Fresh is always my preference because it eliminates the thawing headache, but a frozen bird is totally fine! If you go frozen, please budget roughly 24 hours of thawing time in the fridge for every 5 pounds of bird.
Seriously, start early, or you’ll be frantically trying to defrost a giant ice block last minute, which I know from chaotic experience.
Crafting the Aromatic Compound Butter (Herbs and Fats)
Room temperature, softened butter is non-negotiable for the compound butter; it needs to be soft enough to spread without tearing the fragile turkey skin. I love using fresh sage and thyme here for that classic Thanksgiving Turkey flavour, but feel free to swap in fresh rosemary or even finely chopped chives.
If you absolutely need a substitute for butter, high-quality rendered duck fat or softened lard works beautifully for the skin rub, offering a richer flavour.
The Simple Ratio for the Dry Brine Mixture
The foundation of a great Thanksgiving Turkey Brine Recipe is mostly salt, and the ratio is simple. I stick to about 1 tablespoon of coarse Kosher salt per 5 pounds of turkey, maybe a little more if it's a huge bird. The herbs rosemary, thyme, pepper are just bonus flavour.
| Ingredient to Substitute | Recommended Substitution |
|---|---|
| Kosher Salt | Use half the amount of standard iodized table salt. |
| Fresh Herbs (Sage/Thyme) | Use 1/3 the amount of dried herbs. |
| Unsalted Butter | Duck fat or high-quality lard (for the skin rub). |
| Chicken Stock | Plain water, white wine, or unsweetened apple cider. |
Must Have Equipment Checklist (Roasting Pan, Thermometer)
You need a sturdy roasting pan and a V-rack or flat rack to lift the bird out of the drippings this helps air circulation for the underside. But forget the fancy gadgets; the only true must have is an instant read meat thermometer. If you don't have one, stop right now and invest.
It is the only way to guarantee a perfectly cooked turkey and avoid serving dry breast meat.
step-by-step Directions for a Flawless Roast
Phase 1: Applying the Dry Brine and Resting Uncovered (48 Hours)
First, remove the turkey from its packaging, making sure to remove the neck and giblets. Pat the turkey absolutely bone dry inside and out with paper towels. Next, mix your salt and dried herbs, then rub that mixture aggressively over every surface, making sure to season the cavity, too.
Place the turkey uncovered on the rack in the fridge for at least 48 hours.
Phase 2: Preparing the Turkey for Roasting (Tucking the Compound Butter)
Pull the turkey out of the fridge an hour before roasting to temper (take the chill off). Mix your softened butter with the fresh herbs and garlic. Gently slide your fingers between the breast meat and the skin, creating generous pockets.
Push two-thirds of that creamy herb butter right into those pockets, then rub the remaining butter over the legs. Place your quartered onion, carrots, and celery into the cavity.
Phase 3: Initial over High heat Sear and Temperature Adjustments
Preheat your oven to a blazing 425°F (220° C) . Roast the turkey at this high temperature for 30 minutes exactly. This blast of heat sets the skin into a beautiful, crispy, golden armor.
Then, reduce the heat down to 325°F (160° C) and let it cruise for the remaining cook time.
Phase 4: Monitoring and The Critical 30 Minute Rest
Do not peek too often! Start checking the temperature around the 3 hour mark for a 14 pound bird. Once the thickest part of the thigh reads 175°F (80° C) and the breast is 160°F (71° C) , pull that bird out immediately.
Transfer the Perfect Roast Turkey to a cutting board, tent it loosely with foil, and let it rest for a minimum of 45 minutes. If you skip this step, all the precious juices will run out onto your board, leaving you with dry meat.
Troubleshooting Your Roast: Expert Tips and Common Mistakes
Why Basting Is Not Necessary With This Method
Basting is a culinary myth that makes you feel useful but ruins your skin texture. Every time you open the oven door, the temperature drops dramatically, slowing the cook time and releasing precious internal heat.
The compound butter under the skin melts and handles the self basting and moisture, making manual basting redundant for this recipe.
Preventing Dry Breast Meat (Shielding Techniques)
If you notice your turkey breast is looking like a perfectly browned trophy after about 2 hours but the thighs still need to come up in temperature, it’s time to intervene. Tear off a piece of aluminium foil, gently crinkle it, and drape it loosely over the breast only.
This reflective shield forces the heat toward the legs and thighs, allowing the darker meat to finish cooking without incinerating the delicate breast.
Mistake 1: Not Using a Reliable Meat Thermometer
Seriously, I’m putting this one first because relying on timing alone is the biggest fail point for basic turkey recipes. A high-quality instant read thermometer is the difference between an incredibly juicy, Perfectly Cooked Turkey and a dried out disappointment.
Always check in the thickest part of the thigh, making sure your probe avoids hitting the bone.
Storing and Reheating Leftover Turkey Safely
Refrigeration Guidelines for Cooked Turkey
You should store cooked, carved turkey meat in airtight containers within two hours of roasting. It’s safe to keep in the fridge for 3 to 4 days, but honestly, we usually eat it all within 48 hours.
I find it helpful to store white meat separately from dark meat, as dark meat holds up better to gentle reheating.
Best Practices for Freezing Portioned Turkey Meat
If you know you won't eat all those leftovers within the four day window, freeze it quickly! Slice or dice the meat, place it in freezer safe bags or containers, and press out all the air before sealing tightly. Frozen turkey meat is best if consumed within 3 months.
To reheat without drying it out, thaw it overnight in the fridge and warm gently in a low oven (300°F/150°C) with a splash of stock added for moisture.
Essential Gravy Preparation from Pan Drippings
That dark brown liquid and fat at the bottom of your roasting pan after the turkey is removed is absolutely liquid gold. Pour the drippings into a fat separator (or simply skim the fat off the top after resting).
Use a few tablespoons of the separated fat to make a roux (equal parts fat and flour), then whisk in your stock and the pure, flavourful pan juices. This is the secret to rich, beautiful gravy that pairs perfectly with the roast.
Perfect Pairings: What to Serve Alongside Your Thanksgiving Turkey
Since this Thanksgiving Turkey is incredibly rich, buttery, and deeply flavourful, you absolutely need some bright, acidic contrast to cut through all that delicious fat.
Skip the heavy, creamy side dishes entirely. Instead, try something crisp and vibrant, like my crunchy 15Minute Thanksgiving Salad: Crunchy Autumn Side Ready in 15 Mins . Or, if you prefer something heartier but still bright, the citrus dressing on my Thanksgiving Salads: The Brightest Kale Sprout Salad for Dinner is a perfect counterpoint to the sage and thyme flavours in the bird.
And for dessert, since you are officially the master of the main event, make something easy ahead of time. You totally deserve a stress free finale! The satisfyingly sweet and slightly tart make-ahead Thanksgiving Desserts: Stress Free Cranberry Trifle Recipe is always a massive hit, and the cranberries naturally complement the holiday flavour profile.

Recipe FAQs
Why is my turkey breast always dry, even after brining?
Overcooking is the primary culprit, as breast meat cooks significantly faster than leg meat. Use an instant read thermometer and pull the turkey when the breast reaches 160°F (71°C), as it will coast to the safe temperature of 165°F (74°C) outside the oven.
If the breast is browning too quickly, loosely shield it with foil to prevent excessive moisture loss while the thighs continue to cook.
I forgot to apply the dry brine until Thanksgiving morning. Can I still save the turkey?
Yes, you can still proceed, but the flavor depth and moisture retention won't be as profound as a 24-hour brine. In this case, apply the salt and compound butter immediately before roasting, and remember to pat the turkey skin completely dry beforehand to aid in crisping.
For faster results, try applying the brine under the skin rather than just over the skin.
What is the ideal internal temperature, and where should I check it?
The safe internal temperature for poultry is 165°F (74°C), but you are aiming for slightly different temperatures in different sections. Check the temperature in the thickest part of the breast (aiming for 160°F) and the thickest part of the thigh (aiming for 170°F 175°F).
Ensure the thermometer doesn't touch bone, as this will result in a falsely high reading.
Can I stuff the turkey, or should I cook the stuffing separately?
For safety and even cooking, it is strongly recommended to cook your stuffing separately outside the turkey cavity. Stuffing inside the cavity insulates the meat, causing the turkey to take much longer to reach a safe temperature.
This often results in a dangerously overcooked and dry breast by the time the center of the stuffing is safe to eat.
My turkey skin is crisp on top, but the underside near the legs is soggy. How do I fix this?
Soggy underside skin is usually caused by steam trapped underneath or turkey juices pooling against the skin. Ensure you elevate the turkey using a V-rack or roasting rack so air can circulate completely underneath the bird.
If necessary, you can rotate the turkey briefly during the last 30 minutes to expose the underside to more direct heat.
How long should I let the turkey rest after cooking, and why is this necessary?
You should allow the turkey to rest, loosely tented with foil, for a minimum of 30 minutes, but ideally 45 to 60 minutes for a large bird. This rest period allows the cooking process to complete (carryover cooking) and, more importantly, permits the muscle fibers to relax and reabsorb their precious juices.
Skipping the rest will result in all those delicious juices running out onto your cutting board.
How long can I safely store leftover turkey, and can I freeze it?
Cooked turkey leftovers should be cooled quickly and stored in airtight containers in the refrigerator for 3 to 4 days. Yes, turkey meat freezes extremely well; remove the meat from the bone, wrap it tightly to prevent freezer burn, and use it within 3 months for the best quality.
Dry Brined Thanksgiving Turkey Recipe

Ingredients:
Instructions:
Nutrition Facts:
| Calories | 250 kcal |
|---|---|
| Fat | 12 g |
| Fiber | 0 g |
