Artisan No Knead Bread the Effortless Ultracrusty Dutch Oven Loaf
- Unlocking the Secret to Professional Bakery Crusts at Home
- Why This Artisan No Knead Bread Is the Best Loaf You'll Ever Bake
- The Simple Pantry Staples Required for Masterful Bread
- The Effortless Four and Step Process to Perfect Crust and Crumb
- Troubleshooting and Mastering Your Loaf
- Recipe FAQs
- 📝 Recipe Card
Unlocking the Secret to Professional Bakery Crusts at Home
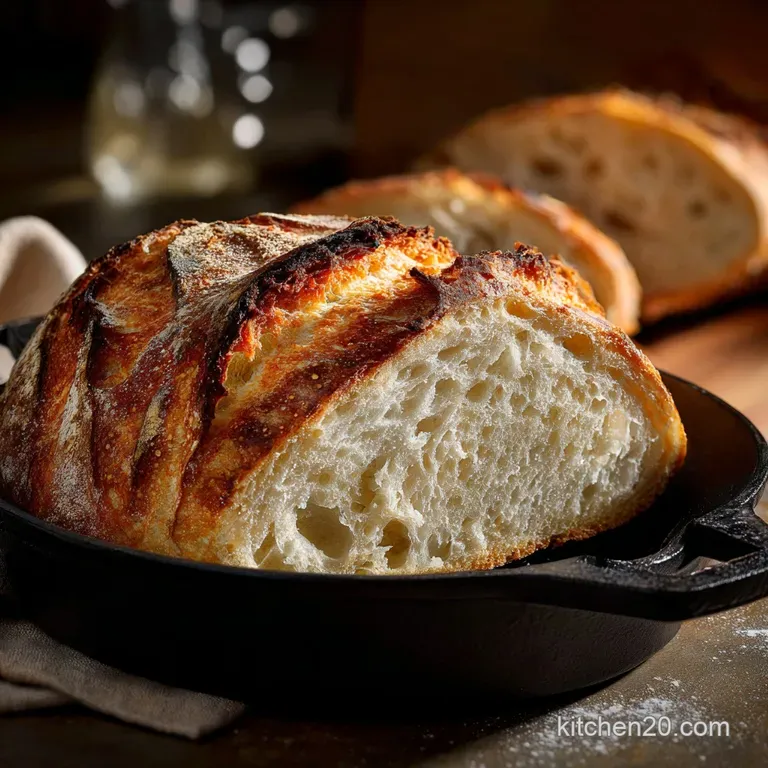
If you’re anything like me, you’ve spent years chasing that perfect, shattered crust. You know the one. It looks like polished mahogany, has those sexy little blisters all over it, and practically screams when you slice into it.
For ages, I thought that kind of bread was reserved only for professional bakers with industrial steam ovens. I failed so many times trying to replicate it at home; dense bricks, crusts that were soft and sad (the worst!), and uneven, gummy interiors.
But then, I discovered the secret weapon, and honestly, it changed everything. The secret isn't some complex folding technique or a highly specific type of ancient grain. It’s a very hot pot and a lot of patience. This easy artisan no knead bread recipe is the only one you need.
It uses basic physics trapped steam, specifically to trick your ordinary home oven into creating a professional environment. We're going to create the perfect crusty bread with barely any effort. Right then, let’s crack on.
Why This Artisan No Knead Bread Is the Best Loaf You'll Ever Bake
I know, that’s a bold claim. But truly, this method is revolutionary. It requires maybe five minutes of active work, tops. The rest is just waiting, which, granted, is sometimes the hardest part. The payoff is immense: a beautiful open crumb (the inside structure) and a truly magnificent, crisp exterior.
The Magic of Time: Understanding Long Fermentation
When you bake bread the traditional way, you have to knead it furiously. That friction and manipulation activate the gluten, developing structure quickly. The no and knead method swaps effort for time. We use a tiny amount of yeast, which slows everything down.
Slow fermentation (12 to 18 hours!) is where the magic really happens.
Think of it like this: the yeast doesn’t just make gas (bubbles); it creates complex organic acids. These acids are why sourdough tastes tangy and layered. By letting this dough hang out on your counter all day (or overnight), we develop that deep, nuanced flavor that simply doesn’t exist in a fast, store and bought loaf.
If you rush it, you get bland bread. Simple as that.
Jim Lahey’s Genius: The Origin of the Effortless Loaf
We owe a huge debt of gratitude to Jim Lahey, the owner of Sullivan Street Bakery in New York, who popularized this method. Before him, bread baking was seen as a difficult, sweaty job.
He essentially said, "Stop trying so hard." He figured out that if you use an incredibly wet dough high hydration the gluten strands will align themselves automatically over time, needing no manual kneading. It's the ultimate baking cheat code.
When people ask me how I make my artisan no knead loaf, I just point them to this method.
What Does 'No Knead' Actually Mean for Gluten Development?
Gluten development is what gives the dough structure and allows it to hold those beautiful air bubbles. In a low and hydration dough, you must knead to make the gluten proteins (glutenin and gliadin) link up.
In this specific, very sticky dough, we use a very high hydration ratio (meaning lots of water). The water allows the proteins to move around freely, and over 12+ hours, they naturally find each other and form strong, elastic networks. This process is called autolyse, or enzymatic activity.
It’s brilliant. You mix it, it looks like a shaggy mess, and then 18 hours later, you peek under the plastic wrap, and suddenly you have a cohesive, bubbly, beautiful dough. It’s completely passive.
Related Recipes Worth Trying
- Fig Date Nut Bread Elevated Date Fig Walnut Loaf for Tea Time — Fig Date Nut Bread is an incredibly moist and dense Dessert Bread perfected by soaking fruit in tea This fig and date nut bread recipe is ideal for...
- Crispy Buttermilk Cornbread Waffles with Cowboy Chili Proper Comfort — Elevate your dinner These Crispy Cornbread Waffles with Chili are a textural masterpiece replacing traditional sides Its the ultimate comfort food recipe...
- Stop the Soggy Bowls Crispy Cornbread Waffles with Smoky Chili — Elevate your comfort food game with Hearty Homestyle Cornbread Waffles served under rich smoky beef chili The crisp lattice holds up perfectly A...
The Simple Pantry Staples Required for Masterful Bread

You only need four ingredients for this crusty loaf, but getting them right matters. Don’t just grab whatever is lurking in the back of the cupboard.
Choosing the Right Flour: High Protein vs. Standard AP
For the best results, stick with Bread Flour . Why? It has a higher protein content (usually 12% to 14%) than All and Purpose (AP) flour (usually 10% to 11%). Those extra proteins translate directly into stronger gluten development, which means better oven spring and a chewier texture.
TRUST ME: If you use AP flour, your bread will still be good, but it might spread a little flatter when you transfer it. If you’re serious about that tall, airy loaf, spring for the bread flour. Don't worry about bleached vs. unbleached; unbleached usually gives a slightly better flavour, but either works fine.
Measuring Precisely: Hydration Ratios Explained
If you skip the scale for this recipe, you are setting yourself up for failure. That sounds harsh, but it’s true. The ratio of water to flour (hydration) must be exact. We are aiming for a very wet dough somewhere around 80% to 95% hydration, depending on your flour.
This wetness is what creates the open crumb and allows the auto and kneading process to work.
A tiny difference in measurement (like scooping your flour instead of weighing it) can turn a perfect dough into a sticky, impossible puddle, or a stiff, dry brick. Invest the $20 in a scale. It’s the single biggest improvement you can make to your baking.
Crucial Equipment Checklist: Beyond the Dutch Oven
The most important piece of equipment for easy artisan no knead bread is, without question, the Dutch Oven . We need a heavy pot, 4- to 6 quarts, that can handle high heat and has a tight and fitting lid. Cast iron enamel is perfect.
What does the Dutch oven do? It acts as a mini and oven within your big oven. When the dough hits the searing hot pot, all the moisture within the dough immediately turns to steam. Because the lid is on, the steam is trapped around the loaf.
This keeps the surface cool and moist just long enough for the dough to fully expand. After 30 minutes, we take the lid off, and bam —the rapid moisture evaporation gives you that incredible, hard crust.
Here are the tools I find non and negotiable:
- Kitchen Scale: See above. Non and negotiable.
- Bench Scraper: This dough is sticky! A plastic or metal bench scraper makes handling and shaping so much easier.
- Proofing Basket (Banneton): Or a bowl lined with a heavily floured kitchen towel. This helps the sticky dough hold its shape during the final rise.
The Effortless Four and Step Process to Perfect Crust and Crumb
We’ve waited long enough. Here is the process distilled down to four key stages.
Initial Mixing: Achieving Shaggy Dough Consistency
Seriously, use a spatula. Don't even think about using your hands yet, or you'll be washing flour off your knuckles for an hour. Combine the dry ingredients first, then pour in the water. Mix until just combined. You want a shaggy, wet, ugly and looking mass.
Stop mixing the second you don’t see any dry flour patches left. Over and mixing now will actually make the resulting bread tougher later. Cover it tight, like you’re sealing a science experiment (because you are).
The Overnight Slumber: Ideal Fermentation Temperature and Placement
This is where your kitchen temperature matters. Most recipes suggest 12 to 18 hours. If your kitchen is warm (75°F+), stick to 12 hours. If, like mine, your kitchen sometimes dips down to basement temps (around 68°F), push it closer to the 18 hour mark.
What are you looking for? The dough should at least double, but more importantly, the entire surface should be pocked with small and large bubbles, and it should wobble slightly when you shake the bowl. It will smell pleasantly yeasty and acidic. If it looks flat and lifeless, give it more time.
If it smells like nail polish remover, you left it too long (oops, I did that once).
The Fold and Proof: Shaping Without Destroying Air Pockets
When it’s time to move the dough, use flour, but don't overdo it. The key here is gentle handling. Tip the dough onto your floured surface. Now, we’re going to perform a gentle fold, pulling the edges over the center like folding an envelope.
This builds necessary surface tension so the loaf stands tall instead of spreading.
Flip the dough seam and side down and gently cup your hands around it, dragging it slightly to tighten the surface into a taut ball. Then, place it into your heavily floured proofing basket (seam and side up!). Let it rest for its final proof (1.5 to 2 hours).
The Dutch Oven Advantage: Preheating and Steam Trapping
This step is the most critical for that crust. You need to start heating the Dutch oven while the dough is still proofing. Place the empty pot (with the lid) into a cold oven, then crank the temperature up to 450°F (232°C).
Let it preheat for a full 30 minutes after the oven reaches temperature. It needs to be screaming hot.
When you drop the dough in (carefully, please, that pot is lethal!), the contact with the extreme heat gives it a massive initial push. Thirty minutes covered, trapping the steam. Then, remove the lid. The bread will already look puffed and pale.
The last 15– 20 minutes uncovered will brown the crust deeply and lock in the crispy texture.
CRUCIAL WARNING: Do not, under any circumstances, slice this hot loaf immediately. That steam trapped inside is finishing the baking process. If you cut it early, it releases the steam, and the starches condense, leaving you with a gummy, unpleasant texture. Patience for one more hour!
Troubleshooting and Mastering Your Loaf
Even when baking easy artisan no knead bread, things can go sideways.
Why Isn't My Crust Blistering? Humidity and Temperature Fixes
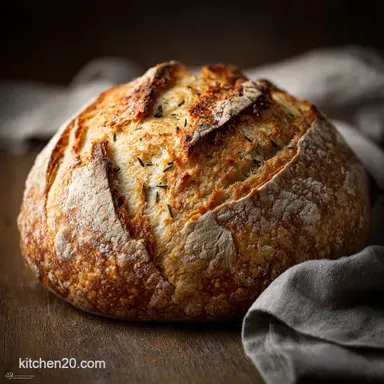
Those gorgeous blisters (we call them presents ) are caused by uneven evaporation and hot steam hitting the dough. If your crust is uniformly smooth, you have a few things to check:
- Oven Temperature: Was your Dutch oven truly hot? If the pot isn't hot enough, the dough won't spring immediately, and steam generation will be weak.
- Humidity: The dough must be slightly tacky when it goes into the pot. If the surface of your dough dried out during the second proof, it forms a premature skin that prevents blistering. Make sure you cover the proofing basket lightly to maintain surface moisture.
- Flour Choice: Sometimes switching to an organic, higher and quality flour increases the blister formation.
Adapting Your Artisan No Knead Bread for Flavor Variations
The simplicity of this base recipe makes it perfect for adding flavor. I often mix in my additions during the initial mixing stage, when I add the water.
- Cheesy Goodness: Add 1 cup of shredded sharp cheddar and 1/4 cup of chopped chives.
- Herbaceous: Mix in 2 tablespoons of dried oregano and a teaspoon of crushed red pepper flakes.
- Sweet Note: For a breakfast loaf, add 1/4 cup of golden raisins and 1 tablespoon of cinnamon. Remember, sugar feeds the yeast, so you might need to slightly shorten the bulk fermentation time.
Storing and Reviving Stale No and Knead Bread
This artisan no knead loaf is best eaten the day it’s baked, but it keeps well for 2 3 days. Store it at room temperature, cut side down, on a cutting board, or loosely wrapped in a linen towel. Please, never put it in the fridge; it speeds up staling significantly.
If it starts to get a bit stiff, you can revive it beautifully. Just run the entire loaf quickly under cool tap water (don't soak it, just wet the crust). Place it directly on the oven rack in a 350°F (175°C) oven for about 5– 10 minutes.
The moisture on the crust turns to steam, softening the crumb and re and crisping the exterior. It comes out tasting freshly baked.
Nutritional Snapshot: Calories and Carb Breakdown per Slice
I'm a home cook, not a nutritionist, but since you asked, here’s a rough idea based on a standard 10 slice serving. I don't bake bread for its diet qualities (I bake it for the butter delivery system), but knowing the basics can be helpful. This is primarily complex carbohydrates, meaning it’s fuel.
| Component | Estimate Per Slice (1/10th of loaf) |
|---|---|
| Calories | 170 190 kcal |
| Carbohydrates | 35 40 grams |

Recipe FAQs
Crikey, my dough looks like soup! Is this Artisan No Knead Bread supposed to be this wet and sticky?
Absolutely, yes! This method relies on very high hydration (more water than typical dough) to achieve that airy, open interior crumb; handling the sticky dough gently and using plenty of rice flour or cornmeal on your work surface is the proper trick.
Eighteen hours is a proper wait. Can I proof the dough faster, or do I really need all that time?
Patience is key, old sport, as the long, slow, cool fermentation is what develops the complex, slightly sour flavour and excellent structure; speeding it up by using warmer water or more yeast sacrifices the delicious "artisan" profile we are aiming for.
I haven't got a Dutch oven is there a sneaky way to still get that cracking crust?
Yes, you can manage it! Preheating a pizza stone or thick baking sheet in the oven and placing a cast iron tray containing boiling water on the lower rack mimics the crucial steam environment needed for a beautiful, blistered crust.
Once baked, what's the best way to store my lovely loaf to keep it fresh?
Once cooled completely, store the loaf cut-side down on a wooden board or loosely wrapped in a paper bag at room temperature; avoid plastic wrap or sealed containers, as they trap moisture and quickly ruin that wonderful, crunchy crust.
I fancy a change. Can I add seeds or use different flour in this recipe?
Certainly, variations are encouraged! You can swap up to 100g (about 1/4) of the white bread flour for whole wheat or rye (perhaps adding a splash more water if needed), or stir in 1/4 cup of mixed seeds, rosemary, or garlic during the initial 5-minute mixing stage.
Easy Artisan No Knead Bread Loaf
Ingredients:
Instructions:
Nutrition Facts:
| Calories | 190 calories |
|---|---|
| Fat | 1 g |
| Fiber | 2 g |
