Homemade Almond Joys: a Taste of Paradise

- Unwrapping the Secret to the Ultimate Homemade Almond Joy
- Essential Ingredients for the Perfect Candy Bar Base
- Shaping and Dipping Your Homemade Tropical Confection
- Achieving the Perfect Texture: The Science of the Coconut Filling
- Troubleshooting Tips for Confectionery Success
- Keeping Your Coconut Candies Fresh: Storage Guide
- Beyond the Candy Dish: Creative Ways to Serve This Treat
- Recipe FAQs
- 📝 Recipe Card
Unwrapping the Secret to the Ultimate Homemade Almond Joy
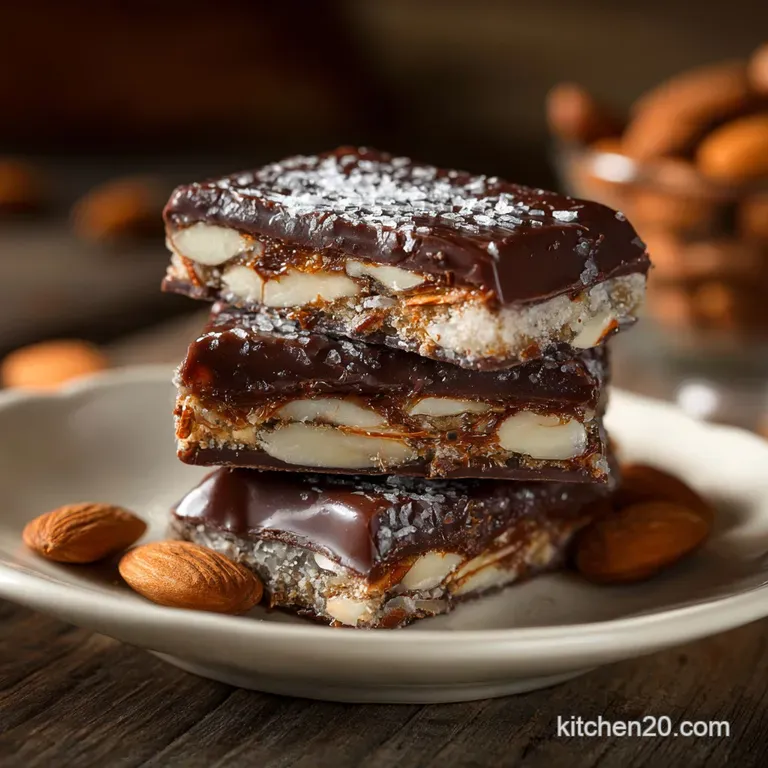
When you open the tin, the smell of dark chocolate and tropical coconut hits you immediately. It's a deeply comforting aroma, far richer and more complex than anything packaged in a shiny blue wrapper could ever deliver.
The texture of these [Homemade Almond Joys] is exactly what you want: a tender, creamy inside coated in a snappy, slightly bitter shell.
Seriously, store-bought candy bars are a total rip-off when you realize how ridiculously easy this is. This [Homemade Almond Joys Recipe] is a lifesaver because the prep takes about twenty minutes, and it uses kitchen staples you probably already have in the pantry.
You are building pure nostalgia, but better, and you can make a huge batch for the cost of three pre-made bars.
We aren't just making candy today; we are conquering the dreaded, seizing chocolate dip and achieving that perfect internal moisture level. Get your parchment paper ready because once you learn these simple tricks, you’ll never buy the commercial stuff again.
The Difference Between store-bought and Confectioner Grade
The biggest difference comes down to freshness, plain and simple. Commercial bars rely on stabilizers and waxes to keep the coconut from drying out over six months on a shelf. When you make them at home, using high-quality sweetened condensed milk provides that incredibly creamy, dense binder that is unbelievably moist and chewy.
Why You Should Skip the Mix and Make These Today
These are the easiest [Easy Candy Recipes Homemade] you will ever attempt. Unlike cookies or cakes, there's no oven involved, and the recipe is totally scalable. If you need a big batch of [Christmas Candy Recipes Homemade], you can easily double or triple this recipe without worrying about oven space.
Essential Ingredients for the Perfect Candy Bar Base
You don't need fancy ingredients for this, but quality matters, especially with the chocolate. Think of these three components coconut, binder, and chocolate as your foundation. If one is off, the whole candy bar suffers.
Choosing the Best Dark Chocolate Coating (Cacao Percentage Guide)
I always recommend dark chocolate for [Homemade Almond Joy Bars] because the filling is already intensely sweet. A dark chocolate around 60% to 70% cacao is your sweet spot; it provides bitterness to cut through the coconut richness. Avoid using anything under 50% unless you prefer a truly cloyingly sweet treat.
Toasted vs. Raw Almonds: Enhancing Nut Flavor
While the original commercial bars use raw almonds, toasting them quickly in a dry pan until they smell fragrant is a total game changer. Toasting enhances the nut flavor exponentially. If you are short on time, raw is fine, but trust me, spend the extra five minutes to get that warm, nutty depth.
Making It Dietary Friendly: dairy-free Coconut Filling Options
If you’re trying to avoid dairy, don't worry, you can still have homemade paradise! Sweetened condensed milk is the heart of the filling, but a thick, creamy substitute works well if you adjust the sugar content.
| Ingredient | Standard Ingredient | Viable Substitute |
|---|---|---|
| Binder | Sweetened Condensed Milk | Full fat coconut cream solids + Powdered Sugar |
| Coating | Dark Chocolate Chips | high-quality Vegan Dark Chocolate Bar |
| Nuts | Almonds | Pecan halves or small cashew pieces |
Shaping and Dipping Your Homemade Tropical Confection
This process has to happen in stages. Do not rush the chilling! My first attempt was a complete disaster because I tried to dip soft mounds, and they just dissolved into a horrifying chocolate sludge. Learn from my gooey past.
Phase 1: Mixing and Chilling the Coconut Log
In a large bowl, mix the condensed milk, vanilla, and salt until they are combined. Fold in the desiccated coconut aggressively until every single strand is coated and the mixture is sticky enough to hold its shape easily.
Scoop this mixture onto parchment lined baking sheets and form small, uniform ovals this consistency is crucial for clean dipping later. Chill the mounds for at least 90 minutes. They need to be solid, like little coconut bricks.
Phase 2: Mastering the Chocolate Dip (Avoid Clumping)
Chocolate is temperamental, so use a double boiler, or a heatproof bowl set over simmering water (not boiling!). Add the chopped chocolate and just a tiny bit of coconut oil for sheen and flow. Remove the bowl from the heat as soon as about two-thirds of the chocolate is melted; the residual heat will melt the rest.
Keep stirring slowly until it is silky smooth.
Phase 3: The Finishing Touch: Placing the Signature Almonds
Once the coconut base is chilled solid, press your two almonds firmly onto the top of each mound. This prepares the candy for dipping. Dip the chilled, firm mounds into the warm chocolate one-by-one.
Use a dipping fork (or two standard kitchen forks) to lower and lift them, tapping gently against the edge of the bowl to remove any excess chocolate. Immediately place the coated candy back on the parchment paper to set.
Chef's Note: If you are feeling extra fancy, sprinkle a tiny bit of flaky sea salt on the still wet chocolate coating. The salt provides a perfect savory pop against the sweetness of the filling.
Achieving the Perfect Texture: The Science of the Coconut Filling
The Crucial Role of Sweetened Condensed Milk in Binding
Sweetened condensed milk is the non-negotiable binder here because it contains a lot of sugar and fat, but minimal water. When the mixture chills, the milk fat solidifies and the high sugar content locks the coconut fibers together into a dense, moist block.
This prevents the coconut filling from tasting dry or falling apart when you try to dip it.
Why Particle Size Matters: Desiccated vs. Flaked Coconut
Always use finely desiccated coconut for the interior of [Homemade Almond Joy Candy]. The finer particle size allows the condensed milk to coat everything uniformly, creating a cohesive, fudgy interior.
Large coconut flakes, while beautiful on top, trap air and moisture unevenly, resulting in a more crumbly, less satisfying texture.
How to Prevent the Coconut Filling From Crumbling
The primary enemy of a clean, cohesive filling is lack of chilling time. If the filling mixture doesn't look sticky and dense before chilling, you might need to add another tablespoon of condensed milk. However, the true preventative measure is the 90 minute chill.
It must be rock solid before hitting the chocolate.
Handling Melted Chocolate Like a Professional Dipper
Quick Fixes for a Too-Soft Filling
If you pull your mounds out of the fridge and they still feel too soft, don’t panic! This usually means your kitchen is too warm, or perhaps your condensed milk was too watery.
The fix is simple: add 1 2 tablespoons of powdered sugar to the remaining coconut mixture, mix well, reshape, and return them to the freezer for 15 minutes. The sugar helps bind the excess moisture immediately.
Troubleshooting Tips for Confectionery Success
- The Chocolate Seized: If your chocolate turns thick, dull, and grainy, it means it got too hot or a tiny drop of water sneaked in. Fix: Try adding 1/2 teaspoon of coconut oil or vegetable oil and stir vigorously. Sometimes this can rescue a seize by reintroducing a necessary lubricant.
- My Mounds Are Falling Apart: They weren't cold enough, or you used too much flaked coconut. Next time, give them a full 2 hours in the fridge or 20 minutes in the freezer. Remember, cold coconut resists the heat of the chocolate.
- The Coating is Streaky (Bloom): This is usually due to poor tempering or drastic temperature change. When setting, ensure the candies don't go straight from warm room air into a deeply cold fridge. Let them cool in a slightly cooler spot first, then transfer them to the fridge to set completely.
Keeping Your Coconut Candies Fresh: Storage Guide
Short Term Refrigeration: Extending Shelf Life
These [Homemade Almond Joy Bites] are best stored in an airtight container in the refrigerator. They will easily last for 7 to 10 days, though they seldom last that long! The coconut flavor actually deepens slightly over the first couple of days.
But does it freeze well? You bet. Place the fully set candies in a freezer safe, airtight container, separated by sheets of parchment paper. They will last perfectly for up to 3 months. When you want a treat, pull them out and let them thaw slowly in the refrigerator overnight.
Do not try to thaw them on the counter, as the sudden humidity change can cause condensation (and potential sugar bloom) on the chocolate shell.
Beyond the Candy Dish: Creative Ways to Serve This Treat
These aren’t just for snacking; they elevate a dessert spread. If you are having a dinner party, serve these cut in half on a small white plate, drizzled with a rich dark caramel sauce. They pair beautifully with a post dinner espresso.
Alternatively, crush two or three of these bars and use them as a topping for vanilla ice cream, or mix them into a plain cheesecake crust for a tropical twist. If you’re hosting friends who are avoiding carbs, pair these rich candies with a slice of a savory low-carb bread, maybe even some of my famous Keto Buns: Best Fluffy Low Carb Almond Flour Sandwich Rolls for a sophisticated, contrasting snack board.

Recipe FAQs
Why is my coconut filling dry or crumbly?
This issue often arises if you've used unsweetened desiccated coconut without adjusting the liquid ratio, or if the mixture wasn't compacted properly before chilling. Ensure you use the precise amount of sweetened condensed milk specified, and firmly press the mixture into your molds or tray to ensure a cohesive, moist bar.
Proper compaction and adequate liquid are essential for the signature tender texture.
Do I have to temper the chocolate for the coating?
Tempering the chocolate is highly recommended if you desire a professional looking, glossy finish and a satisfying snap that resists melting at room temperature. If you skip this step, the chocolate may develop unattractive gray streaks, known as bloom, and will soften very quickly when handled.
For convenience, you can use high-quality chocolate melting wafers which are formulated not to require tempering.
Can I make this recipe vegan or dairy-free?
Yes, this recipe adapts beautifully to dairy-free diets by substituting the sweetened condensed milk with sweetened condensed coconut milk, which provides the identical rich texture. Ensure you also select a high-quality, dairy-free dark chocolate for the coating, as many standard varieties contain milk solids.
The rest of the ingredients, primarily coconut and almonds, are naturally vegan.
How should I store the finished Homemade Almond Joys, and how long do they last?
For optimal freshness and stability, store the finished candies in an airtight container in the refrigerator, where they will maintain quality for up to two weeks. While they can be kept at a cool room temperature (below 70°F) for 4-5 days, refrigeration prevents the coconut filling from softening too much.
Always layer them with parchment paper to prevent the chocolate coating from sticking.
Can I use milk chocolate instead of dark chocolate for the shell?
You may certainly use milk chocolate, but be aware that it will result in a significantly sweeter candy overall. The dark chocolate specified (around 60% cocoa) is crucial as it balances the intense sweetness of the condensed milk and coconut filling.
If switching to milk chocolate, consider reducing the sugar content slightly in your coconut mixture to maintain balance.
Can I freeze the Homemade Almond Joy bars?
Absolutely, these candies freeze exceptionally well, extending their shelf life for up to three months. Once fully set, place the bars in a freezer safe, airtight container, using parchment paper between layers to protect the chocolate coating.
To thaw, move them gradually to the refrigerator overnight to prevent condensation from forming on the chocolate surface.
My chocolate coating seized (turned thick and grainy). What went wrong?
Chocolate seizes instantly when even a tiny drop of water or steam is introduced while melting, disrupting the cocoa solids and causing the mixture to clump. To prevent this, always melt your chocolate in a dry bowl over simmering, not boiling, water, ensuring the bowl does not touch the water surface.
Using microwave safe tempering methods on low power can also help avoid accidental seizure.
Easy Homemade Almond Joys Recipe

Ingredients:
Instructions:
Nutrition Facts:
| Calories | 526 kcal |
|---|---|
| Protein | 11.7 g |
| Fat | 40.9 g |
| Carbs | 40.8 g |
