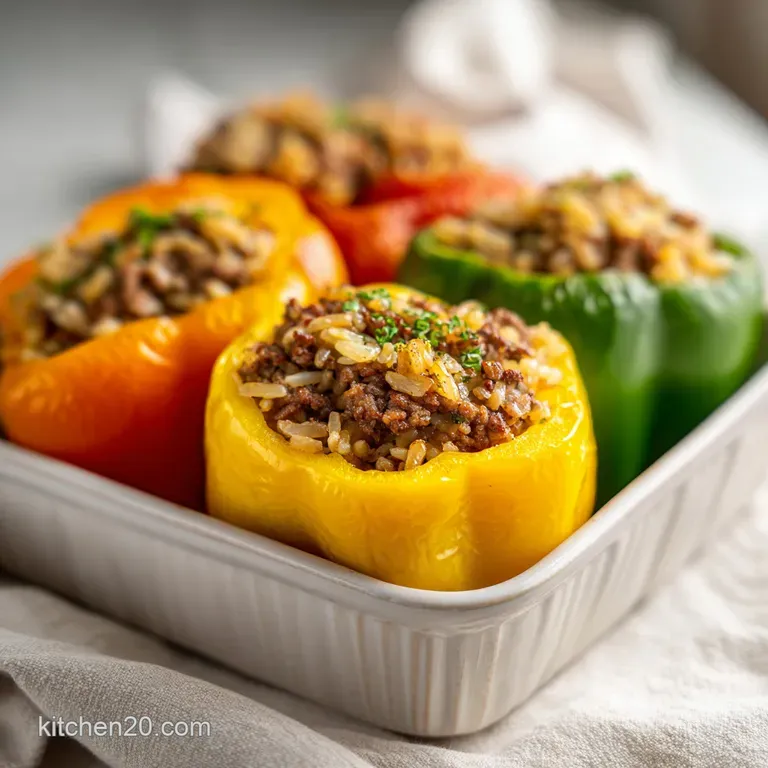
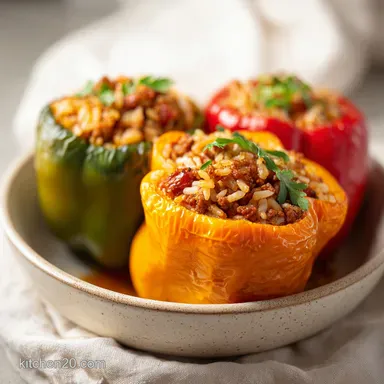
Stuffed Peppers: Tender and Savory
- Time: Active 20 minutes, Passive 45 minutes, Total 65 minutes
- Flavor/Texture Hook: Charred, cheesy, and savory with a melt in-your mouth beef filling
- Perfect for: Weeknight meal prep and family dinners
- The Best Way To Make Stuffed Peppers
- Why This Recipe Works For You
- Component Analysis and Ingredient Roles
- The Essential Elements and Substitutes
- Minimal Appliance and Tool Setup
- Step by Step Implementation
- Avoiding Common Kitchen Errors
- Scaling the Recipe Up or Down
- Debunking Stuffed Pepper Logic
- Preservation and Reheating Tactics
- Plating and Pairing Ideas
- Recipe FAQs
- 📝 Recipe Card
The Best Way To Make Stuffed Peppers
We have all been there, you pull a tray of beautiful peppers out of the oven, the cheese is bubbling, and the smell is incredible. Then you take that first bite and your teeth hit a grain of rice that feels like a literal pebble.
It is frustrating because you did everything the recipe said, yet the textures are completely out of alignment. Either the rice is undercooked, or you have cooked it so long that the bell pepper has turned into a translucent, watery mess that slides right off your fork.
I used to think the answer was boiling the peppers first, but that just creates more dishes and leads to those dreaded "soggy bottoms." After streamlining my process, I realized the fix is actually about managing moisture and heat in two distinct phases.
We want the pepper to soften enough to be tender but still hold its shape like a sturdy edible bowl. This recipe solves the texture gap by using pre cooked rice and a specific foil steaming step that ensures everything finishes at the exact same moment.
This isn't just a recipe, it is a system for a consistent weeknight win. By using fire roasted tomatoes and a touch of smoked paprika, we get a depth of flavor that usually takes hours of simmering, but here, it happens in about an hour.
If you are tired of watery fillings and crunchy rice, this is the targeted fix you have been looking for. Let's get into the mechanics of why this specific approach actually works every single time.
Why This Recipe Works For You
Moisture Equilibrium: Covering the dish with foil for the first 30 minutes creates a steam chamber that softens the pepper skins without drying out the meat.
Baking Soda Buffer: Adding a pinch of baking soda to the raw beef helps it retain moisture and stay velvety even during the long bake time.
Starch Stability: Using cooled, pre cooked rice prevents the grains from absorbing too much tomato juice and turning into a gummy paste.
Thermal Stability: Trimming the pepper bottoms provides a flat base, ensuring even heat distribution and preventing the peppers from tipping over and spilling their juices.
| Method | Cook Time | Texture Result | Best For |
|---|---|---|---|
| Oven (This Recipe) | 45 minutes | Tender pepper, charred cheese | Traditional family dinner |
| Stovetop | 35 minutes | Softer pepper, no cheese crust | Hot summer days |
| Air Fryer | 20 minutes | Firm pepper, very crispy top | Quick solo meals |
When you choose the oven method, you are opting for that specific Maillard reaction on the cheese that you just cannot get on the stove. While the stovetop is faster, it tends to "stew" the peppers rather than roast them, which can lead to a more muted flavor profile. If you're interested in a different texture profile, you might enjoy my roasted red pepper technique for a silkier finish.
Component Analysis and Ingredient Roles
The success of a stuffed pepper depends on how the filling interacts with the vegetable vessel. If the filling is too lean, it becomes a dry brick. If it is too fatty, the pepper fills with grease. We use a 90/10 lean ground beef mix combined with a few smart additions to keep the interior light and savory.
The fire roasted tomatoes provide a smoky acidity that cuts through the richness of the sharp cheddar.
| Ingredient | Science Role | Pro Secret |
|---|---|---|
| Ground Beef | Provides structural protein | Mix with baking soda 15 mins before cooking to keep it tender. |
| Bell Peppers | Acts as a moisture trapping vessel | Use peppers with 4 lobes at the bottom for better stability. |
| Rice | Absorbs excess tomato moisture | Use day old rice so the grains stay separate and distinct. |
| Tomato Paste | Emulsifies the sauce and adds depth | Sauté it with the garlic to "bloom" the flavor and remove raw tinny notes. |
Using cooled rice is a non negotiable step here. When rice is freshly cooked, the starches are still very active and sticky. If you throw hot, wet rice into this filling, it will continue to break down in the oven, leaving you with a filling that feels more like porridge than a structured meat and grain mix.
By using rice that has had time to chill, the grains have undergone retrogradation, meaning they will hold their shape even as they soak up the savory beef juices.
The Essential Elements and Substitutes
To get this right, you need 6 large bell peppers. I prefer a mix of red, orange, and yellow because they have a higher sugar content and caramelize better than green ones. You'll also need 1 lb of lean ground beef and 2 cups of cooked long grain white rice.
The seasoning profile is built on 1 tsp of dried oregano, 0.5 tsp of smoked paprika, and 1 tbsp of Worcestershire sauce.
- 6 large bell peppers: Use any color, but red is sweetest. Why this? They provide the perfect vessel size for a single serving.
- Substitute: Large poblano peppers for a spicier, more earthy kick.
- 1 lb lean ground beef: 90% lean is the sweet spot. Why this? Enough fat for flavor without making the pepper greasy.
- Substitute: Ground turkey (add 1 tbsp olive oil to compensate for lower fat).
- 2 cups cooked white rice: Long grain is best. Why this? Stays fluffier than short grain varieties during the second bake.
- Substitute: Quinoa or cauliflower rice for a lower carb profile.
- 14.5 oz fire roasted tomatoes: Drained slightly. Why this? Adds a charred flavor that mimics an outdoor grill.
- Substitute: Regular diced tomatoes with a drop of liquid smoke.
- 1.5 cups shredded sharp cheddar: Freshly grated if possible. Why this? Melts smoother and has a punchier flavor than mild cheddar.
- Substitute: Monterey Jack or a vegan meltable cheese alternative.
- 0.25 tsp baking soda: Why this? It raises the pH of the meat to prevent protein bonding, keeping it juicy.
| Original Ingredient | Substitute | Why It Works |
|---|---|---|
| Ground Beef (1 lb) | Ground Turkey (1 lb) | Similar protein structure. Note: Result is leaner and slightly drier. |
| White Rice (2 cups) | Cooked Quinoa (2 cups) | High protein and nutty flavor. Note: Filling will be more crumbly. |
| Sharp Cheddar | Pepper Jack | Same melting point. Note: Adds significant spice to the final bite. |
If you are going for a more colorful vegetable feast, you can easily swap the beef for a mixture of black beans and corn. Just keep the moisture ratios the same so the filling doesn't become a soup inside the pepper. The goal is a cohesive, scoopable interior that holds together when you cut the pepper in half.
Minimal Appliance and Tool Setup
One of the reasons I love this meal is that it doesn't require a mountain of gadgets. You need a large skillet (at least 12 inches) to brown the meat and onions properly. A 9x13 inch baking dish is the standard size for six peppers.
You will also need a large mixing bowl to combine the filling components, as trying to stir everything in the skillet usually results in rice flying all over your stovetop.
Chef Tip: Use a grapefruit spoon or a small measuring spoon to scrape out the ribs and seeds of the peppers. It is much more efficient than using a knife and prevents you from accidentally piercing the bottom of the pepper.
Keep a roll of heavy duty aluminum foil handy. The "steaming" phase is what makes or breaks the texture of the pepper walls. If the foil isn't tight, the moisture escapes, and you end up with peppers that are charred on the outside but still tough and "leathery" on the inside.
A good seal is the difference between a mediocre meal and a velvety success.
step-by-step Implementation

- Preheat and Prep. Set your oven to 375°F (190°C). Slice the tops off the bell peppers, remove ribs and seeds, and trim the bottoms slightly if necessary for stability. Rub the exterior with olive oil and salt. Note: Salting the skin now ensures the pepper itself isn't bland.
- Tenderize the Meat. Mix the ground beef with the baking soda and a pinch of salt. Let it sit for 15 minutes while you dice your onions and garlic.
- Sear the Beef. In a large skillet over medium high heat, brown the ground beef and diced onions until the meat is deeply browned and onions are translucent.
- Bloom the Aromatics. Stir in minced garlic and tomato paste for 1 minute until the paste turns a dark brick red. Note: This removes the metallic taste from the paste.
- Mix the Filling. In a large mixing bowl, combine the beef mixture, cooked rice, diced tomatoes, Worcestershire sauce, oregano, and smoked paprika. Fold together until the mixture is evenly coated and cohesive.
- Prepare the Base. Pour the 0.5 cup of tomato sauce into the bottom of your 9x13 inch baking dish. This creates a moist environment and prevents the peppers from sticking.
- Stuff the Vessels. Stuff each pepper generously with the filling, pressing down slightly to ensure there are no air pockets, and place them upright in the dish.
- The Steam Phase. Cover the dish tightly with aluminum foil. Bake for 30 minutes until the peppers are tender when pierced with a fork.
- The Cheese Phase. Remove the foil, top each pepper with the shredded cheddar cheese, and bake uncovered for an additional 15 minutes until the cheese is melted, bubbly, and starting to brown.
- Garnish and Rest. Let the peppers sit for 5 minutes before serving. Sprinkle with fresh parsley to add a pop of brightness and color.
Avoiding Common Kitchen Errors
The most common failure in stuffed peppers is managing the liquid. If your filling is too wet, it will boil the pepper from the inside out, leading to a structural collapse. If it is too dry, you'll be reaching for a glass of water with every bite.
The fire roasted tomatoes should be drained slightly, but don't squeeze them bone dry. You need that little bit of juice to hydrate the rice as it heats back up.
Why Your Peppers Are Bitter
If you are using green peppers, they naturally have a more bitter profile because they are technically unripe. However, if your red or yellow peppers taste bitter, it is usually because the "ribs" (the white pith inside) weren't fully removed. That pith contains most of the bitterness.
Take the extra 30 seconds to scrape it clean.
Managing the Steam Trap
If you find a pool of water at the bottom of your peppers after baking, it means the peppers released their internal moisture but it had nowhere to go. To prevent this, make sure your filling isn't packed so tightly that it acts as a waterproof plug.
A firm but slightly airy pack allows steam to circulate through the rice and meat.
Internal Seasoning Check
Many people forget to season the inside of the pepper itself. Before you put the filling in, sprinkle a tiny pinch of salt into the empty pepper cavity. This ensures that every layer of the dish is seasoned, not just the meat mixture. It makes a massive difference in the final flavor profile.
| Problem | Root Cause | Solution |
|---|---|---|
| Crunchy Rice | Using raw rice or not enough liquid | Always use pre cooked rice and ensure the dish is tightly sealed with foil. |
| Soggy Peppers | Overcooking or too much sauce in the dish | Stick to the 30 minute covered limit and drain tomatoes well. |
| Bland Filling | Under seasoning the beef | Brown the beef deeply to develop flavor and don't skip the Worcestershire. |
Common Mistakes Checklist
- ✓ Ensure the oven is fully preheated to 375°F (190°C) before the tray goes in.
- ✓ Pat the peppers dry after washing to ensure the olive oil and salt stick to the skin.
- ✓ Don't use "instant" rice; it lacks the structure to hold up during a 45 minute bake.
- ✓ Check that your baking dish is small enough that the peppers support each other but large enough that they aren't crushed.
- ✓ Let the meat rest after browning before mixing with the cold rice to prevent the rice from clumping.
Scaling the Recipe Up or Down
When you need to feed a crowd, doubling this recipe is straightforward, but you must be careful with the spices. If you double the peppers to 12, only use 1.5 times the salt and smoked paprika initially, then taste the filling. Spices can become overwhelming when doubled linearly.
Use two separate 9x13 dishes rather than trying to cram everything into one giant pan, as airflow is crucial for even cooking.
If you are cooking for just two people, I still recommend making the full batch of filling. It freezes beautifully. You can freeze the meat and rice mixture in a freezer bag for up to 3 months. When you're ready for a quick dinner, just thaw the filling, prep two fresh peppers, and bake as directed.
You'll need to reduce the initial bake time by about 5 minutes since there is less thermal mass in the oven.
For those using smaller ovens or toaster ovens, you may need to reduce the temperature to 350°F (180°C) and extend the time by 10 minutes. Smaller spaces circulate heat more aggressively, which can burn the tops of the peppers before the centers are hot.
Always place the tray in the center of the oven to avoid hot spots.
| Servings | Pepper Count | Meat Amount | Rice Amount | Pan Size |
|---|---|---|---|---|
| 2 People | 2 large | 1/3 lb | 2/3 cup | 8x8 inch |
| 6 People | 6 large | 1 lb | 2 cups | 9x13 inch |
| 12 People | 12 large | 2 lbs | 4 cups | Two 9x13 inch |
Debunking Stuffed Pepper Logic
There is a long standing myth that you must blanch your peppers in boiling water before stuffing them. This is an outdated technique from a time when oven temperatures were less reliable. Blanching actually ruptures the cell walls of the pepper prematurely, leading to that "slumped over" look and a watery texture.
The foil steam method in this recipe achieves the same tenderness while preserving the pepper's structural integrity and flavor.
Another misconception is that the meat needs to be fully cooked through before it goes into the oven. While we brown it for flavor (the Maillard reaction), the 45 minutes of total oven time is more than enough to cook the beef.
The real reason we sear it in the skillet is to develop those savory, browned bits and to soften the onions. If you put raw meat and raw onions directly into a pepper, the onions will stay crunchy and the meat will steam into a gray, unappealing ball.
Preservation and Reheating Tactics
Stuffed peppers are a meal prep hero. They actually taste better on day two because the spices in the filling have had time to penetrate the rice grains. Store them in an airtight container in the fridge for up to 4 days. When reheating, the microwave is efficient, but the oven is better.
If using the microwave, cut the pepper in half first to ensure the center gets hot without overcooking the outer edges.
For the zero waste cook, don't throw away those pepper tops! Dice them up and sauté them with the onions for the filling, or save them for a morning omelet. If you have leftover filling but no peppers, it makes an incredible "unstuffed pepper" bowl.
Just heat it up in a pan with a little extra tomato sauce and serve it with a dollop of sour cream.
- Fridge: Store in a sealed container for up to 4 days.
- Freezer: Freeze the stuffed (but unbaked) peppers for up to 3 months. Bake from frozen at 350°F (180°C) for 60-75 minutes.
- Zero Waste: Use the pepper "ribs" and leftover stems to flavor homemade vegetable stock.
Plating and Pairing Ideas
These peppers are a complete meal on their own, but if you want to stretch the serving, a simple side makes a big difference. A crisp green salad with a sharp vinaigrette provides a necessary acidic contrast to the rich, cheesy peppers.
Alternatively, a side of garlic bread is perfect for mopping up any of the tomato sauce left in the bottom of the dish.
If you are serving this for a dinner party, try using a variety of colors and garnish heavily with fresh herbs. The visual appeal of a bright red, yellow, and orange platter is hard to beat. You can also drizzle a little bit of high-quality balsamic glaze over the top just before serving to add a sophisticated sweetness that complements the charred pepper skins. For more inspiration on using peppers as a centerpiece, check out these colorful vegetable feast ideas.
If you want a Mediterranean vibe, do this:
- Swap the cheddar for feta cheese.
- Replace the oregano with fresh mint and dill.
- Use ground lamb instead of beef for a richer, gamier flavor.
If you want a Tex Mex twist, do this:
- Add a small can of diced green chiles to the beef.
- Use Pepper Jack cheese instead of cheddar.
- Top with crushed tortilla chips for the last 5 minutes of baking for an extra "shatter" of texture.
If you want a lighter version, do this:
- Use ground turkey and quinoa.
- Double the amount of onions and add finely diced zucchini to the filling.
- Use a light sprinkle of parmesan instead of a heavy layer of cheddar.

Recipe FAQs
Should peppers be cooked before stuffing?
No, they do not need pre-cooking. You will steam them inside the oven for 30 minutes while covered in foil and then bake them uncovered for another 15 minutes, which perfectly softens the pepper while keeping it sturdy.
What are some common mistakes when making stuffed peppers?
Using instant rice is a major error. It lacks the structural integrity required for a 45-minute bake and will turn into mush; always use long grain white rice instead. If you prefer a faster meal, try our deconstructed one-pan dinner which skips the stuffing step entirely.
What is the filling for stuffed peppers?
The core filling consists of browned ground beef, cooked rice, and aromatics. You combine the beef pre-treated with baking soda for tenderness with onions, garlic, fire roasted tomatoes, tomato paste, Worcestershire sauce, oregano, and smoked paprika.
What fillings go well in bell peppers?
Lean ground beef and long grain rice are the standard pairing. This classic combination absorbs the flavors of the tomato paste and smoky paprika perfectly during the baking process.
How to ensure the peppers stay upright in the baking dish?
Trim a thin sliver off the bottom of the pepper to create a flat base. Additionally, select a baking dish size where the peppers fit snugly against one another to provide mutual support during the 45-minute cook time.
Is it true the beef needs to be mixed with baking soda?
Yes, this is a vital technique for texture. Mixing 0.25 teaspoons of baking soda into the pound of beef before browning helps the meat retain moisture and prevents it from becoming tough during the final bake.
How to achieve the perfect cheesy crust on top?
Add the sharp cheddar during the final 15 minutes of baking. Keeping the foil off during this stage allows the cheese to melt and bubble into a golden crust without over steaming the peppers themselves.
Easy Stuffed Peppers
Ingredients:
Instructions:
Nutrition Facts:
| Calories | 404 kcal |
|---|---|
| Protein | 25.2 g |
| Fat | 19.1 g |
| Carbs | 32.8 g |
| Fiber | 3.2 g |
| Sugar | 6.4 g |
| Sodium | 485 mg |
