Sweet and Sour Chicken: Crispy and Tangy

- Time: Active 15 minutes, Passive 15 minutes, Total 30 minutes
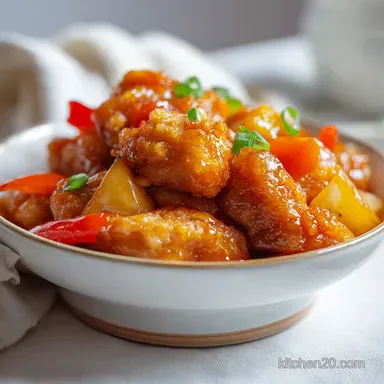
- Flavor/Texture Hook: Shattering crisp coating with a glossy, zingy honey pineapple glaze
- Perfect for: High speed weeknight dinners when you crave takeout but want better quality
- Better Than-Takeout Easy Sweet and Sour Chicken
- The Secret To Sticky Glazes
- Ingredient Deep Dive
- Shopping List For The Best Sauce
- Tools Needed For Quick Success
- Simple Steps For Perfect Chicken
- Troubleshooting Your Sticky Stir Fry
- Flavor Swaps For Creative Cooks
- Storing And Using Your Leftovers
- Best Sides To Serve Tonight
- Kitchen Myths Debunked
- High in Sodium
- Recipe FAQs
- 📝 Recipe Card
Better Than Takeout Easy Sweet and Sour Chicken
Right then, let's talk about that specific sound. You know the one the high pitched, satisfying "clack" of a wooden spoon hitting a piece of chicken that has been seared to absolute perfection. I remember the first time I tried making this in my first tiny apartment.
I had one dull knife, a pan that leaned slightly to the left, and a serious craving for the Sweet and Sour Chicken from the place down the street. I used to think the secret was a deep fryer and a gallon of red dye, but I was so wrong.
My first attempt was a soggy, pink mess because I tried to use a thick flour batter that just soaked up the sauce like a sponge.
The real magic happened when I ditched the heavy batter and started treating the chicken like a science project. When you toss those chunks in cornstarch and hit a hot pan with just enough oil, the aroma that fills the kitchen is unbelievable.
It is that sharp, bright scent of apple cider vinegar hitting the ginger and garlic, immediately followed by the tropical sweetness of the pineapple. It's the kind of smell that brings people into the kitchen asking, "How much longer?" before you've even finished the sauce.
This version is designed for those of us who have zero interest in cleaning up oil splatters from a deep fryer on a Tuesday night. We are going for a minimal tool approach that relies on heat and timing rather than complicated equipment.
You get that shattering crust, the tender interior, and a sauce that actually tastes like fruit and honey instead of just corn syrup. It is brilliant, fast, and honestly, once you see how the sauce goes from a murky liquid to a translucent, ruby red glaze in seconds, you'll never go back to the plastic containers again.
The Secret To Sticky Glazes
Starch Hydration: The cornstarch on the chicken absorbs the meat's surface moisture, creating a dry exterior that crisps instantly in hot oil.
Enzymatic Balance: Pineapple juice contains acidity that cuts through the richness of the chicken, while the sugars in the honey provide the "tack" needed for the sauce to cling to the meat.
The Slurry Mechanism: Adding a cold water and cornstarch mixture to a boiling liquid causes the starch granules to swell and trap water, creating that iconic thick, glossy finish without altering the flavor profile.
| Thickness | Internal Temp | Rest Time | Visual Cue |
|---|---|---|---|
| 1 inch chunks | 165°F (74°C) | 2 minutes | Golden edges and opaque center |
| 1.5 inch chunks | 165°F (74°C) | 3 minutes | Deep golden crust; firm to touch |
| 0.5 inch strips | 165°F (74°C) | 1 minute | Quick browning; white throughout |
Getting the chicken right is all about the "sear and clear" method. You want the pan screaming hot so the chicken develops a crust before it has time to release its juices and steam. If you see liquid pooling in the pan, you've overcrowded it, and that's the fastest way to lose the crunch we worked so hard for.
Ingredient Deep Dive
| Ingredient | Science Role | Pro Secret |
|---|---|---|
| Cornstarch | Moisture Barrier | Use it for both the coating and the sauce to keep the textures consistent. |
| Apple Cider Vinegar | Acid Catalyst | This provides the "sour" note and helps tenderize the peppers slightly during the quick stir fry. |
| Honey | Viscosity Agent | Unlike white sugar, honey creates a smoother, silkier glaze that doesn't crystallize as it cools. |
| Tomato Paste | Umami & Color | This gives the sauce its deep red hue and a savory backbone without needing artificial dyes. |
When you are looking at these components, think of them as a team. The cornstarch is the armor for your chicken, protecting the delicate meat from the high heat of the skillet. The white pepper is a subtle touch, but it provides a floral heat that black pepper just can't match in this specific Sweet and Sour Chicken context.
Shopping List For The Best Sauce
- Chicken Breasts (1.5 lbs): Cut these into uniform 1 inch chunks. Why this? Ensures even cooking so no piece is dry while others are raw.
- Cornstarch (0.5 cup + 1 tbsp): You will use the bulk for coating and a tiny bit for the slurry. Why this? Creates a thinner, crispier crust than flour.
- Salt (0.5 tsp) & White Pepper (0.25 tsp): Essential for seasoning the coating.
- Red & Green Bell Peppers (1 each): Diced into large pieces. Why this? Provides color contrast and a satisfying crunch.
- White Onion (0.5 large): Cut into "petals" or large squares.
- Pineapple Chunks (1 cup): Fresh is great, but canned in juice works perfectly.
- Pineapple Juice (0.25 cup): Reserved from the can or fresh.
- Garlic (3 cloves): Minced finely for maximum infusion.
- Ginger (1 tsp): Freshly grated is a must here.
- Apple Cider Vinegar (0.25 cup): The "sour" element.
- Low Sodium Soy Sauce (0.33 cup): Adds the necessary salt and umami.
- Honey (0.25 cup): The natural "sweet" element.
- Tomato Paste (2 tbsp): For body and color.
- Vegetable Oil (2 tbsp): High smoke point for searing.
For the chicken, I prefer breasts because they stay lean and take on the sauce flavor beautifully, but if you're a fan of richer meat, boneless thighs are a great swap. Just keep in mind they might need an extra minute or two in the pan.
Tools Needed For Quick Success
You don't need a professional kitchen for this. I usually reach for my heavy bottomed 12 inch non stick skillet or a carbon steel wok if I’m feeling fancy. The goal is surface area. You want enough room for the chicken to sit in a single layer without overlapping.
If the pieces touch too much, they'll steam each other, and you'll end up with "Sweet and Soggy Chicken," which is a tragedy.
A microplane is also your best friend for the ginger. Don't bother peeling it with a knife just use the edge of a spoon to scrape the skin off, then grate it right into the pan.
For the sauce, a small whisk helps get the tomato paste and honey fully integrated so you don't have any weird clumps in your final dish.
Simple Steps For Perfect Chicken

Phase 1: Prepping For High Speed
- Whisk the sauce base. Combine the apple cider vinegar, low sodium soy sauce, honey, tomato paste, and 0.25 cup pineapple juice in a small bowl. Whisk until the tomato paste is completely dissolved and the mixture is smooth. Note: Doing this first allows the flavors to meld while you prep the rest.
- Coat the chicken. In a large bowl, toss your 1.5 lbs of chicken chunks with 0.5 cup cornstarch, salt, and white pepper. Toss until every nook and cranny is white and chalky, then shake off the excess. Note: Shaking off the excess prevents the oil from turning into a thick paste.
Phase 2: Achieving The Perfect Crunch
- Sear the chicken. Heat 2 tablespoons of vegetable oil in your skillet over high heat. Add the chicken in a single layer. Cook for 5-7 minutes without moving them too much until a shattering golden crust forms on all sides. Note: If your pan is small, do this in two batches to maintain the heat.
- Remove and rest. Take the chicken out of the pan and set it on a plate. It should be cooked through but will stay juicy as it sits for a moment.
Phase 3: Finishing The Glossy Sauce
- Sauté the aromatics. In the same pan (don't wash it!), toss in the bell peppers and onion petals. Stir fry for 2-3 minutes until they are bright and tender crisp.
- Add the flavor boosters. Throw in the garlic, ginger, and pineapple chunks. Sauté for 60 seconds until you can smell the garlic throughout the house.
- Create the slurry. In a tiny cup, mix 1 tablespoon of cornstarch with 2 tablespoons of cold water until it looks like milk.
- Thicken the sauce. Pour the sauce base into the pan with the veggies. Once it starts to bubble, pour in the cornstarch slurry. Stir constantly for about 30 seconds until the sauce turns clear and glossy.
- The final toss. Return the crispy chicken to the pan. Toss for 10-15 seconds just to coat every piece and serve immediately. Note: Don't let it simmer too long or the crust will soften!
Troubleshooting Your Sticky Stir Fry
Why is my sauce too thin?
If your sauce looks like soup rather than a glaze, it usually means the cornstarch slurry didn't get hot enough to "activate." The starch needs to reach a simmer to swell and thicken the liquid. Another culprit could be too much moisture from the vegetables.
If you notice a lot of water at the bottom of the pan before adding the sauce, let it evaporate off for a minute on high heat.
| Problem | Root Cause | Solution |
|---|---|---|
| Soggy chicken | Overcrowded pan or low heat | Sear in smaller batches on high heat; don't move the meat too early. |
| Sauce is cloudy | Slurry added too early or not boiled | Ensure the sauce base is simmering before adding the slurry; stir until clear. |
| Bitter flavor | Burnt garlic or ginger | Add aromatics last and only cook for 60 seconds before adding liquids. |
Why did my breading fall off in the pan?
This usually happens if the chicken was too wet before you added the cornstarch, or if the oil wasn't hot enough. The cornstarch needs to instantly bond with the heat to create that shell. If the oil is lukewarm, the starch just slides off into a gooey mess.
Always wait until the oil shimmers or a tiny pinch of starch sizzles instantly when dropped in.
Common Mistakes Checklist:
- ✓ Pat the chicken chunks dry with a paper towel before tossing in cornstarch.
- ✓ Ensure the oil is shimmering hot before the first piece of chicken hits the pan.
- ✓ Don't skip the slurry; it's the only way to get that professional "cling" on the sauce.
- ✓ Use a large enough pan; if the chicken pieces are touching, they will steam instead of fry.
- ✓ Serve the dish immediately after tossing; the clock starts ticking on the crunch the moment the sauce hits the chicken!
Flavor Swaps For Creative Cooks
If you are looking to change things up, this recipe is incredibly flexible. For those who want a bit of heat, adding a teaspoon of red chili flakes or a dollop of sambal oelek to the sauce base is a fantastic move. It balances the honey perfectly and gives it more of a "Dragon Chicken" vibe.
If you're in the mood for something different but equally sticky, you might enjoy this Sweet and Sour Sauce for Meatballs which uses similar principles but is tailored for beef or pork.
| Original Ingredient | Substitute | Why It Works |
|---|---|---|
| Honey | Brown Sugar | Adds a deeper, molasses like sweetness but may feel slightly grainier. |
| Apple Cider Vinegar | Rice Vinegar | A more traditional Chinese flavor profile; slightly less "fruity" than cider vinegar. |
| Pineapple Chunks | Mango Chunks | Provides a similar sweetness and texture but with a creamier mouthfeel. Note: Mango softens faster than pineapple. |
Chef's Tip: If you want an extra shattering crust, freeze your chicken chunks for 10 minutes before coating them in cornstarch. The cold temperature helps the starch adhere better and creates a more dramatic temperature shock when it hits the hot oil.
Storing And Using Your Leftovers
Let's be honest, Sweet and Sour Chicken is best eaten the second it's made. However, if you have leftovers, they’ll keep in an airtight container in the fridge for up to 3 days. The crust will lose its crunch as it absorbs the sauce, but the flavor actually deepens over time.
To reheat, I highly recommend using an air fryer at 350°F (180°C) for about 5 minutes. It’s the only way to bring back some of that original texture.
For freezing, you can freeze the cooked chicken and the sauce separately for up to 2 months. Don't freeze them together, or the breading will turn into mush when it thaws. When you're ready to eat, thaw them overnight in the fridge, crisp the chicken in a pan or air fryer, and then toss with the warmed sauce.
Regarding zero waste: don't throw away those bell pepper scraps or the ends of the onion! I keep a bag in my freezer for "veggie scraps" that I eventually turn into a quick stock. Even the pineapple core can be chopped finely and boiled with a little water and sugar to make a simple syrup for cocktails or soda.
Best Sides To Serve Tonight
This dish screams for a neutral base to soak up all that extra honey glaze. A simple bowl of fluffy jasmine rice or even some quick cooked rice noodles works wonders. If you want to keep the "minimal tool" theme going, you can even steam some broccoli right in the microwave while the chicken is searing.
If you're looking for a complete meal experience, start with a light appetizer. On a cold day, I love pairing this with a bowl of Chicken Noodle Soup to balance the sweetness of the main dish with a savory, salty broth. It might sound like a weird combo, but the contrast between the sticky sweet chicken and the clear, herb forward soup is actually quite refreshing.
Decision Shortcut: Choosing Your Style
- If you want maximum crunch, use slightly more cornstarch and double fry the chicken (sear, remove, then sear again for 1 minute).
- If you want a healthier version, skip the cornstarch coating on the chicken and just sauté it plainly before adding the sauce.
- If you want a party style appetizer, cut the chicken into tiny half inch popcorn bites and serve them with the sauce as a dip on the side.
Kitchen Myths Debunked
One of the biggest myths is that you need a deep fryer for "real" Sweet and Sour Chicken. That's just not true. A shallow fry in a high-quality skillet actually gives you more control over the browning and prevents the chicken from becoming an oil soaked sponge.
Another misconception is that the bright red color comes from the pineapple or vinegar. In most restaurants, it is food coloring. In our kitchen, we use tomato paste. It provides the color plus an actual layer of flavor that food dye simply cannot offer. Trust the paste!
Finally,, don't believe the lie that fresh pineapple is always better than canned. While fresh pineapple is delicious, canned pineapple is consistent in its acidity and sweetness, and you get the bonus of the juice which is essential for our sauce base.
It's a shortcut that actually preserves the quality of the final dish.

High in Sodium
842 mg 842 mg (37% 37%)
The American Heart Association recommends limiting sodium intake to no more than 2,300mg per day, with an ideal limit of less than 1,500mg for most adults.
Tips to Reduce Sodium
-
Switch to Low-Sodium Soy Sauce-20%
Replace the standard soy sauce with a low-sodium version. This is a significant contributor to the recipe's sodium content.
-
Halve the Added Salt-12%
Reduce the amount of added salt by half. You can always add a pinch more at the table if needed.
-
Use Fresh Pineapple-5%
If using canned pineapple, opt for fresh pineapple chunks instead. Canned fruits can sometimes have added sodium.
-
Embrace Aromatics
Increase the amounts of fresh garlic and ginger, and consider adding other sodium free aromatics like onions and bell peppers.
-
Spice It Up Naturally
Use a variety of herbs and spices like black pepper, red pepper flakes, or dried herbs to add flavor without sodium.
Recipe FAQs
How to make sweet and sour chicken easy?
Follow a logical workflow by prepping your sauce first and dredging chicken in batches. Completing all cutting and whisking before turning on the heat ensures the 15-minute cooking time remains stress free.
What is the secret to the best sweet and sour sauce?
Use tomato paste as an emulsifier to achieve a deep, glossy consistency. If you enjoyed mastering this emulsification technique, you can use the same thickening method to create a tangy sauce for other dishes.
What kind of batter is used for sweet and sour chicken?
Use a dry cornstarch coating rather than a wet batter. Tossing the chicken chunks in cornstarch, salt, and white pepper creates a shattering golden crust that stands up better to the sauce than traditional flour based batters.
What to add to sweet and sour sauce for chicken?
Incorporate pineapple juice and apple cider vinegar for the perfect acid sugar balance. These ingredients are essential to cut through the richness of the seared chicken and provide the signature tangy profile.
Is it true that I should use flour for a crispier crust?
No, this is a common misconception. Cornstarch is superior for this recipe because it produces a lighter, crispier texture that remains shattering even after a quick toss in the sauce.
How to keep the chicken from getting soggy?
Wait to combine the sauce and chicken until the very last second. Serving immediately ensures the crust stays crisp, as any extended contact with the liquid will naturally soften the starch coating.
How to reheat leftovers without losing the crunch?
Use an air fryer at 350°F for 5 minutes. Microwaving will turn the crust mushy, but an air fryer effectively drives off excess moisture to restore a portion of the original exterior texture.
Easy Sweet And Sour Chicken
Ingredients:
Instructions:
Nutrition Facts:
| Calories | 558 kcal |
|---|---|
| Protein | 56.2 g |
| Fat | 13.1 g |
| Carbs | 52.4 g |
| Fiber | 3.2 g |
| Sugar | 28.6 g |
| Sodium | 842 mg |
