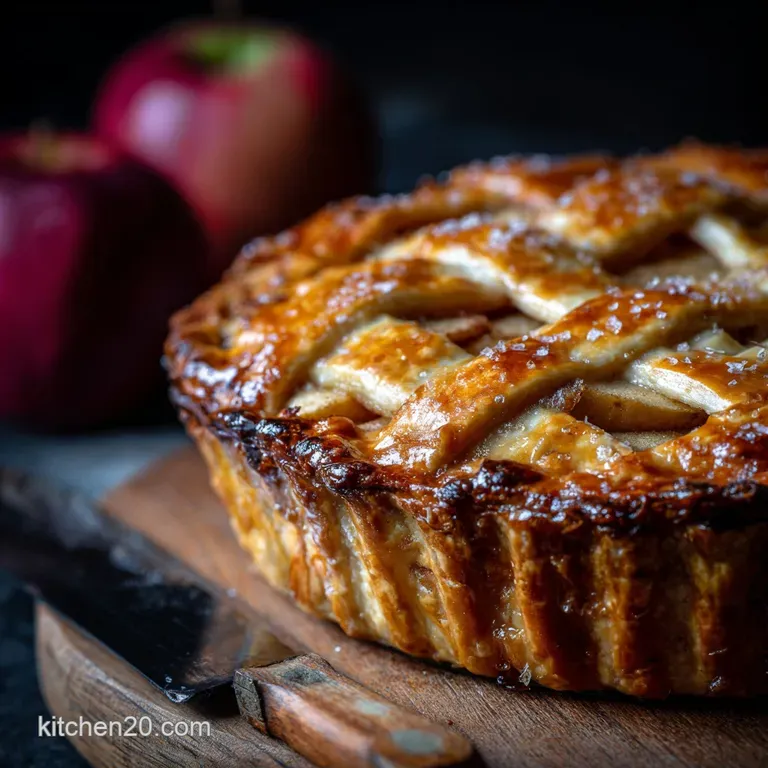
Apple Pie: the Quintessentially British Deep-Dish Pie with Flaky Butter Crust
- Why This Deep and Dish Apple Pie is Your New Standard
- Gathering Your Provisions: Essential List of Baking Components
- Preparing the Baker’s Arsenal: Required Equipment
- Crafting the Perfect Flaky Dough: Step and by-Step Guide
- Building the Heart of the Pie: Preparing the Apple Filling
- Sealing and Baking Your Masterpiece
- Expert Tips from Our Bakers for the Ultimate Apple Pie Experience
- Storing and Serving Your Homemade Apple Pie
- Customizing Your Traditional Apple Pie Recipe
- Recipe FAQs
- 📝 Recipe Card
Why This Deep and Dish Apple Pie is Your New Standard
If you’ve been chasing the mythical "Perfect Apple Pie" for years (I certainly have), you probably keep running into two problems: a soggy bottom, or a crust that tastes sadly like cardboard.
I spent too much time using shortening and chasing pie weights, only to realize the answer was simplicity, excellent ingredients, and one essential technique: keeping everything Arctic cold. This recipe isn’t fussy, but it is particular.
It results in a gorgeous, golden, high and sided pie that truly smells like your grandmother's kitchen, even if your grandmother didn't bake. It’s simply brilliant. Let’s crack on.
Unlocking the Secret to an All and Butter Flaky Pastry
Look, I love shortening. It makes things easy. But if you want that shatteringly flaky texture, where the crust separates into delicate layers, you have to use all butter. I learned this the hard way after one disastrous attempt where I let my butter get too warm and ended up with a crust that was tough and oily.
A true flaky pastry depends on tiny pockets of cold, solid butter surviving the mixing process. When those tiny pockets hit the oven heat, the water inside the butter turns instantly to steam, forcing the pastry layers apart. That’s the magic.
You want the mixture to look like coarse sand, with some distinct pea and sized lumps of butter still visible. Those lumps are your flakiness insurance.
The Essential Difference of the British Deep and Dish Style
We’re not making a flat, wide dessert here. We are building a mountain. The deep and dish style (usually 9 inches deep) serves two critical purposes. First, it allows for a massive amount of filling (which is why we’re here, right?).
Second, the high sides help insulate the filling and keep the juices from boiling over the rim, which often leads to burnt edges and a messy oven. It guarantees a generous slice every time. It’s a proper job.
Preparing Your Workspace for Baking Success
Temperature is everything when tackling the perfect apple pie recipe. If your kitchen is warm (say, above 75°F / 24°C), you need to cheat a little. Get your flour and mixing bowls into the fridge for 20 minutes before you start.
Use a granite or marble countertop if you have one, as it stays naturally cool. And when handling the dough, work quickly. If it starts to feel sticky or greasy, stop what you’re doing and put it back in the fridge for ten minutes. The ten minutes of waiting is always faster than trying to rescue sticky dough.
Gathering Your Provisions: Essential List of Baking Components
You’ve already seen the ingredients list above, but I wanted to stress something: baking is chemistry, and the quality of your provisions matters, especially when we are aiming for that classic apple pie perfection. Don't cheap out on the butter.
Use high and quality, unsalted European and style butter if you can find it; the higher fat content is a game changer for the texture.
Preparing the Baker’s Arsenal: Required Equipment
Honestly, you don't need fancy gear, but a decent rolling pin and a deep dish are non and negotiable. I prefer glass or ceramic pie plates because they heat more evenly than metal, which helps the bottom crust cook completely and avoids that nasty raw dough line.
Just make sure whatever dish you use, it truly is deep . We need room for those apples.
Choosing the Best Baking Apples for Texture and Flavor
If you use just one type of apple, the filling will be flat. I promise. You need a blend. We want some apples that hold their shape (Braeburn, Honeycrisp, or Mutsu) mixed with apples that provide sharp tartness (Granny Smith). The varying textures ensure the filling isn't just mush after an hour in the oven.
Aim for a 50/50 split of crisp and tart apples. Slice them about ⅛ inch thick thin enough to cook down properly but thick enough to retain structure.
The Role of Chilled Butter in Pastry Perfection
We talked about the pea and sized pieces earlier, but let’s be specific. You must cut the butter into cubes before you put them back in the freezer for ten minutes. Yes, the freezer. This ensures maximum coldness, so when you blend it into the flour, it doesn't immediately melt into the flour.
If the butter is fully incorporated, you end up with shortcrust (tender, but not flaky), not the glorious, layered crust we are after.
Spices and Seasoning Blends for a Warming Filling
Ground cinnamon is a given for any apple pie filling recipe, but what separates a good pie from an incredible one is freshly grated nutmeg. Seriously, buying whole nutmeg and grating it right into the mix changes everything. It adds a warmth and complexity that bottled, pre and ground spice just can't match.
And please, don't skip the lemon juice. It keeps the filling bright and stops the apples from turning brown while you prepare the pastry.
Selecting the Right Deep and Dish Pie Plate
As noted, glass or ceramic is best for conducting heat slowly and steadily. This gentle heat transfer is vital for the bottom crust. A standard 9 inch plate usually measures about 1.5 inches deep. For this deep and dish perfect apple pie, you want a plate that measures closer to 2 inches deep.
Crafting the Perfect Flaky Dough: Step and by-Step Guide
The key philosophy here is gentleness . Once the butter is cut into the flour, you only want to mix in the ice water just enough so that the dough can be coaxed into a disc. Don't knead it. Don't treat it like bread. Think of it like coaxing a very shy friend to come out of hiding.
You’ll know you’ve added enough water if you can squeeze a handful and it holds together without crumbling, but the rest of the bowl still looks shaggy.
Related Recipes Worth Trying
- Mini Pumpkin Pies: The Handheld Spiced Fall Dessert Recipe — Make amazing Mini Pumpkin Pies with this easy, high performance recipe. Perfect for Thanksgiving, these individual desserts are baked in a muffin tin for a...
- Apple Crisp Mini Cheesecakes Easy Fall Cheesecake Bites — Forget the springform! These individual Apple Crisp Mini Cheesecakes combine creamy filling with warm, spiced apples and a crunchy streusel topping. They...
- Apple Crisp with Oats Guaranteed Thick Crunchy Oat Topping — This classic Apple Crisp with Oats recipe delivers a crunchy thick oat topping and perfectly spiced tender apples Skip the sloppy dessert and try this easy...
- Stuffed Baked Apples HoneyGlazed Spiced Walnut Crumble Recipe — Stuffed Baked Apples are the definitive cozy dessert This healthy apple dessert recipe features a warm walnutoat filling and a glistening lemonhoney glaze...
- Dutch Baby Pancake with Apples The Easiest Most Spectacular Breakfast Puff — This Dutch Baby Pancake with Apples recipe delivers kitchen theatre Achieve a massive golden puff using a cast iron skillet and caramelized cinnamon apples...
- The Proper DoubleCrust Cherry Pie Flaky Pastry Never Runny Filling — Achieve gloriously flaky allbutter doublecrust homemade cherry pies using our classic recipe This guide guarantees a set neverrunny filling enhanced by our...
Building the Heart of the Pie: Preparing the Apple Filling
We need to talk about the filling mixture. If you throw the apples, sugar, and flour directly into the crust and bake it, you run a huge risk of a liquidy mess. The sugars need time to pull moisture out of the apples, a process called maceration.
By mixing your filling ingredients right away and letting them sit while you roll out the dough, you allow that initial sweat to happen. If you see a ton of liquid pooling at the bottom of the bowl after 20 minutes, don't panic. Just pour off the excess liquid before you fill the crust.
That small step is major insurance against a soggy bottom.
Sealing and Baking Your Masterpiece
This is the final stretch, but it’s where precision pays off.
Mixing and Hydrating the Dough Without Overworking
If you are using a food processor (my preferred method for speed), pulse the water in only until the dough just starts to cling to the sides. If you process it too long, you activate the gluten, and your crust will be tough.
Stop immediately when it looks shaggy, dump it out onto the counter, and gather it into discs by hand.
The Critical Chill Time: Ensuring Pastry Structure
You chill the dough twice for two different reasons. The first chill (the 60 minutes) solidifies the fat and makes the dough workable. The second chill (the 30 minutes, after assembly) is arguably more important: it allows the gluten strands, which you inevitably stretched while rolling and crimping, to relax.
If you skip this second chill, your beautifully crimped edges will shrink dramatically in the oven, exposing the filling.
Preventing the Dreaded "Soggy Bottom" Syndrome
We use three tactics here:
- The Chill: A cold crust takes longer to heat up, which gives it more time to solidify before the liquid filling starts to run.
- The Thickener: Don't skip the 3 tablespoons of flour in the apple pie filling recipe. It is essential.
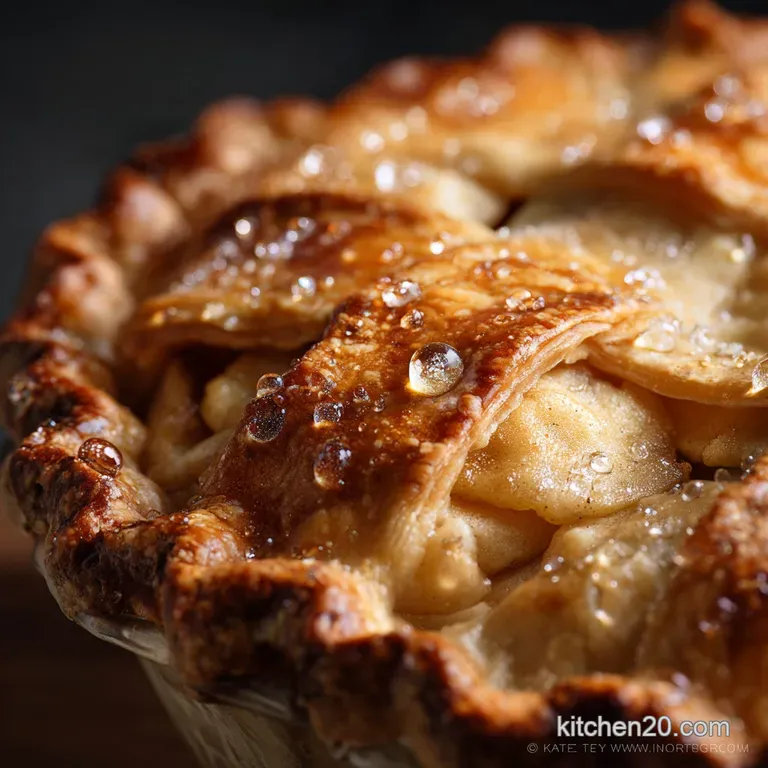
- The Temperature Strategy: Starting the oven at 425°F (220°C) is key. That high, initial blast of heat guarantees the bottom crust begins cooking rapidly before the juices in the apple pie filling start to bubble.
Achieving the Perfect Dome: Layering the Fruit
Do not be shy when filling your pie. The apples are going to lose about 30% of their volume during baking. If you fill the pie flat, you will end up with a gaping cavern between the top crust and the filling. Pack those slices tightly, piling them up into a slight dome shape in the center.
Detailed Guide to Crimping the Edges (The Proper Job Seal)
This isn’t just decorative; it’s structural. Trim your edges neatly, leaving a 1 inch overhang. Tuck the top overhang under the bottom overhang this creates a thick, robust rim.
Then, use the knuckle of one hand (inside the pie) and the thumb and index finger of your other hand (outside the pie) to press and flute the dough inward. Alternatively, just press firmly all the way around with a fork.
Crucial Warning: Make sure your vents are generous. If the steam can't escape, the top crust will balloon dramatically and sometimes tear, releasing sugary lava everywhere. Four to six decent slits are required.
Temperature Control and Visual Cues for Doneness
When the pie goes in, we blast it to set the crust ( 15 minutes). Then we reduce the heat to 375°F (190°C). If you baked the whole thing at 425°F, the crust would be black before the centre was cooked.
The visual cues for doneness are non and negotiable: the crust must be a deep, rich golden brown, and you must see thick, syrupy filling actively bubbling in the vents. If it’s not bubbling, the filling hasn’t reached its maximum thickening temperature yet.
Expert Tips from Our Bakers for the Ultimate Apple Pie Experience
- Make it ahead: The dough keeps beautifully in the fridge for up to three days.
- Prevent burn: If the crust edges are browning too fast, cut a 1 inch ring out of foil and loosely cover the perimeter of the pie for the remaining bake time.
- Let it rest: I know it’s hard, but the most important step after baking is cooling. You absolutely must wait 3- 4 hours, or preferably until room temperature, for the filling to fully set. Slice it hot, and you get liquid soup.
- The Sugar Finish: Always use coarse sugar (like turbinado or demerara) sprinkled over the egg wash. It adds sparkle and a perfect crunch.
Storing and Serving Your Homemade Apple Pie
Once fully cooled, cover the apple pie loosely with foil or plastic wrap. It will keep perfectly well at cool room temperature for up to two days. If your kitchen is very warm, you can refrigerate it, but bring it back up to room temperature or gently reheat it before serving for the best flavor.
Customizing Your Traditional Apple Pie Recipe
Troubleshooting Common Pastry and Filling Mishaps
| Issue | Cause | Solution |
|---|---|---|
| Runny Filling | Too much moisture in apples, not enough thickener, or sliced too thick. | Drain the apples after maceration. Next time, add 1 Tbsp extra flour/cornstarch. |
| Cracked Crust | Dough was too cold, too dry, or over and worked. | Patch cracks with a little cold water and leftover dough trimmings before baking. |
| Shrunken Edges | Skipped the second chill (after assembly). | Always chill the assembled pie for 30 minutes before egg washing and baking. |
Prepping Ahead: Making Dough and Filling in Advance
As mentioned, the pastry dough is ideal for making ahead. Wrap it tightly and it stores well in the fridge. For the filling, you can peel and slice the apples up to 12 hours ahead, but store them tossed only in the lemon juice (not the sugars or spices) in an airtight container in the fridge.
Adding the sugar too early results in too much liquid.
Best Methods for Freezing and Reheating Leftovers
You can freeze the assembled, unbaked pie. Wrap it tightly in several layers of plastic wrap and foil. Bake from frozen: remove the plastic/foil, egg wash, and add about 15- 20 minutes extra to the total bake time.
For reheating leftovers, a 15 minute stint in a 350°F (175°C) oven is best to crisp the crust. Never, ever microwave pastry.
The Perfect Accompaniment: What to Serve Alongside
In my house, it has to be warm, homemade custard. It’s non and negotiable. That runny, vanilla and infused sauce melting into the hot apples is heaven. If you must use ice cream, vanilla bean is the only acceptable flavor, or perhaps a sharp, mature Cheddar cheese slice, which is oddly delicious with the sweet apples.
Introducing Crumble Toppings or Cheese Pastry Options
Want to switch things up? Here are two great ways to customize your apple pie:
- The Crumble Swap: Replace the top pastry with a simple streusel (1 cup flour, ½ cup brown sugar, ½ cup cold butter, mixed until crumbly). It saves time and adds a wonderful texture.
- The Savoury Twist:
We are obsessed with sharp cheddar cheese in the UK, and baking it right into the pastry is a revelation. The sharp, salty notes cut through the rich sweetness of the apples perfectly. Simply incorporate about ½ cup of finely grated, mature Cheddar cheese along with the cold butter when making the dough.
The crust will be slightly less flaky, but infinitely more interesting.

Recipe FAQs
How do I stop the bottom of my pie being a complete soggy bottom disaster?
Use a glass or ceramic dish, par-bake the base briefly (blind bake), and ensure the oven is piping hot initially (425°F/220°C). This rapid heat sets the bottom crust.
Which apples make the best Apple Pie filling?
A mix is a proper job: use tart Granny Smiths for reliable structure and crisp varieties like Braeburn or Honeycrisp for balanced sweetness and flavour. Avoid soft, mealy apples.
Why does my Apple Pie filling run out when I slice it?
Patience, mate! You must let the finished Apple Pie cool completely (3 4 hours) before slicing. This allows the flour thickener to fully set and solidify the filling juices.
Can I freeze this pie, or should I just leave it on the counter?
Store leftovers covered at room temperature for 2 days, or refrigerated for up to 4 days. For long storage, freeze the assembled, unbaked pie, then bake from frozen (add 20 mins baking time).
I’ve got leftover slices, what’s the best way to warm them up?
Reheat slices in a moderate oven (350°F/175°C) for 10-15 minutes, or use a toaster oven until the crust is crisp again. Avoid the microwave if you want to keep the flaky texture.
Flaky Crust Deep Dish Apple Pie
Ingredients:
Instructions:
Nutrition Facts:
| Calories | 420 kcal |
|---|---|
| Protein | 4.0 g |
| Fat | 18.0 g |
| Carbs | 63.0 g |
