Pumpkin Pie: the Flawlessly Flaky, Deeply Spiced Showstopper
- Unlocking the Perfect Pumpkin Pie: Rich Flavor, Zero Soggy Bottom
- The Science of Silk: Why This Pumpkin Pie Filling Never Grains
- Essential Pantry Checklist and Ingredient Deep Dive
- Mastering the Method: Step and by-Step for a Perfect Finish
- Chef's Troubleshooting Guide: Fixing Cracks and Wet Spots
- Presentation, Storage, and Perfect Pairings
- Recipe FAQs
- 📝 Recipe Card
Unlocking the Perfect Pumpkin Pie: Rich Flavor, Zero Soggy Bottom
The moment that heady scent of cinnamon, ginger, and nutmeg starts wafting out of the oven, you know autumn has officially arrived. It’s warm, it’s comforting, and when done right, the filling is a custardy, impossibly silky dream that melts against a truly flaky, buttery crust.
If you've ever dealt with watery filling or a gray, soggy bottom, I promise you, this recipe is the fix you need.
Let’s be honest: pie is stressful. We’re all trying to nail that holiday dessert lineup without spending three days stressing over a cracked custard or a collapsed crust. This recipe, perfected over years of minor disasters (trust me, I’ve had many), prioritizes ease and reliability.
It uses simple techniques like the crucial blind and bake to guarantee that show and stopping result without the drama.
So, ditch the dry, grainy filling trauma of Thanksgiving Past. We are focusing on two key things here: maximizing the pumpkin flavor and using simple temperature controls to achieve the silkiest texture imaginable. Ready to bake the only pumpkin pie recipe you will ever need? Let's crack on.
The Science of Silk: Why This Pumpkin Pie Filling Never Grains
My goal isn't just a delicious pie; it's a structurally sound pie. Every step here is engineered to prevent the three biggest pie problems. This isn't just random baking; it's chemistry, baby!
The Three Common Pumpkin Pie Problems Solved
Most people fail their pumpkin pie on the texture. It either comes out grainy (like scrambled eggs) or it cracks wide open after cooling. We combat this using two simple ingredients: evaporated milk and an extra egg yolk.
The evaporated milk creates a denser, creamier custard than standard milk, holding the spices beautifully. Meanwhile, that extra yolk ensures a rich, smooth structure that resists separation.
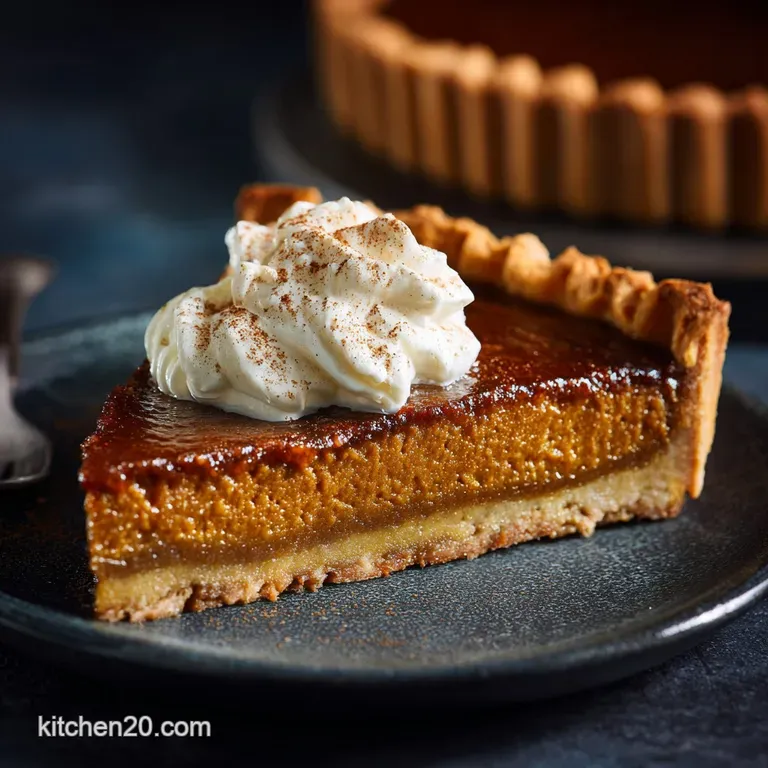
Defining the Ideal: Silky Custard Meets Buttery Shortcrust
The crust must be worthy of the filling. No one wants a perfectly spiced filling sitting in a wet cardboard shell. This recipe requires a full blind bake, meaning the crust is baked almost entirely before the filling goes in. This creates a waterproof barrier, absolutely guaranteeing a crisp, flaky base, even if you keep the pie for a couple of days. If you’re a fan of super flaky pastry, you might want to check out my deep dive into Apple Pie: The Ultimate Classic Recipe for a Flaky Double Crust techniques the principles are the same!
At-a-Glance: Prep Time, Bake Time, and Yield
We’re looking at about 90 minutes of active prep and bake time, but remember that mandatory cooling time. Don’t rush the cooling! You need at least three hours, maybe four, to let the custard fully set up and become sliceable. Patience is the secret ingredient here, truly.
The Blind Bake Advantage: Guaranteeing a Flaky Crust
Blind baking is non and negotiable for a custard pie like this. We bake the pastry with weights (rice, beans, or ceramic beads) to stabilize the butter and prevent the crust from collapsing or shrinking. Then, we remove the weights and bake the shell until lightly golden.
This pre and baking seals the pastry, making it impermeable to the wet pumpkin filling, which means you avoid the dreaded soggy bottom 100% of the time.
Controlling Coagulation: The Secret to a Smooth Custard Texture
Custard is just eggs and liquid being heated until the proteins lock together, or coagulate. Too fast, too hot, and those proteins seize up, squeeze out the moisture, and leave you with grainy, cracked filling.
We bake this pie low and slow at 350°F (175° C) , and we pull it out when the center still slightly jiggles. This method ensures the eggs set slowly and gently, keeping the texture velvety smooth.
The Art of Spice Layering: Elevating Cinnamon and Ginger
You can't just dump in pre and mixed spice and call it a day, although that works in a pinch. We build flavor depth by using individual spices and here’s my secret weapon: a tiny pinch of fresh black pepper. It won't make the pie spicy, I promise.
It just wakes up the cinnamon and ginger, making the whole flavor profile feel warmer and more complex.
Essential Pantry Checklist and Ingredient Deep Dive
Canned vs. Homemade Puree: Maximizing Pumpkin Flavor
For 99% of people, canned pumpkin puree is actually the better choice . It's already cooked down and concentrated, meaning you get consistent flavor and moisture levels every single time.
Crucial warning: Make sure you grab 100% pure pumpkin puree, not the "pumpkin pie filling," which already has the sugar and spices added.
| Ingredient | Substitute Suggestion | Why it Works |
|---|---|---|
| Evaporated Milk | Heavy Cream | Richer, though slightly less traditional density. |
| Brown Sugar | Maple Syrup (Reduce liquid slightly) | Adds a lovely, woodsy depth. |
| Allspice/Cloves | Extra Nutmeg & Cinnamon | Adjusts for missing complexity, still tastes "fall." |
| Eggs | Cornstarch Slurry (for vegan) | Provides necessary binding and thickening structure. |
Choosing Your Base: Evaporated Milk vs. Heavy Cream for Richness
I stick with evaporated milk because it’s concentrated, which leads to that dense, classic holiday pumpkin pie structure. Heavy cream is a fine substitution, but it has a higher water content than evaporated milk, so your filling might be a touch looser. If you want a slightly different approach that uses heavy cream beautifully, check out my recipe for Thanksgiving Cake Pops Easy Spiced Pumpkin Treat — it uses a totally different technique!
Vegan Swaps and Gluten and Free Crust Alternatives
Making this pie vegan is totally doable! Swap the butter for a solid, high and quality vegan shortening or stick butter replacement in the crust. For the filling, use canned full and fat coconut milk (the kind that separates in the can) instead of evaporated milk, and bind it with a cornstarch or arrowroot slurry instead of eggs.
As for the crust, any decent store and bought gluten and free shortcrust works perfectly fine here, especially since we are blind baking it.
Mastering the Method: Step and by-Step for a Perfect Finish
Step 1: Preparing the Pastry and Pre and Baking the Shell (The Crucial Blind Bake)
Start cold, stay cold. When making the dough, make sure your butter is diced and ice and cold, and use only enough ice water to barely bring the dough together. After shaping and rolling the dough into your 9 inch pie plate, the most important step is to freeze the formed crust for 20 minutes .
This chilling firms up the butter, setting the pastry structure before it hits the heat.
Step 2: Whisking the Filling: Temperature Control is Key
This step should be a gentle merge, not a vigorous assault. Whisk your pumpkin puree, evaporated milk, eggs, and yolk until combined. Then, fold in your sugars and spices. Do not overmix!
Overmixing incorporates too much air, which can cause the filling to puff up dramatically in the oven and then fall and crack upon cooling.
Chef's Note: For the ultimate smooth texture, many professionals strain their mixed filling through a fine and mesh sieve before pouring it into the crust. It’s extra credit, but it eliminates any stubborn spice clumps.
Step 3: Oven Time and the Wiggle Test for Doneness
Preheat your oven to 400°F (200°C) for the blind bake, but remember to drop the temperature immediately to 350°F (175°C) before you put the filled pie in. If the edges of your crust start browning too quickly during the 50 60 minute bake, use aluminum foil strips to gently shield the crimped edges.
The pie is done when you gently nudge the pan and the filling barely jiggles, looking set and dull around the perimeter, but still slightly wet in the center.
Step 4: Cooling Properly to Avoid Cracks and Separation
This is where my friends usually mess up. They pull the pie and stick it straight into the fridge or try to slice it warm. Big mistake! A sudden temperature drop shocks the delicate custard proteins, causing them to contract and leading to ugly cracks right down the middle.
Cool the pie slowly at room temperature on a wire rack for a minimum of three hours.
Chef's Troubleshooting Guide: Fixing Cracks and Wet Spots
Why is My Pumpkin Pie Filling Grainy? (And How to Prevent It)
Grainy filling is almost always a result of high heat or overbaking. The eggs curdled! If the oven temperature is too high, or if you bake it until the center is completely firm, you've gone too far. Prevention tip: Use the low temperature (350°F/175°C) and the jiggle test.
If you realize the filling is already cracked, don't despair! Cover the crack with a thick layer of whipped cream, meringue, or a beautiful lattice cut and out.
Best Bakeware: Glass, Ceramic, or Metal Pans?
For pumpkin pie, I swear by a metal or ceramic pie dish, specifically a deep and dish style . Metal conducts heat the most efficiently, helping the bottom crust crisp up nicely during the blind bake. Glass is fine but heats slower, and ceramic looks beautiful but can lead to a less reliably crispy bottom. Just make sure whatever you use is 9 inches and deep enough for this amount of filling. If you want to make smaller, shareable versions, I have a fantastic guide on Mini Pumpkin Pies: The Handheld Spiced Fall Dessert Recipe !
Presentation, Storage, and Perfect Pairings
The Critical Role of Rest Time Before Slicing
Remember that three and hour cooling time? It’s not just for texture; it’s for clean slices. If you slice the pie warm, the custard is still fluid and will ooze out, ruining the presentation. If you let it set fully, you get sharp, beautiful slices.
Sometimes I even pop the cooled pie in the fridge for 30 minutes before serving just to ensure total firmness.
How Long Does Homemade Pumpkin Pie Last? (Refrigeration and Freezing)
Because it’s a custard dessert, pumpkin pie absolutely must be refrigerated once fully cooled. It will keep beautifully for 3 to 4 days, stored loosely covered in the fridge. Yes, you can freeze it! Wrap the cooled, unsliced pie tightly in plastic wrap, then a layer of aluminum foil.
Freeze for up to 1 month. To thaw, move it to the refrigerator overnight. Reheat gently in a 300°F (150°C) oven for about 15 minutes before serving to freshen the crust.
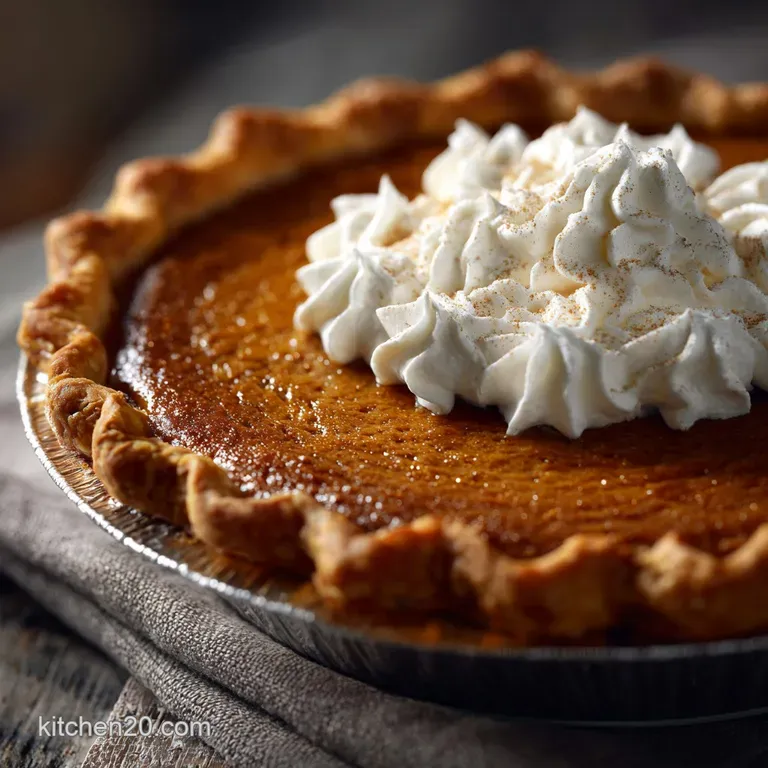
Creamy Complements: The Best Toppings and Sauces
Keep it classic! A mountain of freshly whipped cream is the ultimate partner. I like to stabilize my whipped cream with a tiny bit of powdered sugar and a splash of vanilla bean paste for extra flavor.
For a rich alternative, a dollop of high and quality vanilla ice cream or a drizzle of homemade sea salt caramel sauce elevates the whole experience.
Beverage Matchmaking: Coffee, Tea, and Wine Recommendations
Pumpkin pie needs a beverage that can stand up to all those powerful spices. A strong, dark roast coffee is always a winner. If you prefer tea, try a smoky Earl Grey or a robust Chai latte.
For the adults, a digestif like a dark aged rum, or a surprisingly good pairing: a slightly chilled, moderately sweet sherry or a late and harvest Zinfandel. It’s brilliant.

Recipe FAQs
How do I prevent a soggy bottom and ensure my crust stays flaky?
Blind baking the crust fully is the most crucial step in preventing a soggy bottom. Before adding the filling, brush the chilled, pre-baked crust with a thin layer of beaten egg white or heavy cream, then return it to the oven for 2 minutes.
This creates a necessary moisture barrier that protects the pastry from the wet custard filling during the final bake.
Why did my pumpkin pie filling crack after cooling?
Cracks are typically caused by overbaking or cooling the pie too quickly in a drafty environment. Remove the pie from the oven immediately when the edges are set but the center still retains a slight jiggle, which signifies a perfect custard texture.
Allow the pie to cool gradually on a wire rack away from cold air currents for several hours.
Can I use fresh pumpkin puree instead of canned?
You may use homemade puree, but it must be exceptionally dry to prevent a watery filling. Roast the pumpkin until very tender, then strain the puree through cheesecloth in a fine mesh sieve overnight in the refrigerator to remove excess moisture.
Since fresh puree can be inconsistent, you might need to slightly reduce the amount of added liquid dairy.
What is the best way to store leftover pumpkin pie?
Due to the dairy and eggs in the custard base, pumpkin pie must be stored in the refrigerator. Cover the pie loosely with plastic wrap or aluminum foil once it has completely cooled down to room temperature. It will maintain optimal texture and safety for 3 to 4 days.
How do I know exactly when the pie filling is perfectly baked?
The pie is done when the outer two inches of the filling are firm and slightly risen, but the center one-inch area still moves like gelatin when gently nudged. For precision, insert an instant read thermometer into the filling near the edge; it should register between 175°F (80°C) and 180°F (82°C).
How can I make this classic recipe dairy-free or vegan?
To make it dairy-free, substitute the evaporated milk and cream with full fat canned coconut milk or oat creamer for equivalent richness. Achieving a fully vegan custard requires replacing the eggs, usually using cornstarch or arrowroot powder combined with silken tofu or a commercial egg replacer, though the set time will vary significantly.
Can I adjust the spices for a richer, more complex flavor profile?
Definitely; using freshly ground spices like nutmeg and ginger will dramatically increase the aroma and depth. For a truly professional touch, incorporate a scant pinch of freshly ground black pepper or a dash of cayenne to amplify the warmth and activate the sweeter spices in the mix.
Flaky Ultimate Spiced Pumpkin Pie
Ingredients:
Instructions:
Nutrition Facts:
| Calories | 327 kcal |
|---|---|
| Protein | 8.0 g |
| Fat | 12.0 g |
| Carbs | 48.0 g |
