Classic Deviled Eggs: Chefs Vintage Recipe for the Silkiest Yolk Filling
Unlocking the Secret to Silky, Perfect Deviled Eggs
Okay, friend. Let's talk about the absolute king of potlucks: the Classic Deviled Eggs . We’ve all been to that BBQ where the eggs are dry, the yolks are lumpy, and they smell faintly of sulfur. That stops today.
We are aiming for something velvety, perfectly seasoned, and frankly, dangerously addictive. This isn't just about mixing yolks and mayo. This is an art form. It’s an incredibly easy art form, thankfully.
The Culinary History of the ‘Deviled’ Treat
The concept of seasoned boiled eggs goes way back think ancient Rome, where they were served with spicy sauces. But the 'deviled' bit? That term popped up in the 18th century, mainly in Europe, describing anything spicy or sharp.
When they started stuffing those little egg white boats with the seasoned yolk mixture, the name stuck. Honestly, I think the real history begins whenever my Aunt Carol brings her platter to Thanksgiving. Those are the memories we’re chasing.
What Makes This Deviled Egg Recipe Stand Out?
The secret to a truly outstanding deviled egg lies in two things: technique and balance. My version of this Original Deviled Eggs Recipe focuses heavily on texture. We’re pushing the yolks through a sieve, yes, really, because we want zero lumps.
The resulting filling looks like velvet ribbon. Beyond that, it’s all about the seasoning. We use Dijon for depth and a tiny splash of white wine vinegar. That acid is crucial. It cuts through the richness of the mayonnaise, making the whole thing taste clean and bright, instead of heavy and flat.
Trust me, the vinegar is the game and changer you didn't know you needed.
Setting the Stage: Essential Prep Work
Your mission starts before the water even hits the stove. First, check your egg carton date. If those eggs are fresh from the chicken (or the store shelf yesterday), you are asking for a shell and peeling nightmare.
Older eggs about a week or ten days old peel like a dream because the pH changes and the membrane releases from the shell easily. Also, gather all your ingredients and have them ready.
Messing around with measuring spoons when your yolks are halfway through the sieving process is a recipe for disaster.
Core Components and Essential Kitchen Gear
Selecting the Best Eggs for Optimal Flavor
I always use large eggs. They give you a nice, deep 'boat' to fill, which means more creamy yolk filling per bite. While freshness is key for scrambled eggs or frying, remember our cardinal rule here: use slightly aged eggs for boiling.
If you are desperate and only have fresh eggs, you can sometimes mitigate the difficulty by adding baking soda to the boiling water, but honestly, just plan ahead. The difference in peeling success is huge.
Mustard, Mayonnaise, and Spice: Balancing the Creamy Filling
The beauty of the filling is its simplicity. You only need a few things for truly 3 ingredient Deviled Eggs (plus seasonings, obviously, let's be real).
- Mayonnaise: Full and fat. Stop trying to make low and fat happen here. This is a treat. Use a good quality mayo; the flavor really shines through.
- Dijon Mustard: That sharp, slightly winey kick is essential. It provides the tang that lifts the rich yolks.
- Vinegar: I prefer white wine vinegar, but even apple cider vinegar works. This is the unsung hero, providing necessary acidity.
- Smoked Paprika: You finish with this, not sweet paprika. The smoky depth makes a difference, distinguishing this from a bland sandwich filling.
Non and Negotiable Tools for Effortless Assembly
While you can mash the yolks with a fork and spoon the filling in, why would you? You want perfection, right?
The absolute non and negotiables:
- Ice Bath: Mandatory. We’ll talk about this more in a second.
- Fine and Mesh Sieve: Seriously. If you want that ultra and creamy, professional texture, push those mashed yolks through a sieve. It takes 60 extra seconds. Worth every single one.
- Piping Bag and Star Tip: You don't need a professional bag. A sturdy Ziploc bag with the corner snipped off works perfectly fine for filling the eggs neatly. But using a star tip just makes them look so chic.
Related Recipes Worth Trying
- Yellow Cake Recipe Rich Moist and Tender Homemade Classic — This is the quintessential Yellow Cake baked from scratch using extra yolks for a deep golden colour and unbelievably tender crumb Our Moist Yellow Cake...
- Sex In A Pan Dessert The UltraCreamy Classic Chocolate Delight — Sex In A Pan Dessert is the nostalgic fourlayer masterpiece your dinner party needs Get the original recipe for this decadent nobake chocolate delight with...
- Proper Classic Homemade Chili Deep Rich Flavour from a Slow Simmer — Master the Classic Homemade Chili with our signature technique spice blooming This Best Homemade Chili Recipe Beef delivers rich smoky depth A perfect hug...
Mastering the Technique for Classic Deviled Eggs
This is where the magic happens. We’re aiming for yolks that are bright yellow all the way through no gross grey ring!
The Cold Water Shock: Achieving Effortless Egg Peeling
I used to boil eggs and just let them cool on the counter. Disaster every time. The whites were sticky, the shells clung like superglue. The secret? The dramatic temperature shift.
As soon as the eggs are cooked ( 10 minutes of sitting in hot water), you must transfer them immediately to a bowl of ice water. Don't wait. This shock causes the egg inside to shrink slightly, pulling away from the shell membrane.
It stops the cooking process cold, preventing that tell and tale grey/green hue from forming around the yolk.
When you peel, crack the egg gently all over first. Then, peel it under a slow stream of cold running water. The water helps wash away tiny shell fragments and slides the membrane off the egg. It's brilliant.
Whipping the Yolk Filling to Maximum Smoothness
Once the yolks are out, mash them thoroughly with a fork until they are fine and crumbly. If you skip the sieve, make sure they are incredibly fine, almost like sand.
Now, add the mayonnaise, the Dijon mustard, and that critical teaspoon of vinegar (our secret ingredient for Classic Deviled Eggs with Vinegar ). Start mixing gently, then whip it vigorously. We are incorporating a little air here. The mixture should lighten in color and volume.
If it looks dry, add half a teaspoon more mayo. If it looks stiff, add a tiny drop of water or vinegar. Season aggressively with salt and pepper.
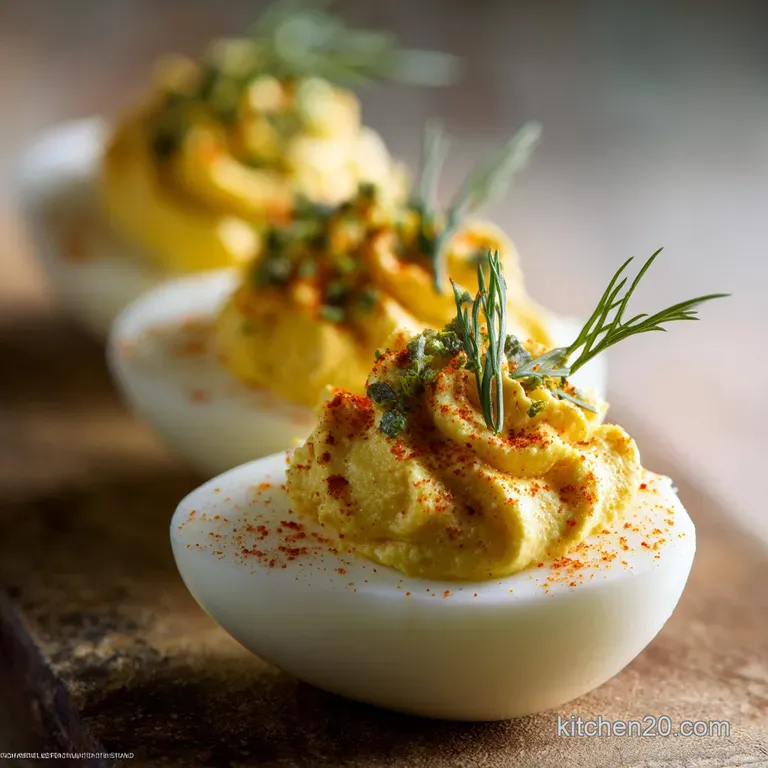
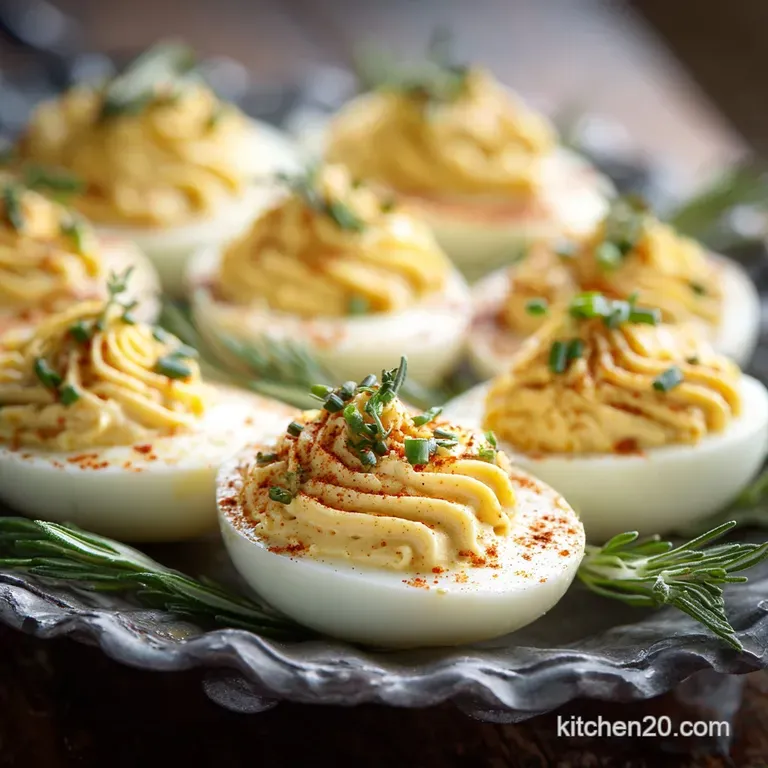
Precision Piping: Finishing Your Deviled Eggs with Flair
You have two choices for filling the white halves:
- The Spoon Method: Use a small teaspoon and gently place the filling into the cavity. It looks fine, totally homemade.
- The Piping Method: This is my favorite. If you use a star tip, pipe the filling starting from the bottom of the egg boat and spiral up, finishing with a nice peak. It holds its shape beautifully once chilled and makes the Eggs Appetizers look super professional.
Safely Storing and Preparing Deviled Eggs in Advance
If you are bringing these to a party, planning ahead is non and negotiable, but you have to be smart about storage. You can’t just assemble them three days early and call it a day.
Shelf Life and Optimal Refrigeration Methods
The good news is that both the hard and boiled eggs and the filling store well separately.
- Hard and Boiled Whites: Keep them peeled and stored in an airtight container in the fridge for up to three days.
- The Yolk Filling: Store this in the piping bag (sealed tightly with a clip) or in a sealed container for up to two days.
- Assembly: Assemble the eggs no more than 8 hours before serving. Why? Because the filling, once piped, will start to "weep" or dry out, and the whites can get soggy.
- Garnish Last: Never garnish with paprika or chives until moments before serving. Paprika can absorb moisture and look damp, and chives might wilt.
Quick Breakdown of Nutritional Information
Look, we are using full and fat mayo here. These aren't diet food. They are happy food. But for those counting:
| Element | Focus | Quick Thought |
|---|---|---|
| Protein | High | Excellent snack source! |
| Fat | High (mostly healthy) | Blame the mayo and the yolk. Worth it. |
| Carbs | Very Low | Keto and friendly, if that's your thing. |
Alternative Flavor Twists: Garnishes and Seasonings
While we love the Classic Deviled Eggs Recipe Easy way, sometimes you want a little pizazz.
- The Relish Addition: For classic deviled eggs with pickle relish, fold about two tablespoons of finely chopped sweet pickle relish into the yolk mixture. It adds crunch and sweetness! (Make sure to reduce the vinegar slightly if you do this.)
- Spicy Kick: Add a half teaspoon of sriracha or a few drops of tabasco to the yolk mixture. Garnish with a thin slice of jalapeño.
- Fresh Herbs: Skip the paprika and go straight green. Mix in finely minced fresh dill and tarragon, then sprinkle with finely chopped micro and greens. Very fresh.
Dealing with Gritty or Runny Fillings
If your filling isn't smooth, you probably didn't mash those yolks enough before mixing. Or, you skipped the sieve step, which is my number one recommendation for eliminating grit.
If your filling is too runny (it won't hold its shape when piped), this usually means you added too much mayo or another liquid. Don't panic!
CRISIS MANAGEMENT: If the filling is too runny, you need a binder. The easiest fix is to add a small pinch of powdered skim milk (seriously, it works wonders) or a half teaspoon of dried mustard powder. That will tighten things right up without messing up the flavor balance too much.
If you have extra cooked yolks on hand (maybe you made 8 eggs but only needed 6 whites), mash those and stir them in. They act like a thickener. Don't throw them out, you hear me? We fix this.

Recipe FAQs
Right, I've made a huge batch for the garden party. How long can I keep these Classic Deviled Eggs?
Deviled eggs are best enjoyed within 1 to 2 days of making them, kept tightly covered in the fridge. For optimal flavour and texture, store the filled egg whites and the yolk filling separately, assembling them no more than two hours before serving.
Help! Why have my hard boiled egg yolks gone all grey and horrid?
That unsightly grey green ring is caused by a chemical reaction (sulfur and iron) when eggs are overcooked or cooled too slowly. The trick is to plunge them immediately into a sharp ice bath after the 10-minute rest period it halts the cooking instantly, ensuring a bright yellow centre.
Can I prep the components for the Classic Deviled Eggs the night before the big bash, or will they go soggy?
Absolutely! You can boil, peel, and halve the eggs, and prepare the filling, storing both elements in separate airtight containers overnight. This keeps the egg whites from drying out and the filling texture spot on; assembly only takes a jiffy when guests arrive.
I love the classic recipe, but what’s a simple way to spice things up a bit without going mad?
For a quick twist, try stirring in a teaspoon of mild curry powder for a warm, fragrant flavour, or mix in some finely chopped pickle relish (piccalilli works brilliantly) for a delightful crunch and tartness. A sprinkle of crispy bacon bits also elevates any deviled egg instantly!
How do the chefs get that deviled egg filling so perfectly silky smooth?
The secret is removing any last lumps by pushing the mashed yolks through a fine mesh sieve or using a small food processor before mixing in the mayonnaise and mustard. This extra step guarantees the velvety smooth texture that distinguishes a good deviled egg from a truly magnificent one.
Flawless Classic Deviled Eggs Recipe

Ingredients:
Instructions:
Nutrition Facts:
| Calories | 155 kcal |
|---|---|
| Fat | 13 g |
| Fiber | 0 g |
