Chefs Fluffy Homemade Pita Bread the Ultimate Pocket Maker
- Ditching the Dry: Why Homemade Pita Bread Wins Every Time
- The Magic of the Pocket: Understanding the Science Behind the Puff
- Minimalist Pantry, Maximum Flavor: Required Provisions
- The Essential Toolkit for Professional-Grade Flatbreads
- From Shaggy Mass to Silky Dough: The Mixing and Kneading Phase
- High-Octane Baking: Achieving the Signature Puff in Pita Bread
- Troubleshooting and Mastering Your Next Batch
- Storing, Serving, and Expanding Your Pita Bread Repertoire
- Recipe FAQs
- 📝 Recipe Card
Ditching the Dry: Why Homemade Pita Bread Wins Every Time
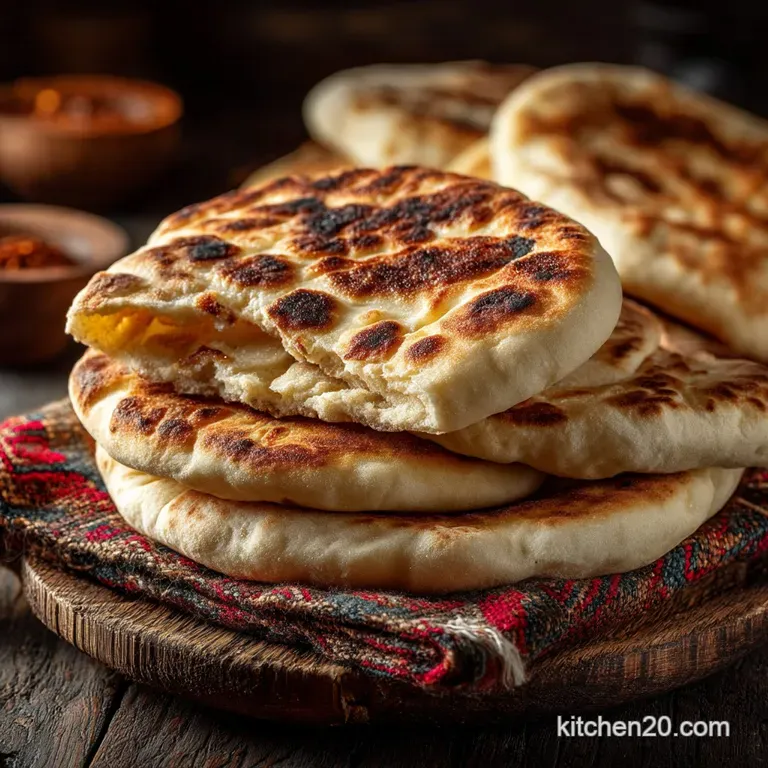
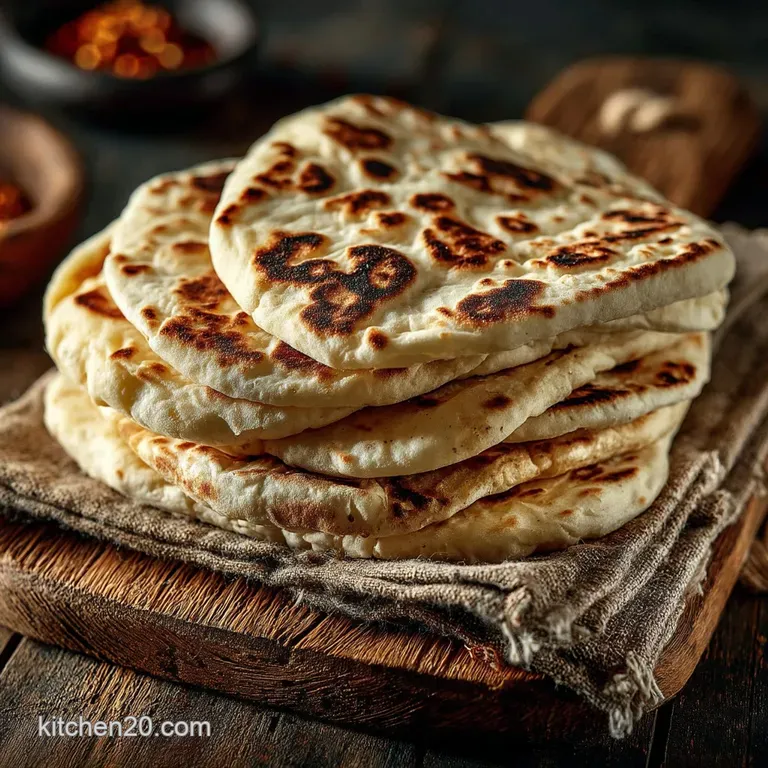
If your experience with pita bread is limited to the brittle, slightly cardboard like discs found in supermarket aisles, prepare for a culinary transformation. Mastering the art of making Fresh Pita Bread at home completely redefines the experience.
The difference lies in the unbeatable texture: a tender, slightly chewy crumb that yields easily, compared to the rubbery stiffness of mass produced versions. Creating a Simple Homemade Pita Bread is not just about saving a trip to the bakery; it's about guaranteeing a fresh, warm, and highly pliable flatbread every time, proving that even the most ancient Bread Recipes Homemade All Purpose Flour can be easily revived in your kitchen.
The Magic of the Pocket: Understanding the Science Behind the Puff
The pita’s signature feature that impressive, airy pocket is a beautiful demonstration of simple physics meeting expert technique. Unlike many other flatbreads, the goal of a true pita is complete layer separation, achieved entirely through steam.
When the dough is correctly proofed and then suddenly exposed to extremely high heat (ideally 500° F or higher), the moisture within the dough immediately converts to steam.
Because the thin, rapidly baked exterior crust traps the gas, the steam forces the top and bottom layers apart, creating the ideal container for stuffing.
The Kitchen Revelation: A Flavor Comparison
Beyond the structural difference, the flavor profile of homemade pita is incomparable. store-bought pitas often contain additives designed for shelf stability, resulting in a dull, slightly sour flavor.
Our Quick Homemade Pita Bread relies on only a handful of essential pita bread ingredients: flour, water, yeast, salt, sugar, and olive oil. This simplicity allows the inherent nutty, slightly sweet taste of the fresh dough to shine through, especially when served straight from the oven, still puffy and piping hot.
Defining Flatbread: What Makes a Pita a True Pocket?
While the term Homemade Flatbread Recipe covers everything from tortillas to focaccia, the defining characteristic of pita is its reliance on yeast and the specific thinness of the final rolling, which facilitates the pocket formation.
Other flatbreads, like naan, use baking powder or yogurt and are cooked at lower temperatures, leading to a bubbling, chewy texture without internal separation. The pita, however, is designed specifically as a pocket, making it the perfect vessel for Mediterranean and Middle Eastern fillings.
Mastering the Essentials: Yeast, Flour, and Heat Ratios
Achieving the perfect puff rests on balancing three critical components. First, the yeast activity: we use 2 ¼ teaspoons of instant dry yeast, ensuring a robust rise (the bulk rise should double the dough volume in 60 to 90 minutes).
Second, the flour ratio: a precise amount of 3 ½ cups of all-purpose flour provides the necessary gluten structure. Finally, and most crucially, the extreme heat aiming for 500° F ( 260° C) is non-negotiable for flash baking the dough and forcing the internal steam action.
Minimalist Pantry, Maximum Flavor: Required Provisions
One of the greatest joys of tackling this pita bread recipe easy method is realizing how few items you truly need. This is truly one of those Healthy Limited Ingredient Recipes where quality triumphs over complexity.
Our required pita bread ingredients are kitchen staples: 1 ½ cups of warm water (crucial for yeast activation), 2 ¼ teaspoons of instant dry yeast, a single teaspoon of granulated sugar (to feed the yeast), 1 ½ teaspoons of fine sea salt for flavor, 3 ½ cups of all-purpose flour, and 2 tablespoons of good olive oil for elasticity and tenderness.
That’s it six simple components creating extraordinary results.
The Essential Toolkit for Professional Grade Flatbreads
While the ingredients are straightforward, the right equipment facilitates the high heat environment necessary for success, significantly improving your yield of fully pocketed pitas.
Flour Selection: Choosing the Right Protein Content
For this recipe, we opt for high-quality All-Purpose Flour. Although some commercial bakeries might use high protein bread flour for extra chew, standard all-purpose (around 10 12% protein) offers the perfect balance.
It develops enough gluten during the 8 10 minute kneading process to trap the steam efficiently while still ensuring a tender, soft finish ideal for a proper pita. Using all-purpose also ensures this remains one of the simplest Bread Recipes Homemade All Purpose Flour for novice bakers.
The Temperature Test: Getting Water Just Right for Yeast Activation
Yeast thrives in a narrow temperature range. For the initial activation, the 1 ½ cups of water must be precisely between 105° F and 115° F ( 40° C and 46° C).
Water that is too cold will cause sluggish yeast activity, while water that is too hot will kill the 2 ¼ teaspoons of yeast, resulting in flat, dense pitas. Combining the warm water with the sugar and yeast mixture ensures a bubbly, active base before the flour and oil are incorporated.
Recommended Equipment: Stone, Steel, or Cast Iron Prep
Forget standard baking sheets; they lose heat too quickly. To achieve the instantaneous puff, you need a surface that retains and radiates extreme, steady heat. A preheated baking steel or a thick ceramic pizza stone, positioned on the middle rack during the 30 45 minute preheating phase, is highly recommended.
These surfaces deliver the necessary heat shock. If neither is available, a very heavy, preheated cast iron skillet can be used on the stovetop or in the oven, though the stone or steel offers superior consistency.
Related Recipes Worth Trying
- Super Soft Fluffy Sourdough Sandwich Bread Recipe — Tired of dense sourdough Learn how to make a truly soft fluffy sourdough sandwich bread with butter incorporated for an unbelievably tender crumb Your new...
- The Proper Crumb Classic Rustic Sourdough Bread Recipe — Finally master that satisfying blistered crust and airy crumb with this straightforward sourdough bread recipe Perfect for using your starter
- The Proper Posh Garlic Bread Recipe Roasted Garlic Butter — Ditch the frozen stuff This easy Garlic Bread Recipe uses slowroasted garlic for an unbelievably flavourful crusty Homemade Garlic Bread Ready in 35 mins
From Shaggy Mass to Silky Dough: The Mixing and Kneading Phase
The development of the gluten structure is paramount for a successful Pita Bread. Begin by activating the yeast, water, and sugar until a slight froth appears (about 5– 10 minutes). Once active, combine the flour and salt, followed by the 2 tablespoons of olive oil.
Mix until a shaggy mass forms. Whether you use a stand mixer with a dough hook or knead by hand, the goal is a full 8– 10 minutes of dedicated working time. The final dough should transform from a sticky mess into a smooth, elastic ball that springs back slowly when lightly poked.
This ensures the gluten network is strong enough to handle the steam pressure during baking.
High Octane Baking: Achieving the Signature Puff in Pita Bread
This stage requires coordination and speed, as the dough must remain warm and pliable, and the oven must be at maximum heat capacity.
The First Rest: Achieving Optimal Dough Volume
After kneading, the dough needs its first crucial rest, or bulk rise. Place the dough ball in a lightly oiled bowl, turn to coat, and cover tightly. Leave it in a warm, draught free spot for 60 to 90 minutes.
This period allows the yeast to work fully, doubling the dough's size and building the internal gases necessary for the dramatic puff later on.
Portioning and Shaping: Creating Uniform Rounds
Gently punch the air out of the proofed dough. Divide the mass into 10 to 12 equal portions, aiming for balls of approximately 75 80 grams each. Roll each piece into a neat ball and place them covered with a cloth for a non-negotiable 30-minute secondary rest.
This brief rest is vital because it relaxes the newly tightened gluten, allowing you to roll the dough thinly without it aggressively shrinking back. You should roll each ball into a uniform, smooth disc, measuring 6 7 inches in diameter and exactly ⅛ inch (3 mm) thick.
Consistent thickness is the key to an even pocket.
Stoking the Oven: Preheating Protocols for Maximum Spring
Preheating is not passive waiting; it’s an active requirement. Place your baking stone or steel inside the oven and set the temperature to its absolute highest setting ideally 500° F ( 260° C) or even 550° F if your oven permits.
Allow the oven and the stone to heat for a full 30– 45 minutes. This ensures the stone has absorbed enough heat to maintain temperature when the relatively cool dough is placed on it, which is the secret behind achieving the perfect spring in this Simple Homemade Pita Bread.
Baking Watch: When to Flip and How to Achieve Full Inflation
Working quickly to prevent heat loss, transfer 1 2 rolled pitas directly onto the preheated stone using a pizza peel dusted lightly with cornmeal. Bake for approximately 2– 3 minutes. You will observe the magic: within the first 90 seconds, the pita should inflate like a balloon.
Once the puff is complete and the bottom is lightly speckled brown, flip the pita using tongs and cook for an additional 30 60 seconds to set the shape. Immediately remove the finished Fresh Pita Bread and wrap it tightly in a clean tea towel to trap the steam and keep it wonderfully soft and pliable.
Troubleshooting and Mastering Your Next Batch
The difference between a flatbread and a pocket is often minor technique adjustments. Consistency and heat management solve most issues related to the pita bread recipe easy process.
Remember that slight variations in kitchen humidity or flour brand can affect absorbency, so if your dough seems too dry or too wet after the initial mix, adjust with a small splash of water or a dusting of flour until the correct elasticity is achieved.
Always ensure the dough balls are fully rested before rolling to prevent premature tearing.
Storing, Serving, and Expanding Your Pita Bread Repertoire
Once you've tasted truly fresh pita, you’ll never look back.
Why Isn't My Pita Pocketing? Common Mistakes and Fixes
The primary reason a pita fails to pocket is uneven rolling. If the dough is thicker in the centre, the steam cannot escape to force the layers apart evenly; it will often puff on one side only or remain flat. Ensure a consistent ⅛ inch thickness across the entire disc.
The secondary failure point is insufficient oven heat. If your oven temperature or stone temperature is below the crucial 500° F threshold, the water won't vaporize fast enough to create the required pressure.
Nutritional Snapshot: Carbs, Fiber, and Calorie Breakdown
This Quick Homemade Pita Bread, based on 10 to 12 servings, offers a relatively guilt free accompaniment to your meals. As one of the more modest Healthy Limited Ingredient Recipes, each pita typically contains 160 175 calories, with the majority coming from the 30 33 grams of carbohydrates.
Each serving also provides around 5 grams of protein and a small amount of dietary fiber (1 2 grams), making it a hearty yet wholesome choice compared to denser bakery loaves.
Best Practices for Freezing and Reheating
Pita Bread stores beautifully. Once cooled and wrapped in the tea towel, they can be kept in an airtight container at room temperature for up to three days. For longer storage, separate the cooled pitas with squares of parchment paper, place them in a freezer bag, and freeze for up to three months.
To reheat, simply thaw them out and warm them directly on a dry, hot cast iron skillet for 30 seconds per side, or flash bake them in a 350° F oven for two minutes. This rejuvenates the tender texture perfectly.
Pairing Perfection: Dipping, Stuffing, and Spreading Suggestions
The versatility of Fresh Pita Bread is unmatched. Naturally, it is the perfect companion for dipping into classics like silky hummus, creamy labneh, or smoky baba ghanoush. Thanks to that deep pocket, it’s also ideal for stuffing full of falafel, homemade Greek chicken gyros, or shawarma.
For a simpler meal, brush the warm flatbread lightly with melted garlic butter and serve alongside robust, spiced lentil soups, allowing the tender bread to sop up every drop.

Recipe FAQs
My pitas look like flat pancakes, not pockets! What went wrong?
Right, this is often down to one of two things, and both hinge on heat. If your oven or stone wasn't preheated to its absolute maximum (we're talking 500°F/260°C or more), the moisture inside the dough won’t instantly steam, leading to a flop.
Secondly, ensure your dough is rolled to a consistent ⅛ inch thickness; any lumps or thicker areas will prevent the steam from fully separating the layers.
I don't have a pizza stone. Can I still cook this amazing Pita Bread at home?
Absolutely, you can still crack on with it! If you’re fresh out of a pizza stone, a heavy duty cast iron skillet is your next best bet, retaining and distributing heat brilliantly. Preheat the skillet fiercely on the hob until it’s smoking hot before dropping the rolled pita straight onto the surface.
Cook the Pita Bread for about 45 seconds per side, flipping quickly, and the dramatic puff should still occur.
How do I stop the dough from "rubber banding" or shrinking back when I roll it out?
The dreaded shrink is a sign the gluten isn't quite relaxed yet. If your dough springs back aggressively immediately after rolling, it means it hasn't had enough rest after kneading. Simply cover the dough balls back up and let them rest for another 15 20 minutes.
This extra relaxation time is crucial; once the gluten has chilled out, you should be able to roll them thin and evenly without a fuss.
I've made a huge batch. What's the best way to store homemade pita and can I freeze it?
Homemade pita is always best fresh, but it will keep soft for 3 4 days at room temperature if wrapped tightly in a tea towel and then sealed in an airtight bag. For longer preservation, freezing is a great option.
Stack the cooled pitas with squares of baking parchment in between to prevent sticking, seal them in a freezer bag, and they'll keep for up to three months. They revive brilliantly in a toaster or hot dry pan straight from the freezer.
Can I add wholewheat flour to the recipe for a bit of a nutritional kick?
Certainly, swapping in wholewheat flour is a clever move for extra fibre, but treat it with a bit of caution. We recommend substituting no more than 50% of the white flour (about 1 ¾ cups).
Since wholewheat absorbs more liquid, you might need to add an extra tablespoon or two of water to ensure the dough remains properly soft and elastic, which is vital for getting that fantastic pocket.
Fluffy Homemade Pita Pockets
Ingredients:
Instructions:
Nutrition Facts:
| Calories | 193 kcal |
|---|---|
| Protein | 5.7 g |
| Fat | 1.5 g |
| Carbs | 19.3 g |
| Fiber | 2.2 g |
| Sodium | 3403 mg |
