Freeform Pear Tart – the Easiest Dessert Ever!
Discovering the Magic of Freeform Pear Tart
You ever just find yourself craving dessert, but you’re also feeling a bit lazy? you know what i mean? one evening, my sweet tooth kicked in, but i didn’t wanna spend hours in the kitchen whipping up a fancy pastry.
That’s when i stumbled upon this absolutely fantastic recipe: freeform pear tart . no need for any special pastry skills, or even a tart tin, with this gem.
Seriously, this is the easiest pear tart ever!
It's funny how a simple dessert can tug at your heartstrings, but this comfort food really hits different. when i pulled that golden brown beauty out of the oven, i was instantly reminded of summer evenings spent with family.
That crisp pastry wrapped around tender cinnamon pears just makes you feel at home. whether you're hosting a party or just want to treat yourself, this tart has got your back.
Recipe Overview
Now, let’s talk about the history of this delightful dish. the freeform pear tart dances on the line between british and french dessert traditions.
Picture this: a rustic tart created during harvest time to show off seasonal fruit. fast forward to today, and it's blowing up in popularity.
Seriously, it’s a hit at potlucks and family gatherings!
Timing is everything, and this beauty doesn’t keep you waiting. with only about 30 minutes of prep and 30 minutes of cooking , you can have a homemade guy that serves eight slices of sweet pear goodness in just an hour! the best part? you don’t break the bank making it.
Simple ingredients mean you won’t have to rob a bank to enjoy this delicious dessert.
Key Benefits
Health benefits? check! while you’re indulging, you’re getting some good stuff too. pears are rich in fiber and vitamin c, making this a bit of a guilt free treat.
Plus, who doesn’t appreciate a dessert that’s both delectable and nutritionally friendly ?
This tart is great for almost any occasion. whether it’s a perfect summer dessert for outdoor barbecues or a decadent dessert for entertaining guests, it fits right in.
It stands out from other recipes too. why? because it’s low-key and delicious no fancy pastry skills needed! friends will think you went to a french pastry shop when you casually mention you whipped it up yourself.
When it comes to serving, the possibilities are endless. You can pair it with ice cream, a drizzle of caramel sauce , or even fresh raspberries for that extra wow factor.
Transition to Ingredients
Ready to dive in? here’s a sneak peek at what you’ll need to create your own stunning freeform pear tart .
Keep your hands ready and your apron on because we’re about to get hands-on with some simple baking!
Now, grab these ingredients and let’s start crafting this delightful treat that’ll elevate your dessert game. Don’t worry about the complicated stuff; remember, this is supposed to be fun, easy, and totally delicious!
Essential Ingredients Guide
Cooking can be a bit intimidating, can’t it? but with the right essential ingredients , you can create magic in the kitchen.
Let’s break down some of these basics, how to pick the good stuff, and how to make it all last.
Premium Core Components
When it comes to recipes, starting off with premium ingredients is key. Here are some essentials:
Measurements: For those of us who aren't champions of the metric system, it can be confusing . Here's a little help:
- 225 g of plain flour is about 1 ¾ cups .
- 140 g of butter? That's ½ cup plus 1 tablespoon . Easy peasy!
Quality indicators: look for butter that's creamy and firm, flour that's fresh (you don’t want that dusty bag lurking in the back of your pantry), and enjoy the sweet smell of ripe pears.
Storage guidelines and shelf life: most ingredients, like flour and sugar, can last quite a while, but after six months , you're flirting with a disaster.
Keep them in airtight containers to stay fresh.
Freshness tips: Shiny, unblemished pears mean you’re golden. Look for a bit of give when you squeeze. If they’re hard as a rock, wait a few days before using.
Signature Seasoning Blend
Now, who doesn’t love a good seasoning blend? The right spices can crank your dish from “meh” to “wow!” Here’s what to keep handy:
Essential spice combinations: A classic cinnamon and brown sugar pairing is heavenly with pears. It’s like they were meant to be!
Herb selections: Fresh basil or thyme works wonders with savory dishes but don't forget to consider the sweet side —try a pinch of thyme with those pears.
Flavor enhancers : Don't overlook vanilla extract —a drop can elevate your homemade pear dessert to dreamy heights!
Regional variations: Think about swapping spices based on the mood. Feeling French? Go chic with a little nutmeg; more British? Stick to that warm cinnamon.
Smart Substitutions
Knowing how to swap ingredients can save the day. Trust me, I’ve been in the kitchen wishing I had just one more ingredient!
Common alternatives: Out of caster sugar? Grab some granulated sugar instead. It’s not as fine, but it will do the trick!
Dietary modifications: Got a gluten-free friend? Easy! Use a gluten-free flour mix.
Emergency replacements: No eggs left? That's okay. Mashed banana or unsweetened applesauce can step in as a quick fix.
Seasonal options: Substitute pears with fall apples when they’re in season. Crispy and sweet —what more could you ask for?
Kitchen Equipment Essentials
You don’t need fancy gadgets to whip up a masterpiece. Here’s the must have kitchen gear:
Must have tools: A mixing bowl and a rolling pin can work wonders! Seriously, you don't need the fancier stuff.
Alternative options: No baking sheet? A pizza stone works! Gets the job done and brings a little extra crispness.
Preparation tips: Keep your tools dry moisture can mess with your pastry dough.
Storage solutions: Use clear containers for your spices and pantry staples. A well organized kitchen is a happy kitchen!
Now that we’ve covered all the essentials , let’s whip up something delightful! if you're ready, let's get to the instructions for my easy, no-fuss freeform pear tart .
Seriously, just grab your ingredients, and let’s make a dessert that will make your friends think you’re a pro baker !
Mastering the Art of Professional Cooking
When it comes to cooking like a pro, having a game plan can make all the difference. seriously, if you’ve ever jumped into a recipe without knowing what’s going on, you know what i’m talking about.
So, let’s break down the professional cooking method into steps that are easy to follow. grab your apron and let’s dive in!
Essential Preparation Steps
Mise en place is your best friend here. it’s french for “everything in its place,” and it means getting all your ingredients organized before you start cooking.
This will save you a ton of time and stress. so, chop those veggies, measure out spices, and have everything at the ready.
Trust me, you’ll thank yourself later!
Next up, time management . timing is key in cooking, folks! i remember a time i thought i could make a fancy five course meal in two hours.
Spoiler alert: i didn’t eat for the next three. use timers on your phone or even old-school egg timers. set them for critical points in your recipes, especially when things are baking or simmering.
Now, let's talk organization strategies . keep your workspace tidy! a cluttered counter can lead to a cluttered mind. use separate bowls for prepped ingredients and keep your tools nearby.
Safety should also be on your radar. ensure you handle sharp knives properly, have a fire extinguisher handy, and keep a clean surface to avoid cross contamination.
Your kitchen should be your calm zone.
step-by-step Process
Alright, here comes the meat and potatoes of it all the step-by-step process. Let’s keep this simple:
- Read the recipe first . I can’t stress this enough know what you're doing before you start!
- Preheat your oven . If it says 350° F, make sure it’s up to temp before you throw anything inside.
- Gather your ingredients and tools. You don’t want to be digging through cabinets mid-recipe.
- Cook or bake as specified, keeping an eye on temperature control . If it says 30 minutes at 375° F —set a timer and check on it!
- Pay attention to visual cues for doneness . Whether it’s a golden crust or bubbling sauce, your eyes will often tell you when something’s ready.
Expert Techniques
Now, let’s sprinkle in some ways to elevate your cooking game.
Use professional methods like the d’artagnan technique, which is all about layering flavors. Start by sautéing your onions to sweeten them up before adding garlic, spices, or meats.
Next, those critical steps —don’t skip them! If you need to whisk your eggs until fluffy, then do it. It makes all the difference in baked goods and custards.
Check your quality checkpoints . Is your sauce too salty? Add a teaspoon of sugar to balance it out. If something’s off, don’t hesitate!
And if things go south? I’ve been there too. Keep a list of troubleshooting tips nearby like if your cake won’t rise, check if your baking powder is fresh.
Success Strategies
Every cook makes mistakes; it’s part of the game. You forgot the salt? No biggie.
What are the common mistakes to avoid? Overmixing your batter can lead to dense cakes. Remember, less is more sometimes when it comes to mixing.
For quality assurance , always taste your dishes as you go. Seasoning needs to be adjusted, and it's better to catch it early.
Want perfect results ? Stick to your recipe to a T! But also be open to make-ahead options . Some meals, like soups or stews, taste even better the next day.
Now that you're prepped to cook like a pro, let’s wrap this up with a delicious recipe highlight that embodies some of these principles our freeform pear tart .
This tart is as easy as pie or should i say, tart! print pin 5 from 1 vote freeform pear tart .
Seriously, no need for any special pastry skills, or even a tart tin, with this gem.
Additional Information
Don’t worry; i’ll share my ultimate tart recipe in the next section! cooking doesn’t have to be complicated it can be fun and totally rewarding (especially when you’re enjoying a slice of homemade pear goodness).
Stay tuned for more tips and delicious ideas!
Additional Recipe Information
Cooking is about more than just following a set of instructions; it’s about creating a vibe, a moment, and lots of delicious memories.
Let’s dive into the nitty gritty of making this freeform pear tart and become the ultimate dessert wizard, shall we?
Pro Tips & Secrets
Start with cold butter . seriously, you want it frosty like the winter chill. this cold magic is what makes your pastry flakier than that neighbor who only waves on paydays.
When making your dough, rub that butter into the flour until it looks like coarse breadcrumbs. but don’t overwork it! a quick mix will help keep it tender.
Need to save time? if you’re all about efficiency, whip up the dough a day in advance and stash it in the fridge.
It will make your life a whole lot easier!
Let’s talk flavor enhancement . a sprinkle of nutmeg or ginger can level up your pear game and keep things interesting.
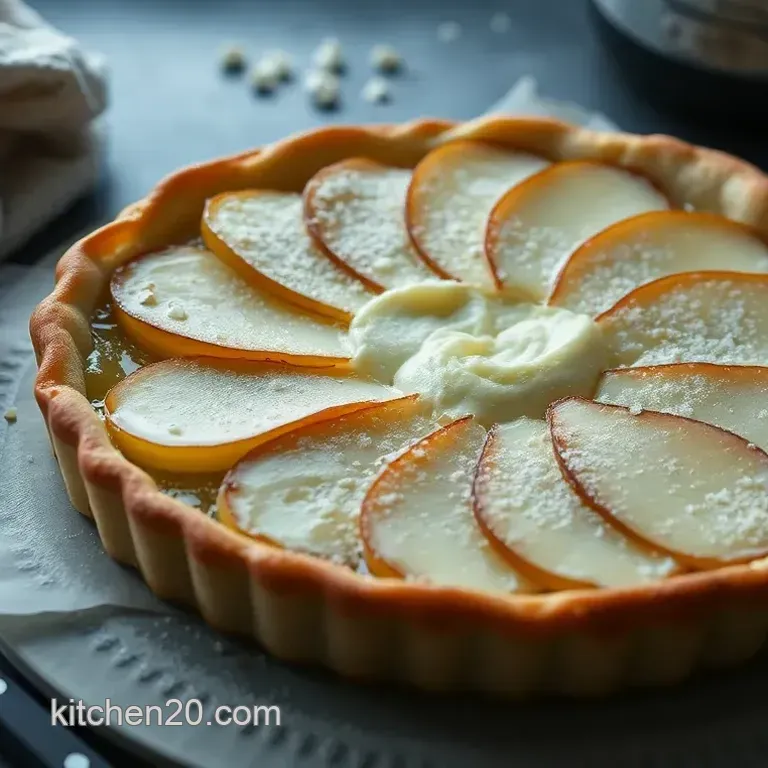
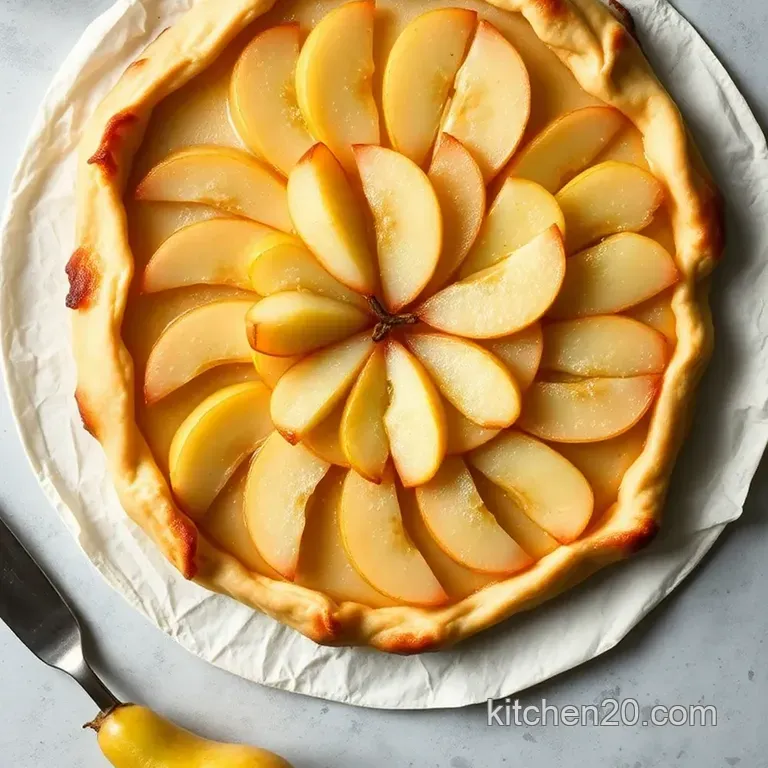
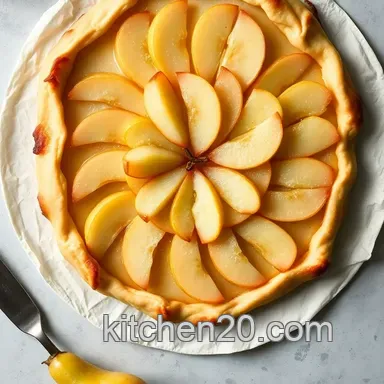
And don’t forget about the presentation ! a little egg wash on the crimped edges before baking not only gives it a beautiful golden glaze, but it’s also your secret weapon to impress everyone at the next dinner party.
Perfect Presentation
Okay, if you're anything like me, you’ve probably served a dessert that looked more like a hot mess than a masterpiece.
So here’s the scoop: plating is everything! aim for that rustic look a gorgeous, imperfect tart rather than a robotically shaped pastry is so much more inviting.
Use a colorful plate to make those cinnamon pears pop against the background. garnish with a sprinkle of powdered sugar or some fresh raspberries to bring color and a touch of elegance.
Trust me, a little goes a long way in the visual appeal department!
Storage & make-ahead
Now let’s chat about storage. if you somehow have leftovers of this easy pear tart recipe (which is hard to believe), keep it wrapped in foil or placed in an airtight container.
It’ll happily sit in the fridge for about 3 days. don’t even think about freezing; this beauty is best enjoyed fresh.
When it's time to dig in again, just pop it in the oven at around 350° f for about 10- 15 minutes to warm it up.
Pair it with a scoop of ice cream, and boom you’ve got yourself a quick dessert idea that feels gourmet!
Creative Variations
Let’s get creative! just because it’s a freeform pear tart doesn't mean you can’t shake things up. swap those pears for apples or peaches , and you’ve got a whole new vibe.
If you’re feeling festive, add cranberries or even a bit of lemon zest for a punch of flavor.
Got dietary concerns? no worries! you can easily make a gluten-free fruit tart by using a gluten-free flour mix. feeling nutty? toss in some chopped walnuts or pecans for crunch.
The world is your pastry!
Complete Nutrition Guide
The last piece of the puzzle is knowing what’s in that delicious dessert. each slice of this tart rolls in at about 322 calories , but the nutrition is just as important as taste.
With 5g of protein and 4g of fiber, it's a real treat that doesn’t leave you feeling guilty unless you eat the whole thing in one sitting.
No judgment here!
When serving this delicious pear pastry, consider portion sizes. It’s tempting to dig in, but a slice paired with some light cream or custard works wonders for balance.
Conclusion
So there you have it everything you need to whip up the easiest and most delicious freeform pear tart ever! no special pastry skills or fancy tools needed.
It’s an excellent introduction to baking or a perfect way to use up seasonal fruits. whether you’re a beginner cook or a seasoned pro, this rustic tart will impress anyone who walks through your door.
So grab those pears, and let’s get muddling! enjoy the process, have fun with it, and remember, baking is all about love and sharing.
Go sprinkle some joy today! after all, nothing beats the smell of a homemade pear dessert wafting through your kitchen.
Frequently Asked Questions
Do I need special skills to make the Freeform Pear Tart?
No, you don't need any special pastry skills to make the Freeform Pear Tart. The recipe is designed to be straightforward and is perfect for beginners. With just a few simple steps, you can create a delicious tart without any fancy equipment.
Can I substitute the pears with other fruits?
Absolutely! While pears are the star of this recipe, you can easily substitute them with other fruits like apples or peaches. Just keep in mind that different fruits may have varying levels of sweetness and moisture, which could affect the overall taste and texture of the tart.
How should I store leftover Freeform Pear Tart?
To store leftover Freeform Pear Tart, wrap it in plastic wrap or place it in an airtight container. It can be kept in the fridge for up to 3 days. You can enjoy it cold, or gently warm it in the oven for a fresh out-of-the-oven experience.
Can I freeze the Freeform Pear Tart?
No, this Freeform Pear Tart is not suitable for freezing, as the texture may deteriorate once thawed. It's best enjoyed fresh or within a few days of baking for optimal taste and quality.
What are some serving suggestions for the tart?
The Freeform Pear Tart can be served warm or cold. Pair it with a scoop of vanilla ice cream, a drizzle of caramel sauce, or a generous pour of custard. For a fresh twist, you might also add a handful of raspberries on top before serving.
What nutritional information should I consider when making this tart?
This tart contains approximately 322 calories per slice and is a good source of carbohydrates, fats, and sugars. Always consider portion sizes, and if you're watching your sugar or fat intake, you can adjust the amount of sugar in the filling or service size accordingly.
Freeform Pear Tart The Easiest Dessert Ever
Ingredients:
Instructions:
Nutrition Facts:
| Calories | 322 |
|---|---|
| Fat | 16g |
| Fiber | 4g |
