Grandmas Thanksgiving Stuffing: Classic Sage and Sausage Dressing
- The Definitive Recipe for Grandma’s Thanksgiving Stuffing
- Achieving the Ultimate Stuffing: Mastering Moisture and Crunch
- Essential Components for Grandmas Thanksgiving Stuffing
- Step-by-Step Guide: Building Deep Flavor Layers
- Troubleshooting and Expert Secrets for Perfect Dressing
- Make-Ahead Mastery: Storing and Freezing Guidelines
- Completing the Feast: Pairing Grandmas Thanksgiving Stuffing
- Recipe FAQs
- 📝 Recipe Card
The Definitive Recipe for Grandma’s Thanksgiving Stuffing
That smell. You know the one. It’s the incredibly savory, deeply herbaceous aroma of fresh sage, melted butter, and slow cooked onions hitting the hot air as the oven door swings open.
This isn't just a side dish; it’s the centerpiece of the feast, the nostalgic taste of comfort that instantly transports you back to every incredible holiday dinner you’ve ever had.
I understand the holiday panic, though. Who has time for complicated recipes that require six hours of prep? This Grandmas Thanksgiving Stuffing is a lifesaver because it relies on simple, pantry friendly ingredients and strategic timing, meaning you can knock out the prep the day before.
It’s affordable, wildly delicious, and tastes like a thousand bucks.
Right, let’s crack on and talk about the secrets to achieving that elusive, perfectly textured dressing crisp on top, gloriously moist inside. We’re moving beyond dry breadcrumbs and bland seasoning; this is the definitive, crowd pleasing version you’ll make every single year.
Achieving the Ultimate Stuffing: Mastering Moisture and Crunch
Why We Call It 'Dressing' (And Why It Matters)
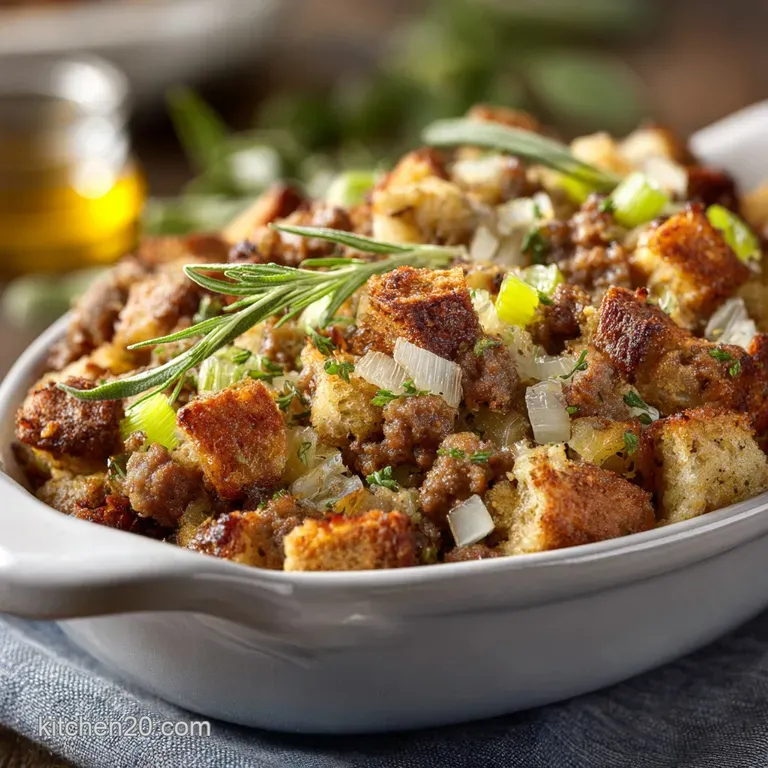
There’s a culinary argument that rages every November: stuffing versus dressing. The difference is simple, but crucial for safety and texture. "Stuffing" is cooked inside the turkey cavity, which makes it incredibly moist but often results in a soggy bottom, and sometimes uneven cooking.
When we talk about this grandma's thanksgiving dressing , we are talking about a casserole style dish baked in its own pan. This allows for total control over the moisture level and guarantees that beautiful, crunchy golden crust everyone fights over. Trust me, baking it outside the bird is the only way to go for holiday peace. If you are serious about making a spectacular dressing ahead of time, check out my recipe for MakeAhead Thanksgiving Dressing: Sage and Pecan, Moist Crispy Top .
The Secret to the Perfect Golden Crust
The true genius of this recipe lies in the sheer amount of butter we use and the fact that we bake it partially covered. Melted butter isn’t just flavor; it’s the fat that enables the exterior crust to achieve its deep golden brown color and shatteringly crisp texture.
That tight foil seal during the first half of baking creates a steamy environment, ensuring the center bread cubes fully hydrate and cook through evenly. Then, pulling the foil off for the final bake allows that top layer to quickly toast and crisp up. It’s a flawless two-stage cooking process.
Quick Prep: Stuffing in Under 30 Minutes
Once your bread is dried (which takes no active time, promise!), the active cooking phase is incredibly fast. We are focused on layering flavor in the pan: browning the sausage, softening the mirepoix, and blooming the herbs in butter. All of that happens in one skillet before the grand assembly.
The key to efficiency is prepping all your chopping (onion, celery, herbs) the morning before you plan to mix everything. We want smooth transitions between steps, not panicked chopping while the sausage burns.
The Maillard Reaction: Browning the Bread Base
If your bread isn’t dry, your stuffing will be paste. Period. We toast the bread cubes with a little butter at a low temperature to remove all internal moisture, making them porous sponges ready for the stock.
This also activates the Maillard reaction on the surface of the bread cubes, giving them a subtle, toasted flavor profile that bland, fresh bread simply lacks.
Balancing Fat, Acidity, and Herbaceous Notes
This dressing is rich it’s Thanksgiving! The richness comes from the savory sausage and the generous amount of butter used to sauté the vegetables. We need the aggressive flavor of fresh sage and thyme to cut through that fat, providing an earthy, sharp counterpoint.
The small amount of egg we add doesn’t turn it into a quiche; it acts as a subtle binder, holding the whole glorious mess together without making it overly dense.
Why Baking Outside the Bird Guarantees Success
Aside from the texture benefits we just covered, safety is paramount. Stuffing needs to hit 165°F (74°C) internally to be safe, which is extremely difficult to verify when it's deep inside a turkey cavity that’s simultaneously roasting. Baking it in a separate dish is the foolproof method.
Essential Components for Grandmas Thanksgiving Stuffing
Selecting Your Carb Base: Sourdough vs. Classic White Bread
I am fiercely loyal to sourdough for this recipe. Its slightly tangy, hearty crumb holds up beautifully to the liquid, avoiding that mushy texture we dread. It gives the final dish a complexity you can't get otherwise.
If you prefer a softer, fluffier result, a rustic white bread or even a slightly sweetened brioche works well, but be cautious with the stock, as they absorb faster. If you want to dive deeper into the world of texture, I highly recommend checking out my Homemade Stuffing: Crispy Sourdough Stuffing for Turkey Dinner for extra tips on bread prep.
The Aromatic Trinity: Sage, Thyme, Onion, and Celery
This is the foundation of classic stuffing recipes —the savory mirepoix (onion and celery) coupled with the potent herbs. You must use fresh herbs here; the flavor difference is startling. Dried herbs are too muted and dusty for this application.
We cook the onions and celery low and slow in the rendered sausage fat and butter until they are soft and sweet, releasing their moisture and concentrating their flavor. Adding the sage and thyme at the end, just before mixing, allows them to 'bloom' in the hot fat, releasing maximum fragrance.
The Sausage Factor: Choosing the Right Grind and Seasoning
We use mild Italian sausage, or if you can find it, a sage flavored breakfast sausage is even better. The ground meat adds a wonderful, savory salinity and richness that elevates this dressing from a simple bread side to a main contender.
Crucially, ensure you drain most of the rendered fat , otherwise the dressing becomes greasy, not just moist.
Liquid Gold: Broth Choices and Butter Ratios
This recipe calls for a generous amount of butter 3/4 cup for sautéing alone. Do not skimp! This fat carries the flavor of the sage and ensures every bread cube is coated, leading to an incredibly tender crumb.
We use low-sodium chicken or turkey stock because we need to control the final seasoning precisely. Always warm the stock slightly before mixing; warm stock absorbs better and prevents the butter from seizing up when you mix it in.
Substitutions Table
| Ingredient to Substitute | Recommended Substitution |
|---|---|
| Sourdough Bread | Cubed Challah or Brioche (Use slightly less stock). |
| Unsalted Butter | Ghee or high-quality refined coconut oil (if dairy-free). |
| Mild Italian Sausage | Omit entirely, replacing the lost fat with 4 extra Tbsp of butter, or substitute with smoked ham hock pieces. |
| Chicken Stock | Quality Vegetable Stock (for non-meat options) or water + Better Than Bouillon paste. |
| Fresh Sage | Dried Rubbed Sage (Use 1/3 the quantity, about 1 Tbsp). |
step-by-step Guide: Building Deep Flavor Layers
Phase 1: Drying and Toasting the Bread Foundation
Cube your bread the day before and let it air dry on the counter, or use the oven method described in the instructions. This is essential for achieving a perfect texture. If the bread is soft, you fail.
Tossing them with a little melted butter before the low toast helps them brown slightly and makes them impervious to mushiness.
Phase 2: Sautéing the Sausage and Mirepoix Base
Start by rendering the sausage until it’s beautifully crisp and browned, which provides an enormous foundation of flavor. Once drained (save that rendered fat!), add the remaining butter and sauté the onions and celery until they are completely translucent about 8 to 10 minutes.
Don’t rush this step; softening the vegetables is key to their sweetness.
Chef's Note: Add the herbs and minced garlic only during the last 60 seconds of sautéing. This prevents the garlic from burning and ensures the sage and thyme release maximum fragrance right before mixing.
Phase 3: The Critical Mixing and Saturation Point
Transfer your dried bread and your savory sausage/mirepoix mixture to the largest bowl you own. Gently toss to coat. Now, we add the whisked eggs and then the warm stock, slowly, ladle by ladle.
You must mix gently, using folding motions, not aggressive stirring. Stop adding liquid when the bread is thoroughly saturated but still holds its shape, and you don't see a visible pool of liquid in the bowl bottom. I once added too much stock and ended up with Thanksgiving porridge don't be me.
Phase 4: Achieving Peak Texture in the Oven
Transfer the mixture to the prepared baking dish, pressing lightly but not packing it tightly, which would prevent steam circulation. Covering it ensures the inner bread cubes cook evenly and retain moisture.
When you uncover it for the last 15 minutes, the exposed top layer finally starts to crisp and turn golden brown, giving you that beautiful crunch.
Troubleshooting and Expert Secrets for Perfect Dressing
Mistake Alert: The Danger of Under Seasoning
Stuffing is a huge volume of bland ingredients (bread and stock) that needs serious seasoning. People often forget to season the sausage and the vegetables as they go, leaving all the work to the end. Fix: Taste the stock and egg mixture before you pour it over the bread.
It should taste slightly too salty and herbaceous right now, because once it's absorbed by the bread, the flavor will dilute.
How to Fix Stuffing That Looks Too Dry (Before Baking)
If you have assembled your dressing and it looks like dry, crumbly pebbles, don't panic. Gently drizzle a little more warm stock (or melted butter) over the top, cover the baking dish, and let it sit for an extra 15 minutes before baking.
The added time will allow the dry spots to slowly hydrate.
Pro Tip: Infusing Butter with Sage Before Sautéing
Want turbo charged flavor for your Buttery Stuffing Recipes ? Melt the butter needed for sautéing in the skillet first. Drop in a few whole sage leaves and heat until the butter smells deeply fragrant and the leaves are crisp.
Remove the crispy leaves and continue with the recipe, using the now sage infused butter to sauté the onions and celery. This creates another layer of savory complexity.
make-ahead Mastery: Storing and Freezing Guidelines
Prepping 24 Hours Ahead: Assembling and Chilling Safely
This recipe is fantastic for Thanksgiving meal planning. You can follow all the steps up to Phase 4 (the transfer to the baking dish). Instead of baking, cover the dish tightly with plastic wrap and foil and refrigerate for up to 24 hours.
Warning: Pull the dish out of the fridge at least 30 minutes before baking to let the glass pan warm up slightly, preventing thermal shock in the hot oven.
Freezing Unbaked vs. Baked Stuffing (The Quality Difference)
You can absolutely freeze this, but quality suffers a bit either way. I recommend freezing it unbaked . Assemble the entire mixture in a disposable aluminum pan, wrap it tightly in two layers of foil, and freeze for up to 3 months.
When ready to use, thaw overnight in the fridge and bake as directed. Baked and frozen stuffing often gets dry and crumbly upon reheating.
The Best Method for Reheating Leftovers Without Drying Out
Leftovers are mandatory for turkey sandwiches! Store fully cooled leftover stuffing in an airtight container in the fridge for up to 4 days. To reheat, place the portion in an oven safe dish, add 1 2 tablespoons of stock or gravy, cover tightly with foil, and warm in a 300°F (150°C) oven until heated through.
The foil keeps the steam locked in, maintaining moisture.
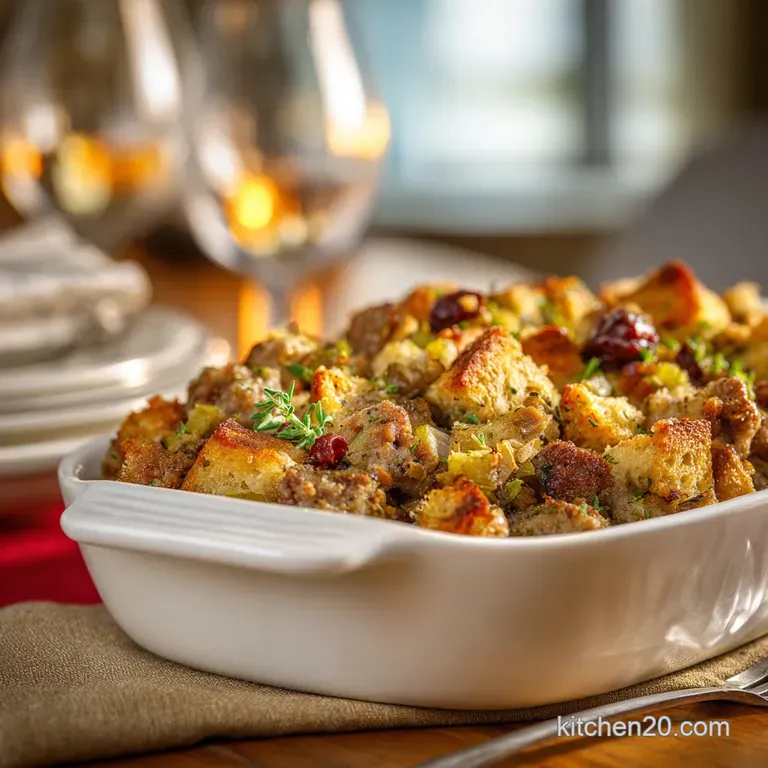
Completing the Feast: Pairing Grandmas Thanksgiving Stuffing
How to Serve This Thanksgiving Stuffing Casserole
This robust dressing deserves equally complex partners on the plate. The richness of the sausage and butter means you need something sharp or sweet to cut through the fat. A vibrant cranberry sauce is non-negotiable.
Don't forget the greens! While the stuffing is the star, balance your plate with something light and tangy. We always serve this alongside our Thanksgiving Side Dishes: Crispy Brown Butter Maple Brussels Sprouts . The bitter crunch of the sprouts is the perfect foil for the heavy, savory dressing.

Recipe FAQs
Why is my stuffing dry or crumbly, and how can I fix it?
If your stuffing is too dry, it likely needed more binding liquid; mix in 1/4 to 1/2 cup extra warm chicken or vegetable broth before returning it to the oven. Ensure you measure the initial broth accurately and trust the mixture should feel moist, but not soaking wet, before baking.
If it is too wet, allow it to bake uncovered for a longer period to evaporate excess moisture and help the bread cubes crisp up.
Can I prepare Grandma's Stuffing ahead of time?
Yes, assembly can be done 12-24 hours in advance; simply prepare all components, mix them together in the baking dish, and store covered in the refrigerator. Do not add the eggs or the bulk of the broth until just before baking, as the salt will draw moisture out of the bread and result in a mushy texture.
When baking chilled stuffing, add 10-15 minutes to the total cooking time to ensure it heats through completely.
Since this is baked outside the bird, how do I get a nice, crispy top crust?
To achieve a perfectly crisp crust, ensure you bake the stuffing uncovered for the last 20-30 minutes of the bake time. You can also lightly dot the surface with small cubes of extra butter before its final bake, which helps promote browning.
If the top begins to brown too quickly, loosely tent the dish with aluminum foil.
I don't eat pork. What is a suitable substitute for the sausage?
You can easily substitute the traditional pork sausage with ground chicken, turkey sausage, or mild Italian sausage for a similar flavor profile. Alternatively, for a vegetarian take, use an equal volume of sautéed mushrooms and chestnuts to add savory depth and texture.
Always cook the substitute meat fully before adding it to the stuffing mixture.
How should I store leftover stuffing, and can it be frozen?
Store cooled leftovers in an airtight container in the refrigerator for up to four days; reheat in the oven or air fryer for best texture results. While freezing can sometimes compromise the integrity of the bread, you can freeze leftover portions for up to two months.
Thaw overnight in the refrigerator and reheat until piping hot (165°F/74°C).
Can I modify this recipe to be fully vegetarian or vegan?
Absolutely; to make it vegetarian, simply omit the sausage and ensure you use a vegetable broth. For a fully vegan version, replace the sausage with sautéed plant based crumbles or mushrooms, swap the butter for vegan sticks, and skip the eggs entirely, relying on slightly more broth for binding.
The resulting stuffing will be slightly more crumbly but equally delicious.
The recipe specifies baking outside the bird. Is it safe to cook it inside?
While traditional, baking stuffing inside the turkey is discouraged due to food safety concerns, as the stuffing must reach an internal temperature of 165°F (74°C) to be safe, which often results in an overcooked turkey.
If you insist on cooking it inside, pack the cavity loosely and use a thermometer to ensure the innermost part of the stuffing reaches the required 165°F temperature. The safest and tastiest method is always baking separately.
Grandmas Thanksgiving Stuffing Recipe

Ingredients:
Instructions:
Nutrition Facts:
| Calories | 237 kcal |
|---|---|
| Protein | 2.9 g |
| Fat | 18.9 g |
| Carbs | 18.1 g |
