Hersheys Perfectly Chocolate Cake the Deeply Moist Classic Fudge Recipe
- Unlocking the Secret to the World's Most Reliable Chocolate Cake
- Mastering the Hersheys Perfectly Chocolate Cake: What Makes it Different?
- The Simple Pantry Staples for Ultimate Chocolate Intensity
- Preparing Your Mise En Place for the Best Hersheys Perfectly Chocolate Cake
- Step and by-Step Guide to the 'Perfectly Chocolate' Batter Method
- Achieving the Ideal Bake and Temperature Control
- Expert Troubleshooting and Frequently Asked Baking Questions
- Finishing Your Masterpiece: Recommended Frostings for Hersheys Perfectly Chocolate Cake
- Recipe FAQs
- 📝 Recipe Card
Unlocking the Secret to the World's Most Reliable Chocolate Cake
Okay, look. We’ve all been there. You spend an hour lovingly crafting a beautiful chocolate cake that promises "deep fudgy flavour," only for it to emerge from the oven looking glorious but cutting like a brick. Dry. Dense. Disappointing. It’s a heartbreak.
I’ve wasted so much cocoa powder on experimental recipes that failed me.
But then there is the one . The recipe that every single person I know, from complete baking novices to seasoned pros, turns to when they need guaranteed success. I am talking, of course, about the classic Hershey’s Perfectly Chocolate Cake.
This isn’t just a cake. It’s a foundational document. It’s chocolate cake perfected through pure, American kitchen science. Forget creaming butter and sugar; we are making the easiest, moistest, most reliably rich chocolate cake you will ever pull out of your oven.
Get ready for moistness levels you didn’t think were possible in homemade chocolate cake recipes.
Mastering the Hersheys Perfectly Chocolate Cake: What Makes it Different?
This specific recipe the one printed right on the back of the cocoa canister for decades is pure genius because it ditches the fussy methods and focuses on chemistry. It's a true dump and whisk job, but the key differences are critical to understanding why it works so brilliantly every single time.
The Magic of the Hot Water Method
This is the non and negotiable step. The recipe calls for adding boiling water, or even better, boiling hot black coffee, right at the end of the batter mixing. Why? That heat instantly wakes up the cocoa powder.
It dissolves the solids and releases all the trapped flavour compounds, turning a simple mix of cocoa and sugar into a true chocolate flavour bomb. We call this "blooming" the cocoa. If you want intensely dark chocolate flavour, this is how you achieve it.
Why Hershey's Sets the Standard for Moistness
It comes down to fat choice. Many classic recipes use softened butter. Butter contains water, and when the cake bakes, that water evaporates, leaving you with a slightly drier crumb. This Hershey's Perfectly Chocolate Cake recipe relies on vegetable oil.
Oil is 100% fat and remains liquid at room temperature, meaning it keeps the crumb tender, soft, and ridiculously moist for days. Trust me, if you want a top rated chocolate cake recipe that stays moist, ditch the butter and grab the oil.
A History of Chocolate Perfection in One Pan
Seriously, ask anyone over the age of 40 if they recognize this recipe. They will. This is the ultimate church potluck, birthday party, Tuesday night comfort food cake. It feels deeply familiar because it has been passed down for generations precisely because it’s idiot and proof.
It was designed to be made quickly with simple pantry staples, resulting in reliable chocolate perfection.
Essential Pre and Bake Kitchen Checks
Baking is science, not magic, and you need your ingredients ready to roll. Before you even preheat the oven, run down this list:
- Room Temp Buttermilk and Eggs: This is key for creating a smooth emulsion with the oil. Cold ingredients will seize up your batter. Get them out 30 minutes before you start.
- Boiling Water (or Coffee) Ready: Make sure your coffee or water is actually boiling when it goes into the batter. If it's just warm, it won't bloom the cocoa properly.
- Pan Prep: Don't just grease and flour. Cut parchment paper circles to fit the bottom of your pans. This ensures a non and stick bottom release, guaranteed.
Selecting the Right Pan for Even Baking
I learned this the hard way: if you use dark non and stick pans, you're going to get dark crusty edges and a dry cake. Dark metal absorbs heat quickly, causing the exterior to set before the centre has a chance to fully rise.
| Pan Type | Performance Note |
|---|---|
| Light Metal | Ideal. Reflects heat, ensuring even browning. |
| Dark Non and Stick | Avoid. Causes over and browning and dryness near the edges. |
| Glass/Ceramic | Okay, but often requires slightly lower oven temperature (by 25°F). |
For the classic two and layer cake, stick to light and colored aluminum 9 inch round pans.
The Simple Pantry Staples for Ultimate Chocolate Intensity
One of the beautiful things about this recipe is that it doesn't require any fancy single and origin cocoa from Borneo. You need the stuff you already have in the cupboard the flour, the sugar, the oil but quality ingredients, especially the cocoa, always make a difference.
If you have a good quality cocoa available, use it. If not, the classic Hershey's natural cocoa powder works exactly as intended.
Preparing Your Mise En Place for the Best Hersheys Perfectly Chocolate Cake
"Mise en place" sounds fancy, but it just means getting your ducks in a row. It saves you from that moment where you realize you’re halfway through mixing and suddenly you don’t have enough baking soda.
Do You Need Dutch Processed or Natural Cocoa?
You need natural cocoa powder for this recipe. Why? Because natural cocoa is acidic. That acidity is necessary to react with the baking soda in the recipe, which is alkaline, to produce the gas needed for a beautiful rise.
Dutch and processed cocoa has been neutralized (made non and acidic) and only works with baking powder. If you swap them out here, your cake will be flat and dense. Stick to the classic unsweetened natural cocoa powder, like the Hershey's brand itself.
Ensuring Your Leavening Agents Are Fresh
Baking soda and baking powder don’t last forever. If your leavening agents have been hiding in the back of the pantry for two years, they are probably dead. Quick test: put a teaspoon of baking soda in a small bowl, add a tablespoon of white vinegar. If it fizzes immediately, you’re good.
If it does nothing, toss it and buy a fresh box. This is non and negotiable for a perfect rise.
Required Mixing Bowls and Baking Equipment Checklist
We are keeping this simple. You don't need a heavy and duty stand mixer (though it helps with the frosting later).
| Equipment | Why You Need It |
|---|---|
| Two 9 inch Pans | For perfect, even layers and standard baking time. |
| Whisk & Spatula | For quick blending; prevents overmixing the batter. |
| Large Mixing Bowls (2) | One for dry, one for the initial wet ingredients. |
| Measuring Cups/Spoons | Precise measurements are the backbone of good baking. |
Measuring Wet Ingredients Precisely
The buttermilk and oil need to be spot on. When measuring liquids, always do so at eye level. Don't eyeball that half cup of oil. Also, make sure those eggs and buttermilk are truly at room temp. This allows for superior emulsification the binding of the fat (oil) and the liquid (buttermilk/egg).
Sifting Dry Ingredients: Myth or Must?
I'm going to be real with you: if you’re using standard all and purpose flour, you probably don’t need to sift. Flour is generally well and aerated these days. However, you absolutely must whisk the dry ingredients thoroughly flour, sugar, cocoa, salt, and leavening.
Whisking ensures the leavening is distributed evenly and breaks up any lumps in the cocoa powder. I always whisk for a solid minute, counting it as my sifting replacement.
Related Recipes Worth Trying
- Sex In A Pan Dessert The UltraCreamy Classic Chocolate Delight — Sex In A Pan Dessert is the nostalgic fourlayer masterpiece your dinner party needs Get the original recipe for this decadent nobake chocolate delight with...
- Levain Bakery Chocolate Chip Crush Cookies Get the Thick Gooey Center — Make the viral Levain Bakery Chocolate Chip Crush Cookies at home This giant chewy chocolate chip cookies recipe uses cold butter to guarantee that...
- Low Carb Keto Pound Cake Cream Cheese Almond Flour Luxury — This Low Carb Keto Pound Cake recipe delivers the moist dense crumb you crave We use cream cheese and almond flour to create the ultimate gluten-free pound...
Step and by-Step Guide to the 'Perfectly Chocolate' Batter Method
Right then. Let’s crack on with the mixing.
Achieving the Ideal Bake and Temperature Control
Combining Dry Ingredients for Uniformity
In your largest bowl, dump all your dry ingredients (flour, sugar, cocoa, leavening, salt). Whisk them together aggressively. You need to make sure you see absolutely no streaks of baking soda or white clumps of sugar. This sets the foundation for a cake that rises beautifully and tastes consistent.
Whip It Real Good: Incorporating the Wet Components
In a separate bowl, whisk together the room temperature eggs, buttermilk, vanilla, and vegetable oil. Once that is smooth, pour the entire wet mixture into the dry mixture. Start mixing on low speed, or use a sturdy wooden spoon. You only want to mix until the streaks of flour are mostly gone. Do not overmix here.
Overmixing develops the gluten too much, which kills that wonderfully tender crumb we are aiming for.
The Critical Role of Boiling Water in Achieving Tenderness
Stop mixing when the batter is mostly smooth. Now, pour in that full cup of boiling water (or hot coffee my preferred secret weapon for ultimate richness). The batter will immediately become very thin and look almost wrong. This is absolutely correct.
Mix slowly until just combined, 30 seconds max. This thin, runny batter is the secret to getting that perfect, moist, light crumb structure. Divide immediately and get it into the oven. Don’t let it sit on the counter.
When to Trust the Toothpick Test
Baking time for two 9 inch layers is typically 30 to 35 minutes at 350°F (175°C). But ovens lie, and timing is everything.
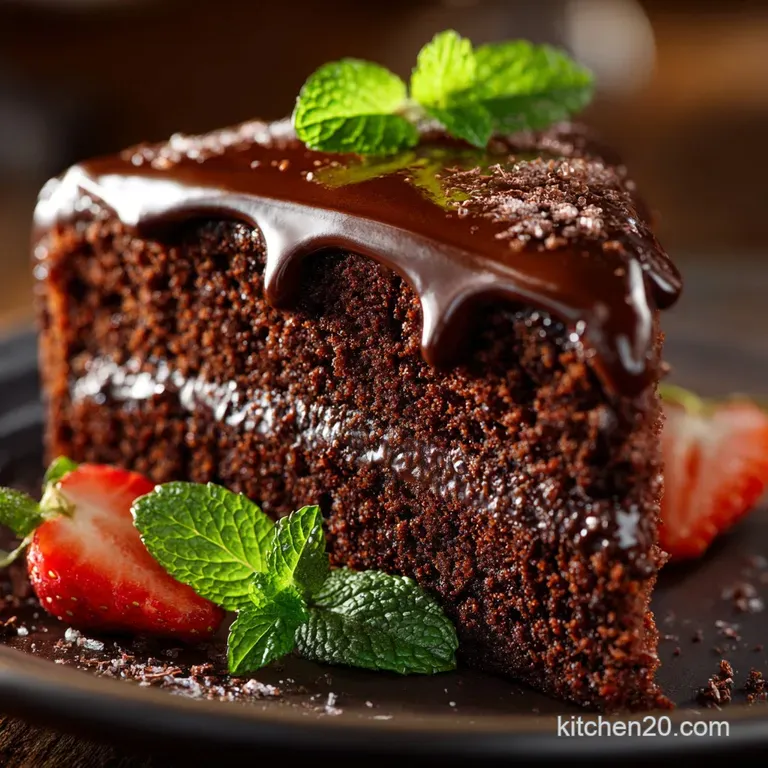
CRITICAL WARNING: Do not wait for the toothpick to come out completely dry. If it is dry, you have overbaked the cake. You want the toothpick inserted into the center to come out with moist, sticky crumbs attached.
That is the sign of a perfect, fudgy, moist chocolate cake.
Cooling Rack Best Practices for a Seamless Release
When the cakes are done, let them cool in the pans on a wire rack for exactly 10 minutes. Set a timer. After 10 minutes, gently run a knife around the edge, invert them onto the wire rack, and peel off the parchment.
Let them cool completely like, completely, about an hour before frosting. Trying to frost a warm cake is a one and way ticket to a sloppy, runny mess.
Troubleshooting: Why Your Cake Sank in the Middle
This usually happens for one of three reasons:
- The Oven Door: You opened the oven door too early, letting a blast of cold air hit the cake before the structure set.
- Expired Leavening: Your baking powder/soda were too old and exhausted their lifting power halfway through the bake.
- Too Much Liquid: If you added more than the cup of hot water, the structure might not have been strong enough to hold up.
Expert Troubleshooting and Frequently Asked Baking Questions
If you’re attempting to make this easy Hershey's Chocolate Cake, you’re probably wondering about substitutions.
Can I Make This Recipe Gluten and Free or Dairy and Free?
Gluten and Free: Yes! Because this cake is so inherently moist thanks to the oil and hot water, it handles GF flour well. I have had great success substituting the all and purpose flour with a standard 1 to-1 gluten and free baking blend that already contains xanthan gum.
Dairy and Free: Also yes. You must substitute the buttermilk. You can make a dairy and free buttermilk substitute by using 1 cup of full and fat plant milk (soy or oat works best) and adding 1 tablespoon of white vinegar or lemon juice, letting it sit for five minutes until curdled.
Use a high and quality non and dairy butter for the frosting.
Optimizing Cake Flavour: Aging and Serving Tips
Honestly, this cake is great fresh, but I find the flavour actually deepens and the texture improves slightly on the second day. Wrap it tightly once cooled (before frosting) or cover the frosted cake with a dome. Serving it slightly chilled helps maintain that excellent structure.
A garnish of fresh raspberries or a little vanilla bean ice cream cuts through the richness beautifully.
The Ultimate Guide to Storing Leftover Chocolate Cake
Leftover cake should be stored in an airtight container at room temperature for up to three days. If you still have leftovers after that (how??), wrap individual slices tightly in plastic wrap, then foil, and freeze them for up to three months. Thaw overnight in the fridge.
Nutrition Facts and Calorie Breakdown
Look, this is not a health food blog. This is rich, decadent dessert. Based on 12 generous servings (and the full Perfectly Chocolate Cake Frosting recipe), you’re looking at around 450 480 calories per slice, with high sugar and fat content. But it’s worth every single calorie.
Scaling the Recipe: Adapting for Cupcakes or Sheet Pans
This batter is extremely adaptable.
- Cupcakes: Fill liners about two and thirds full. Bake time is much shorter, around 18 to 22 minutes.
- Sheet Pan: If you want to make the easy Hershey's Chocolate Cake in 9x13 pan, this is perfect for large gatherings. Pour the entire batter into a prepared 9x13 inch pan. Bake time will be closer to 35 to 40 minutes, using the moist crumb toothpick test.
Beyond the Recipe: Reader Success Stories and Testimonials
I love hearing from you when you try this one. It's truly rewarding because I know how reliable this is. I had a reader tell me last month that her son specifically requested the "super moist, dark chocolate cake" from this blog for his 8th birthday, and she nailed it on her first try.
That’s why I share these old and school, tried and true winners. Baking should be fun and delicious, not stressful. Go forth and conquer the chocolate cake.
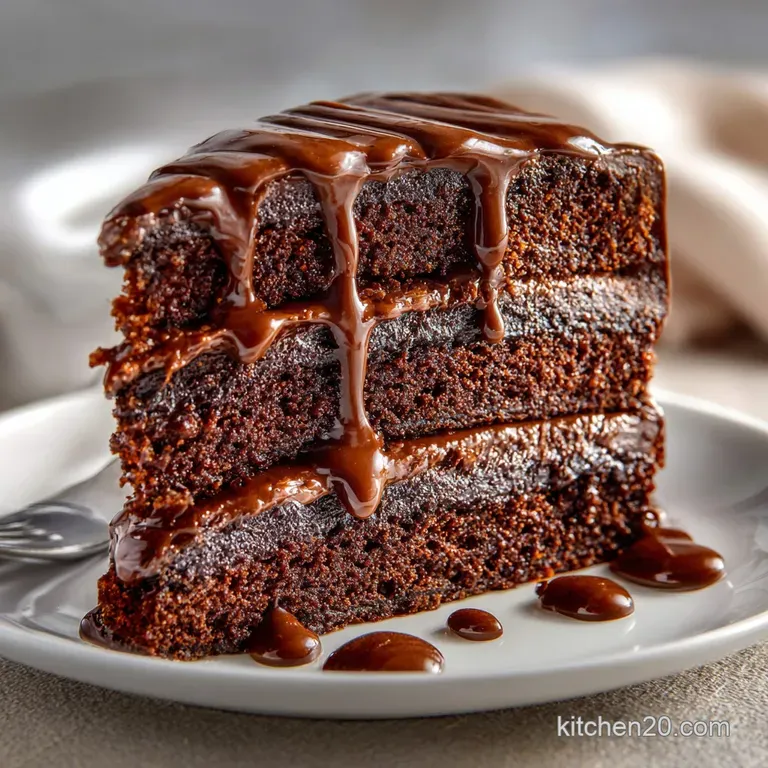
Finishing Your Masterpiece: Recommended Frostings for Hersheys Perfectly Chocolate Cake
The classic pairing for this cake is the simple, quick fudge frosting that Hershey’s recommends. It's incredibly creamy and sets up just enough to hold its shape, matching the dense richness of the cake without overwhelming it.
For a variation, however, you could try these pairings:
- Classic Fudge: (The official Perfectly Chocolate Cake Frosting) Uses cocoa and powdered sugar, beaten with butter and milk. Simple, intensely chocolatey.
- Cream Cheese: A tangier option. Use a standard vanilla or slightly coffee and flavored cream cheese frosting to cut the richness of the deep chocolate.
- Dark Chocolate Ganache: If you want to go ridiculously rich and glossy, a simple pourable ganache made with heavy cream and high and quality dark chocolate is a showstopper.

Recipe FAQs
Crikey, the batter looks really runny! Have I done something wrong with this cake recipe?
No worries, mate, that thin batter is exactly how it should be! The boiling liquid 'blooms' the cocoa for maximum flavour depth, and the vegetable oil (instead of butter) is the secret ingredient that ensures that famous, ridiculously moist, and tender crumb.
Is there a sneaky way to boost the chocolate flavour in this Hersheys Perfectly Chocolate Cake?
Absolutely, it’s the classic baker's secret: substitute the boiling water with an equal amount of hot, strong black coffee or espresso. It won't make the cake taste overtly of coffee, but it seriously deepens and enhances the richness of the cocoa a real game changer.
I’ve run out of buttermilk. Can I just use normal milk, or is that a major baking faux pas?
Don't panic, we can manage that! Just add one tablespoon of white vinegar or lemon juice to a measuring cup, top it up with regular milk to the 1-cup mark, and let it stand for five minutes until it curdles slightly. You'll have a perfect, tangy substitute ready for action.
Can I skip the layer cake fuss and make this as a simple sheet cake or quick cupcakes?
You certainly can, which is splendid if you're feeding a big crowd! Bake the entire batch in a 9x13 inch sheet pan for 35 40 minutes, or convert it into 24 standard cupcakes, checking for doneness after 18 22 minutes.
I've got half a cake left how should I store it so it doesn't dry out and become a disappointment?
Keep the cake wrapped tightly in cling film or in an airtight container at room temperature for up to three days, as refrigeration can sometimes dry out the sponge. If you must keep it longer, chill it, but always let slices come back to room temperature before serving for the best possible texture.
Hersheys Perfectly Chocolate Cake Recipe
Ingredients:
Instructions:
Nutrition Facts:
| Calories | 460 calories |
|---|---|
| Fat | 20 grams |
| Fiber | 3 grams |
