High Protein Honey Garlic Shrimp Recipe
- Time: Active 10 minutes, Passive 10 minutes, Total 20 minutes
- Flavor/Texture Hook: Sticky, umami rich glaze with snappy, tender seafood
- Perfect for: Post workout recovery or efficient weeknight meal prep
- Fast High Protein Honey Garlic Shrimp
- Vital Stats for Meal Prep
- The Premium Ingredient Breakdown
- Tech and Tools You Need
- Executing the Flash Sear Technique
- The Science of Why it Works
- Solving Potential Texture Issues
- Flavor Hacks and Diet Swaps
- Freshness Control and Reheating
- Three Levels of Plating Art
- Pro Tips for Shrimp Success
- Recipe FAQs
- 📝 Recipe Card
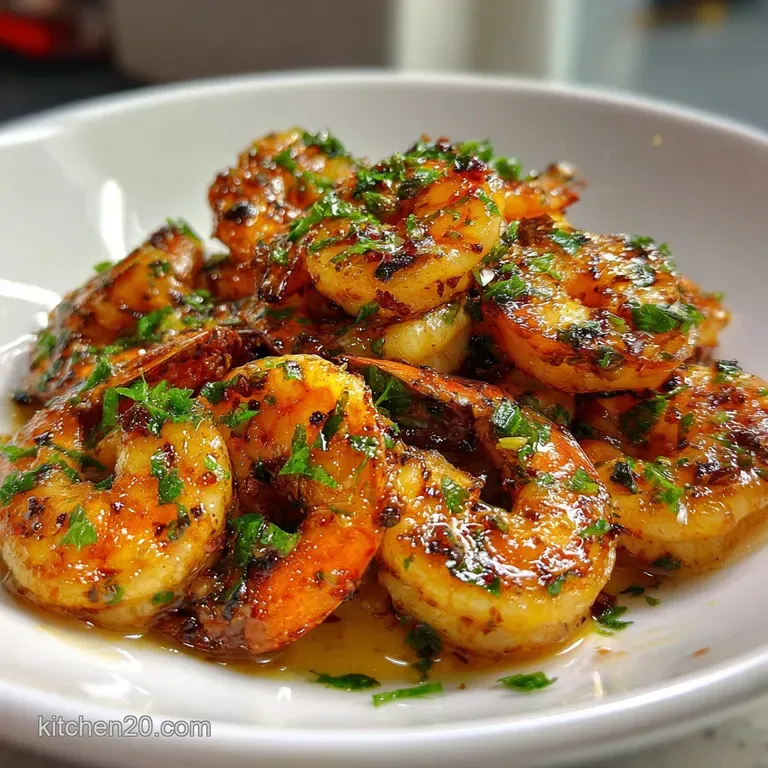
Fast High Protein Honey Garlic Shrimp
Imagine the high pitched hiss as cold seafood hits a shimmering layer of 100% Pure Avocado Oil. That sound is the start of something special, a quick transition from raw ingredients to a sticky, golden masterpiece. If you have ever suffered through a rubbery, bland shrimp dinner, I feel your pain.
I used to overcook these little guys constantly until I realized the secret is all in the timing and the sugar to acid ratio.
This dish is a staple in my rotation because it solves the "I am too tired to cook" problem while hitting those massive protein goals. We are looking at 35g of protein per serving, which is basically a fitness enthusiast's dream.
It's about revolutionizing the way we think about fast food by creating a connected kitchen experience where efficiency meets high level nutrition.
We are going to use a specific technique to ensure the honey doesn't burn while the garlic stays fragrant rather than bitter. It is a simple platform for flavor that you can customize based on what is in your fridge. Let’s get into the details of why this specific method works so well every single time.
Vital Stats for Meal Prep
When we look at the data for this dish, the efficiency is clear. We are optimizing for speed without sacrificing the structural integrity of the ingredients.
| Metric | Measurement | Note |
|---|---|---|
| Active Effort | 10 minutes | Focus on the mince and sear |
| Total Evolution | 20 minutes | From fridge to plate |
| Protein Density | 35 g | Per serving (4 servings total) |
| Caloric Load | 276 kcal | High volume, low calorie |
Compared to a traditional shrimp scampi or a slow simmered gumbo, this method is built for the modern, connected lifestyle. It is about maximum output for minimum time input.
Comparison of Preparation Styles
| Method | Cook Time | Texture Profile | Best Use Case |
|---|---|---|---|
| Fast Flash Sear | 10 minutes | Snappy and Glazed | Post gym refueling |
| Classic Low-Sauté | 25 minutes | Soft and Buttery | Sunday brunch |
| Braised Method | 45 minutes | Tender and Infused | Stews and Soups |
The Premium Ingredient Breakdown
To get the best results, you need to be intentional about your shopping list. I usually grab my 1.5 lbs Large Shrimp from the frozen section, specifically the "Easy Peel" variety if I am in a rush.
The Essentials
- 1.5 lbs Large Shrimp: Peeled and deveined. Why this? Provides the structural protein base for the entire dish.
- 0.33 cup Raw Honey: I prefer [Nature Nate’s] for its consistency. Why this? It creates the sticky glaze via caramelization.
- 3 tbsp Low Sodium Soy Sauce: [Kikkoman] is a solid choice. Why this? Adds salt and umami without overpowering the honey.
- 1 tbsp Fresh Ginger: Grated finely. Why this? Cuts through the sweetness with a sharp, spicy bite.
- 5 cloves Garlic: Freshly minced, not the jarred stuff. Why this? Essential for that signature aromatic profile.
- 1 tbsp Fresh Lime Juice: Squeezed fresh. Why this? The acid balances the sugar and brightens the seafood.
- 1 tbsp Avocado Oil: [Chosen Foods] works perfectly here. Why this? High smoke point prevents the oil from breaking down.
- 1 tsp Smoked Paprika: [McCormick Gourmet]. Why this? Adds color and a subtle depth of flavor.
- 0.5 tsp Kosher Salt: [Diamond Crystal]. Why this? Controlled seasoning that adheres well to the protein.
- 0.5 tsp Cracked Black Pepper: Freshly ground. Why this? Adds a foundational heat to the dry rub.
Tech and Tools You Need
You don't need a high end lab to make this, but the right hardware acts as a catalyst for the Maillard reaction.
- Lodge 12 Inch Cast Iron Skillet: This is my preferred platform for heat retention. It ensures the temperature doesn't drop when the shrimp hit the pan.
- Microplane Zester: Essential for getting that ginger into a paste like consistency so it integrates into the sauce.
- Stainless Steel Mixing Bowls: For tossing the shrimp in the dry seasoning without any reactive metallic taste.
- Silicone Spatula: Great for scraping every last drop of that sticky honey glaze out of the pan.
Executing the Flash Sear Technique
This is where we turn raw components into a finished product. Pay attention to the sensory cues, especially the sound of the sizzle.
Phase 1: The High Protein Seasoning
Pat your 1.5 lbs Large Shrimp completely dry with paper towels. Note: Moisture is the enemy of a good sear. Toss them in a bowl with 1 tsp Smoked Paprika, 0.5 tsp Kosher Salt, and 0.5 tsp Cracked Black Pepper until every piece is coated.
Phase 2: Sauce Integration
In a small jar, whisk together 0.33 cup Raw Honey, 3 tbsp Low Sodium Soy Sauce, 1 tbsp grated Fresh Ginger, 5 cloves minced Garlic, and 1 tbsp Fresh Lime Juice. This creates the flavor interface for the dish.
Phase 3: The Flash Sear
Heat your [Lodge] skillet over medium high heat with 1 tbsp Avocado Oil. Once the oil shimmers, add the shrimp in a single layer. Cook for 2 minutes until the bottoms are pink and slightly charred.
Phase 4: The Flip
Flip each shrimp using tongs. Cook for another 1 minute until the centers are opaque. Do not overthink this, they cook faster than you expect.
Phase 5: Creating the Sticky Reduction
Pour the honey garlic mixture directly into the skillet. The liquid will bubble and hiss immediately. Simmer for 2 to 3 minutes until the sauce thickens into a velvety glaze.
Phase 6: The Final Emulsification
Stir the shrimp constantly during the last 30 seconds to ensure they are fully encapsulated by the reduction. The sauce should cling to the protein, not pool at the bottom.
Phase 7: Resting
Remove from heat immediately. Let it sit for 1 minute. This allows the carryover heat to finish the centers without making them rubbery.
Phase 8: Serving
Plate immediately over your choice of base. The residual heat in the cast iron will continue to cook the sauce, so don't linger.
The Science of Why it Works
Protein Denaturation: Rapid heat causes the shrimp proteins to uncoil and rebond, creating a firm, snappy texture. Maillard Reaction: The amino acids in the shrimp react with the sugars in the honey at high temperatures to create complex, savory flavor compounds.
Chef's Tip: Freeze your ginger for 10 minutes before grating. It makes it much firmer and prevents it from turning into a stringy mess on your Microplane.
If you are looking for another prep friendly meal, the fiber in this Hearty Navy Bean Soup recipe makes a great companion for a balanced weekly menu.
Solving Potential Texture Issues
Even with a simple process, variables like pan temperature can cause friction. Use this guide to keep your kitchen operations smooth.
Why Your Shrimp Is Rubbery
The most common error is leaving the seafood in the pan for too long. Shrimp only need about 4 or 5 minutes of total heat exposure. If they have curled into tight "O" shapes, they are overdone. Aim for a "C" shape.
If the Sauce is Too Thin
If your glaze looks more like a soup, your pan might not have been hot enough, or you didn't let the reduction phase last long enough. Increase the heat slightly and let the honey bubble until the bubbles become large and slow.
Quick Fix Solutions
| Problem | Cause | Fix |
|---|---|---|
| Burnt Garlic | Heat too high or added too early | Add garlic with the sauce, not the oil |
| Bland Flavor | Not enough salt or acid | Add an extra squeeze of lime at the end |
| Gray Shrimp | Pan was crowded | Cook in two batches for a better sear |
Flavor Hacks and Diet Swaps
This recipe is a flexible platform that can adapt to various dietary requirements. Whether you are cutting carbs or avoiding gluten, there is a path forward.
Ingredient Substitution Table
| Original Ingredient | Substitute | Why It Works |
|---|---|---|
| Soy Sauce | Liquid Aminos | Similar salty profile, but gluten-free and soy free |
| Raw Honey | Maple Syrup | Thinner consistency, but adds a woody sweetness |
| Avocado Oil | Ghee | High smoke point with a rich, buttery finish |
For a "Low Carb" Twist
If you want to keep the carbs low, swap the honey for a keto friendly maple syrup alternative or reduce the honey by half and add more lime juice. Serve it over cauliflower rice to keep the macros in check.
For Extra Fiber
Adding steamed broccoli or snap peas directly into the pan during the sauce reduction phase is a great way to bulk up the volume without adding significant calories. It turns the dish into a complete one pan ecosystem.
If you enjoy the snap of seafood but want a bit more heat, you should definitely check out my Fiery Cajun Shrimp recipe for a different flavor profile.
Freshness Control and Reheating
Managing your leftovers is key to a successful meal prep strategy.
- Storage: Place the finished dish in an airtight glass container. It will stay fresh in the fridge for up to 3 days.
- Freezing: You can freeze the cooked shrimp for up to 2 months, but the texture will be slightly softer upon thawing.
- Reheating: Avoid the microwave if possible. Reheat in a skillet over medium low heat with a splash of water to loosen the glaze.
- Zero Waste: Don't throw away the shrimp tails or shells if you peel them yourself. Throw them in a freezer bag and save them to make a quick seafood stock later.
Three Levels of Plating Art
Presentation is the user interface of the culinary world. How you arrange the food dictates the initial experience.
| Level | Style | Key Elements |
|---|---|---|
| Simple | Home Style | Served family style in the cast iron skillet |
| Polished | Meal Prep | Divided into clean rows with white rice and greens |
| Restaurant | Elevated | Stacked in the center with micro greens and lime zest |
The Classic Meal Prep Base
For a standard gym dinner, I recommend a base of jasmine rice. The grains act as a sponge for the honey garlic reduction, ensuring no flavor is lost. It is the most efficient way to consume the macros.
The Low Calorie "Power Bowl"
If you are focused on volume, use a bed of baby spinach. The heat from the shrimp will slightly wilt the leaves, creating a velvety texture that contrasts with the snappy seafood.
Pro Tips for Shrimp Success
Let's debunk some common myths that might be holding your cooking back.
Myth: You must use fresh shrimp for the best flavor. Actually, most "fresh" shrimp at the counter was previously frozen anyway. Buying high-quality frozen shrimp allows you to control the thawing process and often results in a fresher product since they are frozen at sea.
Myth: Leaving the tails on makes it taste better. The tails do hold a bit of flavor, but in a sticky dish like this, they mostly just make it harder to eat. If you are meal prepping, take the tails off before cooking for a seamless eating experience later.
Decision Shortcut If you want it crispier, toss the seasoned shrimp in 1 tsp of cornstarch before searing. If you want it spicier, add 1 tsp of red chili flakes to the honey sauce. If you want it more savory, add a dash of toasted sesame oil at the very end.
- 1. Temperature
- Ensure your pan reaches at least 375°F before adding the oil.
- 2. Weight
- Use exactly 1.5 lbs of shrimp to maintain the sauce to protein ratio.
- 3. Time
- Do not exceed 3 minutes for the sauce reduction or it will turn into hard candy.
Creating this High Protein Honey Garlic Shrimp is about more than just a meal; it's about building a sustainable system for your nutrition. It’s simple, it’s fast, and it’s connected to your goals. Let me know how yours turns out!

Recipe FAQs
What should I serve with honey garlic shrimp to make it a complete meal?
Steamed white rice or roasted asparagus are excellent pairings. The rice soaks up the extra honey garlic glaze beautifully, ensuring you don't waste any flavor. For a low-carb option, try serving it over [Oven Spaghetti Squash: How to Cook Perfectly Every Time].
Can I use frozen shrimp without thawing them completely first?
No, you must thaw them fully. Adding frozen or partially frozen shrimp immediately drops the pan temperature, preventing the high heat sear necessary for that snappy texture.
My honey glaze turned black before the shrimp cooked; what went wrong?
Your heat was too high when adding the honey. Honey burns easily due to its high sugar content. You should add the sauce mixture only after the shrimp have seared for a few minutes, allowing the sauce to reduce at a controlled simmer.
How do I boost the protein content even further?
Add a side of lean protein or use larger shrimp. For example, you could pair this with a side of grilled chicken breast prepared using a quick sear technique similar to our [Ultimate Guide to Grill Spicy Chicken with Zesty Marinade: 5 Amazing Tips].
Can I substitute soy sauce with a gluten-free option?
Yes, use tamari or coconut aminos. These substitutes provide the necessary umami and salt content without introducing gluten. Be aware that coconut aminos are slightly sweeter, so adjust the honey down marginally.
Is this recipe suitable for meal prepping more than two days in advance?
It is best consumed within 48 hours for optimal texture. While safe longer, the glaze tends to soak too deeply into the shrimp after day three, losing some of that initial sticky surface appeal.
What if I don't have fresh ginger?
Use dried ground ginger, but reduce the quantity significantly. Use about 1/4 teaspoon of dried ginger to replace the tablespoon of fresh ginger, as the dried form is much more concentrated in flavor.
High Protein Honey Garlic Shrimp
Ingredients:
Instructions:
Nutrition Facts:
| Calories | 276 kcal |
|---|---|
| Protein | 35 g |
| Fat | 4.4 g |
| Carbs | 25 g |
| Fiber | 0.4 g |
| Sugar | 23 g |
| Sodium | 740 mg |
