The Ultimate 90-Minute Instant Pot Pot Roast: a Proper Sunday Dinner
- The Ultimate 90 Minute Instant Pot Pot Roast: A Proper Sunday Dinner
- The Science of Tenderness: Achieving Flavor Depth Under Pressure
- Building the Flavor Base: Essential Ingredients and Strategic Swaps
- The Ultimate Cooking Method: Step-by-Step Instant Pot Pot Roast Execution
- Troubleshooting Your Pot Roast: Tips for Flawless Results
- Meal Prep and Preservation: Storing Leftover Pot Roast
- Completing the Sunday Spread: Perfect Pairings for Your Roast
- Recipe FAQs
- 📝 Recipe Card
The Ultimate 90 Minute Instant Pot Pot Roast: A Proper Sunday Dinner
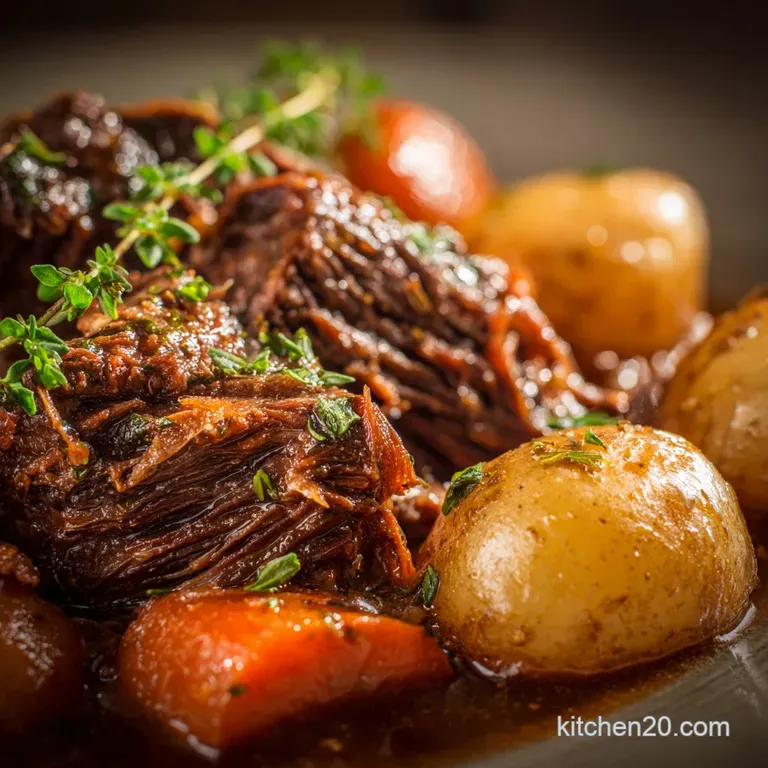
When that first incredible scent of savory thyme and caramelized onion hits you, trust me, you’ll know exactly why you bothered cooking. This isn't just Sunday dinner; it’s a sensory experience, delivering meltingly fork tender pot roast that tastes like it braised all day long.
That deep, dark, rich gravy makes you want to lick the plate clean, honestly.
I used to spend half my weekend babysitting a massive Dutch oven, terrified of drying out the roast or having a mushy final result. But the Instant Pot completely changed the game, cutting the cooking time down by hours and making tender, classic pot roast an achievable weeknight dream.
This recipe is fast, forgiving, and budget friendly, turning a humble cut into pure gold.
This is the method I swear by, honed over years of trial and error (and a few disasters, which we will not discuss). We’re going to layer the flavor, nail the critical sear, and let the pressure cooker do the heavy lifting, resulting in a show stopping pot roast every time. Let’s crack on!
The Science of Tenderness: Achieving Flavor Depth Under Pressure
Why We Ditch the Dutch Oven for Speed and Convenience
Let's be real, five hours of low and slow cooking is simply not happening most weekends. The Instant Pot is a revelation because it harnesses steam pressure to raise the boiling point of the liquid well above 212°F (100°C).
This extreme heat forces the tough connective tissue in the roast to break down much, much faster. It's brilliant.
Prep Time vs. Pressure Time: The 90 Minute Breakdown
The beautiful thing about this recipe is that your active involvement is only about 20 minutes, mostly spent searing and chopping. The actual pressure cooking time is 60 minutes, followed by a critical 20 minute Natural Pressure Release.
That total 90 minutes of hands off cooking is what transforms a sturdy chuck roast into pure, melt-in-your mouth comfort.
What Makes This Recipe the "Ultimate" Roast?
We treat this Instant Pot pot roast recipe not as a shortcut, but as a superior method. We prioritize deep, complex flavor over merely soft texture, achieving both simultaneously. The secret is maximizing the first few steps before the lid ever goes on.
The Maillard Reaction: Maximizing the Initial Sear
If you skip the sear, you are simply boiling your pot roast, and we don't do that here. Searing is non-negotiable. The Maillard reaction that magical chemical process that happens when proteins brown creates hundreds of flavorful compounds that give the roast depth and complexity.
Take the time to get a dark, deep crust on all sides; it’s the foundation of all that rich gravy.
Pressure Cooking and Collagen Breakdown for Fork Tenderness
Chuck roast is tough because it’s packed with collagen, a firm connective tissue. Traditionally, we cook low and slow until that collagen melts into gelatin, creating a moist mouthfeel.
The high pressure and heat of the Instant Pot rapidly dissolve that collagen, yielding spectacular tenderness without drying out the meat. This is why a 60 minute cook time works better than five hours in the oven.
The Liquid Layer: Creating a Self Basting Environment
We use just enough beef broth and red wine to build a rich liquid layer but not so much that the roast is submerged. This ensures we generate plenty of steam for the pressure cycle. Plus, the liquid at the bottom absorbs all those incredible searing flavors, forming the base for our rich, thick gravy later on.
Building the Flavor Base: Essential Ingredients and Strategic Swaps
Getting the right balance of savory, acidic, and aromatic ingredients prevents the final dish from tasting flat. Trust me, I once tried to simplify it too much, and the result was just... wet. Never again.
Selecting the Perfect Cut: Chuck Roast vs. Shoulder Considerations
I always recommend a 3 lb Beef Chuck Roast. It has the ideal ratio of fat marbling and collagen needed for that signature fall apart texture. If you can’t find a chuck roast, go for a Beef Shoulder or Bottom Round.
However, remember that denser cuts like bottom round might need an extra 5- 10 minutes under pressure to achieve the same tenderness.
Aromatics and Broth: Layering Savory Depth
The combination of yellow onion, garlic, low-sodium beef broth , and the critical splash of balsamic vinegar and red wine provides the ultimate depth. The acidity from the wine and vinegar is essential; it cuts through the richness and brightens the entire dish, preventing it from tasting heavy.
Herb Bundles: Fresh vs. Dried Potency Notes
We use dried thyme and bay leaves here because they hold up well to pressure cooking. If you absolutely insist on using fresh herbs, double the quantity and tie them into a little bouquet garni using kitchen twine. I once forgot to take the bay leaves out and had to fish them out awkwardly at the table.
Don't be like past-me.
Making it Your Own: gluten-free and Low-Sodium Adjustments
Making adjustments is easy! If you need this dish to be gluten-free, ensure your Worcestershire sauce and beef broth are certified GF, and use cornflour (cornstarch) to thicken the gravy.
For low-sodium needs, make sure you use a very low-sodium broth and hold back on adding any extra salt until the very end, after the gravy has reduced.
| Ingredient | Viable Substitute | Notes |
|---|---|---|
| Beef Chuck Roast | Bottom Round or Shoulder Cut | Increase cook time by 5- 10 minutes for denser cuts. |
| Dry Red Wine | Equal parts extra Beef Broth + 1 Tbsp Balsamic Vinegar | You need the acidity for balance. |
| Worcestershire Sauce | Soy Sauce or Coconut Aminos | Use 1/2 the amount, taste, and add more if needed. |
| Cornflour (Cornstarch) | Tapioca Starch or Beurre Manié | Tapioca starch requires less stirring; Beurre Manié adds richness. |
The Ultimate Cooking Method: step-by-step Instant Pot Pot Roast Execution
Phase I: The All-Important Deep Sear
- Prep the Roast: Pat the chuck roast completely dry this is key for a proper crust. Season generously with coarse salt and pepper on all sides.
- Sear the Meat: Set your Instant Pot to Sauté (Normal) and add the oil. When shimmering, sear the roast for 4– 5 minutes per side until deeply browned. Remove and set aside.
Phase II: Deglazing and Setting the Pressure Cooker
- Sauté Aromatics: Add the chopped onion to the pot, scraping up any stuck-on brown bits. Cook for 3 minutes, then add the minced garlic and thyme, cooking until fragrant (about 1 minute).
- Deglazing is Critical: Pour in the red wine or the substitute broth. Use a wooden spoon to vigorously scrape the bottom of the inner pot to loosen all those flavorful fond bits. This step prevents the dreaded "Burn" error.
- Build the Liquid: Stir in the remaining beef broth, balsamic vinegar, Worcestershire sauce, and bay leaves.
- Load the Pot: Place the seared roast back into the pot.
Phase III: The Perfect Pressure Hold and Rest Time (The 90 Minute Magic)
- Pressure Cook: Secure the lid and make sure the venting knob is set to Sealing . Pressure cook on Manual/High for 60 minutes.
- The Essential Rest: When the cooking finishes, do not rush! Allow the pressure to release naturally for 20 minutes (NPR). This slow release allows the juices to redistribute, guaranteeing maximum tenderness. Then, quick release any remaining pressure.
Chef's Note: Don't skip the 20 minute Natural Release. Cutting it short will result in a tougher roast because the pressure drop is too sudden, forcing moisture out of the meat fibers.
Finishing Touches: Rest, Slice, and Sauce Reduction
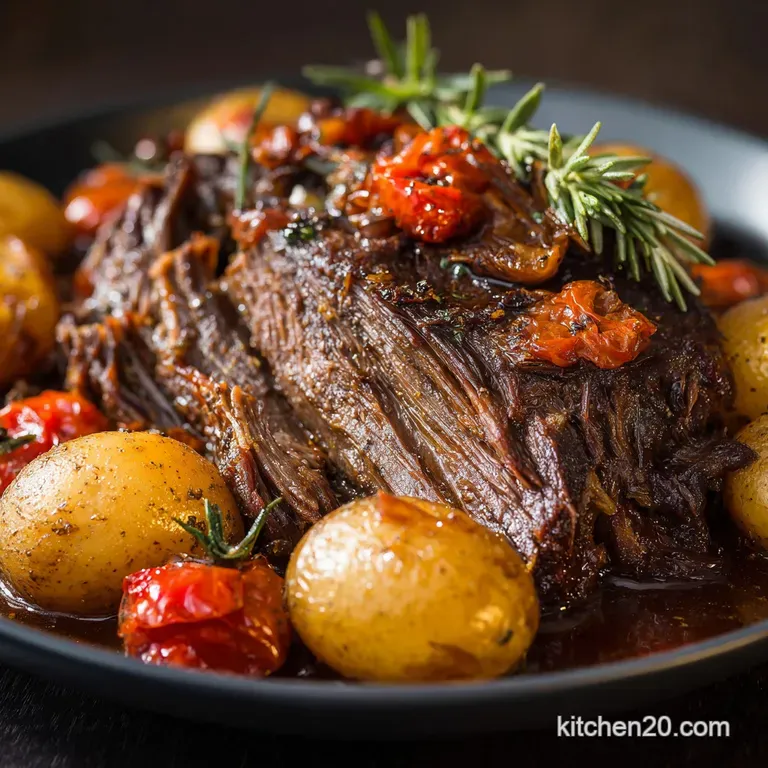
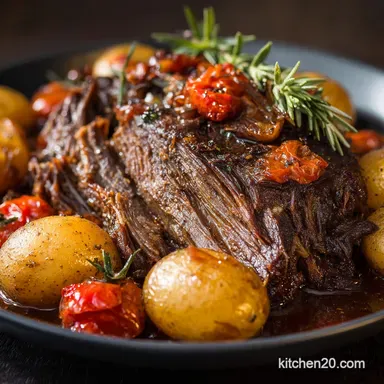
- Rest the Meat: Carefully remove the roast to a cutting board, tent it with foil, and let it rest while you cook the vegetables. Shredding should be effortless at this point.
- Cook the Vegetables: Remove the bay leaves. Add the carrots and potatoes to the liquid. Seal the lid and set to Manual/High for only 3– 4 minutes. Immediately perform a Quick Release (QR) to stop them from turning to mush.
- Amplifying the Gravy: Set the Instant Pot to Sauté (Low) . Whisk the cornflour and cold water/broth together to form a smooth slurry. Pour the slurry into the simmering liquid and whisk constantly until the gravy is thick and glossy. Taste it and adjust seasoning.
- Serve: Return the shredded roast and vegetables to the thickened gravy, gently coat everything, and serve immediately.
Troubleshooting Your Pot Roast: Tips for Flawless Results
Why Is My Pot Roast Still Tough? (Addressing Timing and Release Errors)
If your pot roast feels tough, there are two likely culprits: you didn't cook it long enough, or you Quick Released the pressure too soon. A proper chuck roast requires 60 minutes plus that full 20 minutes of Natural Pressure Release.
If you cut the NPR short, the meat tenses up. If it's still slightly firm after the full cycle, seal the lid and cook for another 10– 15 minutes on High pressure.
Avoiding the Burn Notice (Preventative Measures)
The burn notice is usually triggered by starches or small food bits sticking to the bottom of the pot during pressure build-up. Always make sure you scrape the bottom thoroughly after adding your liquid that deglazing step in Phase II is critical!
Also, never put the thickening cornflour slurry in before the pressure cooking phase.
The Best Way to Slice (Against the Grain Technique)
Pot roast is generally shredded, but if you want neat slices, you must cut against the grain . Look closely at the meat and identify the direction the muscle fibers are running. Cutting perpendicular to those lines shortens the fibers, making every bite tender.
Amplifying the Gravy: A Pro Reduction Trick
If your gravy tastes a bit watery even after thickening, use the Sauté (High) function with the lid off to boil it down slightly before adding the slurry. Reducing the liquid concentrates the flavor. Trust me, this simple trick really brings out the deep savory notes.
Meal Prep and Preservation: Storing Leftover Pot Roast
Maximizing Shelf Life in the Refrigerator
Leftover Instant Pot Pot Roast is fantastic the next day. Store the shredded meat, vegetables, and gravy all together in an airtight container. It will keep beautifully in the refrigerator for 3 to 4 days.
The Best Method for Freezing the Roast and Gravy
Pot roast freezes like a dream, which is one reason I love making a big batch. Place the shredded roast and the gravy together in a heavy duty freezer bag or a freezer safe container. Ensure there is minimal air. It will last for up to 3 months.
When reheating, thaw overnight in the fridge and then warm gently on the stove or in the Instant Pot on the Sauté (Low) setting, adding a splash of broth if it seems dry.
Completing the Sunday Spread: Perfect Pairings for Your Roast
A rich, savory dish like this Instant Pot Pot Roast demands side dishes that are equally comforting. I love serving this with something that can properly soak up all that gorgeous gravy.
The absolute classic pairing is, of course, mashed potatoes, but if you want something with a bit more crunch, try making my Smashed Sweet Potatoes: Ultra Crispy Garlic Rosemary Recipe . The crispy edges stand up beautifully to the heavy sauce.
For a fresh element, consider serving a simple green salad dressed with a light vinaigrette to cut through the richness. And if you are hosting, don't forget a warm beverage! This richness is actually perfectly complemented by a cup of Instant Pot Spiced Apple Cider: Quick Recipe for a Cozy Mulled Classic after the meal. Enjoy your Sunday revolution!

Recipe FAQs
Why is my Pot Roast still tough after the recommended cooking time?
Tough meat usually indicates the cut of beef, typically chuck roast, hasn't reached the temperature required to fully break down its collagen. Ensure your Instant Pot reached full pressure and that you allowed a full natural pressure release (NPR) before checking the meat.
If it's still tough, seal the lid and pressure cook for another 10-15 minutes.
Is the searing step truly necessary, or can I skip it to save time?
While technically optional, searing the beef is highly recommended as it locks in flavour and creates the critical Maillard crust that gives the roast deep, savoury notes. Skipping this step will result in a less flavourful roast, so dedicate the 5-7 minutes required for a proper sear.
How do I make the gravy thicker once the roast is done cooking?
After removing the roast and vegetables, switch the Instant Pot to the Sauté function (Low or Normal setting) to simmer the remaining liquid. Whisk together a slurry of cornstarch and cold water (about 1 tablespoon cornstarch to 2 tablespoons water) and gradually stir it into the simmering liquid until it reaches your desired thickness.
Can I use frozen beef for this recipe in the Instant Pot?
You can use frozen beef, but you must increase the pressure cooking time significantly add about 25-30 minutes per pound if the roast is frozen solid. However, you must skip the crucial searing step, which will impact the overall flavour depth of the final dish.
How should I store leftover pot roast, and can I freeze it?
Store leftover pot roast and gravy in an airtight container in the refrigerator for up to 3-4 days. Yes, pot roast freezes exceptionally well; portion the meat and gravy together and freeze for up to 3 months, thawing overnight in the fridge before reheating gently.
When should I add the carrots and potatoes to ensure they aren't mushy?
For vegetables that hold their shape, add them on top of the roast before starting the main pressure cooking cycle, ensuring they are cut into large, approximately 2 inch chunks. If you prefer firmer vegetables, you can remove the roast after the initial cook, add the vegetables, and pressure cook them separately for 5 minutes with a quick release.
What is the minimum amount of liquid required for safe pressure cooking?
Most Instant Pot models require a minimum of 1 cup (250ml) of thin liquid (like broth or water) to build and maintain pressure effectively. This recipe ensures sufficient liquid, but always make sure your final liquid level meets this standard before sealing the lid.
Instant Pot Pot Roast In 90 Minutes
Ingredients:
Instructions:
Nutrition Facts:
| Calories | 556 kcal |
|---|---|
| Protein | 43.7 g |
| Fat | 9.9 g |
| Carbs | 64.7 g |
