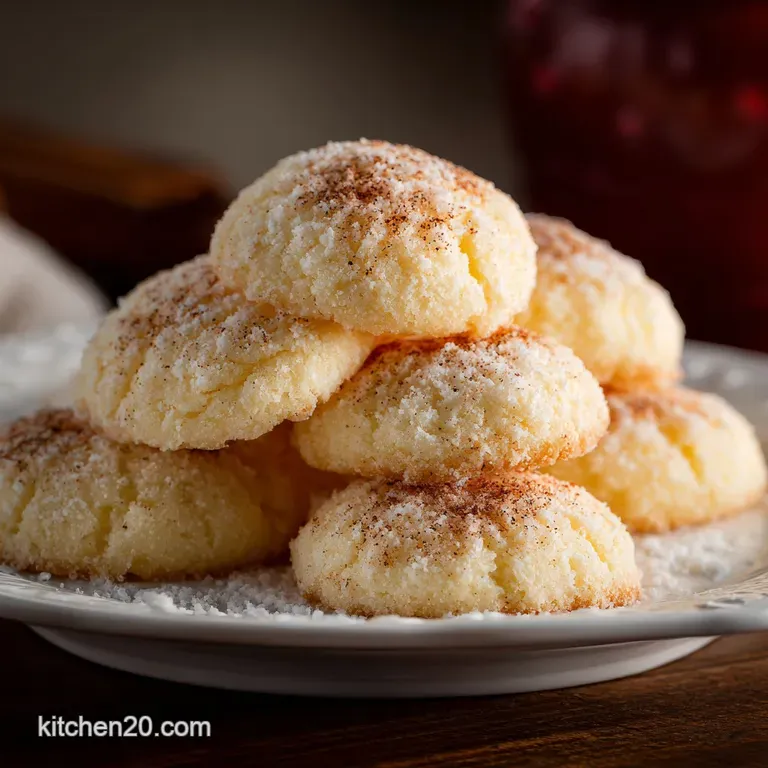
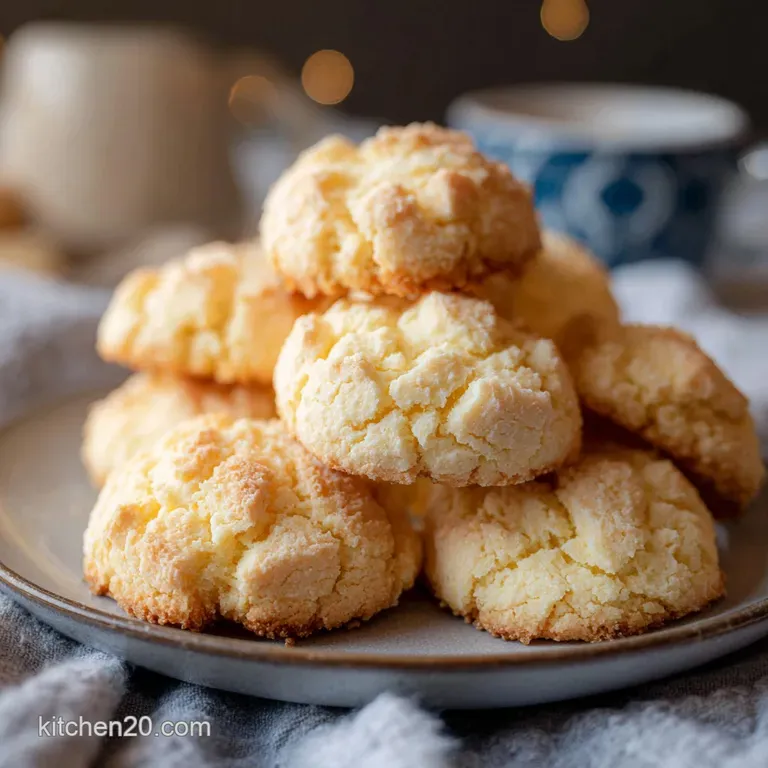
Meltaway Butter Cookies: Velvety and Rich
- Time:15 minutes active + 12 minutes baking = 27 minutes total
- Flavor/Texture Hook: A meltaway, buttery snap with a velvety vanilla finish.
- Perfect for: Holiday gifting, afternoon tea, or a quick dessert project.
- Achieving the Meltaway Snap of Butter Cookies
- Temperature Control Creates the Platform
- Ingredient Deep Dive for Quality
- Selected Components for Superior Texture
- Hardware Essentials for Batch Consistency
- Detailed Methods for Cookie Excellence
- Expert Advice for Avoiding Mistakes
- Alternative Formulas for Inclusive Treats
- De bunking Cookie Myths
- Optimal Storage and Longevity Tactics
- Professional Presentation and Flavor Pairings
- Recipe FAQs
- 📝 Recipe Card
Achieving the Meltaway Snap of Butter Cookies
The smell of butter hitting a warm oven is a sensory trigger that instantly connects us to the best parts of home baking. I remember the first time I realized that not all fats are created equal; I was using a cheap supermarket brand and the cookies just slumped into greasy puddles. It was a mess.
But when I switched to a high-quality butter with a higher fat content, the whole experience changed. The dough held its ridges, the kitchen smelled like a high end patisserie, and that first bite had a distinct "shatter" that felt almost revolutionary.
We aren't just making a snack here; we are building a flavor platform. These Butter Cookies rely on the purity of their components. Because there are so few ingredients, the quality of your butter isn't just a suggestion it’s the entire foundation of the dish.
We want that rich, yellow hue and the creamy mouthfeel that only comes from precision mixing. It is about creating a connection between simple pantry staples and a final product that looks like it belongs in a professional display case.
The beauty of this specific method is how it utilizes technology even something as simple as a stand mixer to aerate the dough without making it cakey. We are aiming for a specific structural integrity that allows the cookie to be delicate enough to melt, yet sturdy enough to survive a dip in dark chocolate.
It’s a balance of physics and flavor that I’ve spent years refining, and I’m so excited for you to see how these turn out in your own kitchen. Trust me, once you see those golden edges, you’ll never go back to the store-bought tins.
Temperature Control Creates the Platform
Aeration Mechanics: Beating the butter for 4 minutes creates a network of tiny air bubbles that expand in the oven, providing lift without baking powder. This results in a delicate shatter rather than a heavy crunch.
Sugar Dissolution: Using confectioners' sugar instead of granulated allows for a tighter crumb and a smoother surface. The cornstarch usually found in powdered sugar also contributes to the "meltaway" characteristic we love.
Emulsification Stability: The egg yolk acts as a bridge between the fat in the butter and the moisture in the vanilla and milk. A proper emulsion prevents the cookies from becoming greasy or tough during the bake.
Starch Gelatinization: As the cookies bake at 350°F, the flour's starches set the structure just as the butter reaches its melting point. This precise timing ensures the ridges from your piping bag remain distinct and sharp.
| Method | Time | Texture | Best For |
|---|---|---|---|
| Fast (No Chill) | 27 minutes | Softer, light spread | Quick weeknight cravings |
| Classic (Chilled) | 1 hour 30 mins | Defined ridges, snap | Professional gifting |
| Freezer to Oven | 15 minutes | Thickest, most tender | On demand fresh baking |
Choosing your method depends entirely on how much of a "snap" you want in your final result. While the fast method works perfectly for a quick treat, chilling the dough for even 20 minutes can deepen the flavor profile, much like the process used in Scottish shortbread cookies. The extra time allows the flour to fully hydrate, leading to a more uniform bake.
Ingredient Deep Dive for Quality
| Ingredient | Science Role | Pro Secret |
|---|---|---|
| Unsalted Butter | Primary fat and flavor | Use 82% fat European butter for a richer, silkier mouthfeel. |
| Confectioners' Sugar | Structural sweetener | Always sift before measuring to ensure a lump free, velvety dough. |
| Egg Yolk | Binding emulsifier | Use a room temperature yolk to prevent the butter from seizing. |
| All Purpose Flour | Structural protein | Spoon and level into the cup to avoid a dry, crumbly cookie. |
Selected Components for Superior Texture
- 1 cup (226g) unsalted butter, softened to 65°F: Why this? The temperature is critical for capturing air during the creaming process.
- Substitute: Salted butter (reduce sea salt to a pinch).
- 3/4 cup (90g) confectioners' sugar, sifted: Why this? Provides a finer texture and smoother finish than granulated sugar.
- Substitute: Granulated sugar (result will be crunchier and more porous).
- 1 large egg yolk, room temperature: Why this? Adds richness and fat without the excess moisture of an egg white.
- Substitute: 1 tablespoon of heavy cream for an egg free version.
- 1.5 teaspoons pure vanilla extract: Why this? high-quality extract provides the characteristic floral aroma of a classic bakery.
- Substitute: Vanilla bean paste for beautiful black speckles.
- 2 cups (250g) all purpose flour, spooned and leveled: Why this? Provides the necessary gluten structure to hold the piped shape.
- Substitute: 1:1 gluten-free flour blend with xanthan gum.
- 1/2 teaspoon fine sea salt: Why this? Enhances the sweetness and cuts through the richness of the butter.
- Substitute: Table salt (use slightly less as it is denser).
- 1 tablespoon milk: Why this? Thins the dough just enough to make piping effortless.
- Substitute: Almond or soy milk for a dairy alternative tweak.
- 4 oz dark chocolate, melted: Why this? Provides a bitter contrast to the sweet, buttery cookie base.
- Substitute: White chocolate or milk chocolate for a sweeter finish.
- 2 tablespoons coarse sanding sugar: Why this? Adds a professional sparkle and a localized crunch.
- Substitute: Sprinkles or crushed nuts.
Hardware Essentials for Batch Consistency
To achieve that professional look, you really need a stand mixer (like a KitchenAid). It provides the constant speed necessary for a true 4 minute cream, which a hand mixer can struggle with. I also highly recommend using a large open star piping tip (like an Ateco 826) and a sturdy reusable piping bag.
Cheap plastic bags often burst because the dough is thicker than your average frosting.
Precision also requires a digital scale. While I've provided cup measurements, weighing your flour and sugar ensures that you aren't accidentally adding 20% more flour, which is the number one cause of "tough" cookies. Finally, light colored aluminum baking sheets are your best friend here.
Dark pans absorb too much heat and will brown the bottoms of your Butter Cookies before the tops are even set.
Detailed Methods for Cookie Excellence
- Prep the environment. Preheat your oven to 350°F and line two heavy duty baking sheets with parchment paper. Note: This prevents the cookies from sticking and ensures even heat distribution.
- Aerate the base. In a stand mixer, beat the 226g of softened butter and 90g of sifted confectioners' sugar on medium high speed for 4 minutes until the mixture is pale ivory and voluminous.
- Incorporate the liquids. Lower the mixer speed to medium low. Add the egg yolk, 1.5 teaspoons of vanilla extract, and 1 tablespoon of milk. Note: Adding the milk now ensures it's fully integrated before the flour goes in.
- Emulsify the dough. Beat for 1 minute until the mixture looks smooth and glossy.
- Fold in the dry ingredients. Whisk the 250g of flour and 1/2 teaspoon of salt together. Add this to the mixer all at once and pulse on the lowest speed just until no white streaks remain.
- Load the piping bag. Fit a piping bag with a large star tip and fill it with dough. Note: Don't overfill the bag; working with half the dough at a time is easier on your hands.
- Shape the cookies. Pipe 1.5 inch swirls or rosettes onto the prepared sheets, leaving 2 inches of space between them. Sprinkle with sanding sugar until the tops are lightly glistening.
- Bake for precision. Place the sheets in the oven for 10-12 minutes until the edges are just barely golden.
- Cool for structure. Allow the cookies to sit on the hot tray for 5 minutes before moving them to a wire rack. Note: They finish setting their structure during this carryover cooling period.
- Apply the finish. Once completely cold, dip half of each cookie into the 4 oz of melted dark chocolate. Place back on parchment until the chocolate is firm and matte.
Expert Advice for Avoiding Mistakes
Why Your Cookies Spread Too Much
If your rosettes look like flat pancakes, the most likely culprit is butter that was too warm (above 70°F) or over beating the egg yolk. When the butter is too soft, it loses its ability to hold the air bubbles we worked so hard to create.
If you suspect your kitchen is too hot, pop the piped cookies into the fridge for 15 minutes before they hit the oven. This "shocks" the fat and keeps it from melting too quickly.
Why Your Dough Is Too Stiff to Pipe
This usually happens when the flour is measured by volume (cups) rather than weight. It's very easy to pack too much flour into a cup. If you find yourself struggling to squeeze the bag, don't force it you'll just burst the bag.
Transfer the dough back to the mixer and add another teaspoon of milk to loosen the tension. It's a quick fix that saves your wrists.
| Problem | Root Cause | Solution |
|---|---|---|
| Gritty texture | Un sifted sugar | Always sift confectioners' sugar to remove lumps. |
| Tough bite | Overmixed flour | Mix only until flour is just incorporated. |
| Uneven browning | Thin baking sheets | Use heavy duty pans or double stack thin ones. |
Most bakers overlook the importance of the "spoon and level" technique, which can cause the same spreading issues seen in soft and chewy MM cookies. If the ratio of fat to flour is off by even a few grams, the chemistry of the cookie changes.
Common Mistakes Checklist:
- ✓ Ensure butter is 65°F (pliable but still cool to the touch).
- ✓ Sift the confectioners' sugar before it enters the bowl.
- ✓ Use a room temperature egg yolk to maintain a stable emulsion.
- ✓ Avoid over creaming the egg yolk; only the butter and sugar need long aeration.
- ✓ Bake on the middle rack for even air circulation.
Alternative Formulas for Inclusive Treats
To scale this recipe down for a small batch (about 18 cookies), simply halve every ingredient. Since the recipe calls for one egg yolk, you can beat one whole egg in a small bowl and use exactly 1 tablespoon of the mixture.
Reduce the baking time by about 2 minutes, as a smaller batch often means more efficient airflow in the oven.
When scaling up for a big event (72+ cookies), do not double the salt or vanilla. Increase those to 1.5x the original amount to avoid overwhelming the delicate butter flavor. You will also need to work in batches; do not try to pipe 72 cookies at once, as the heat from your hands will warm the dough in the bag, leading to spreading.
| Servings | Butter Amount | Flour Amount | Yield |
|---|---|---|---|
| Small Batch | 1/2 cup (113g) | 1 cup (125g) | 18 cookies |
| Standard Batch | 1 cup (226g) | 2 cups (250g) | 36 cookies |
| Party Batch | 2 cups (452g) | 4 cups (500g) | 72 cookies |
If you are trying to make these vegan, the "revolutionizing" step is to use a high-quality vegan butter block (not tub margarine). Tub margarines have too much water and will cause the cookies to steam rather than bake.
Use a flax egg or a tablespoon of soy milk to replace the egg yolk, though the texture will be slightly crispier and less "meltaway."
De bunking Cookie Myths
One of the biggest misconceptions in baking is that "room temperature" means soft, squishy butter. In reality, for the best Butter Cookies, your butter should be 65°F. If you can press your finger into it and it leaves an indent but doesn't feel greasy, you're at the sweet spot.
If it's too soft, the air bubbles will collapse, and you'll end up with a heavy, oily cookie rather than a light, airy one.
Another myth is that you need to chill the dough for hours to get a good result. While chilling helps with some recipes, this specific ratio of butter to sugar is designed to be piped immediately. Chilling this dough actually makes it nearly impossible to squeeze through a star tip.
If you want a more "set" shape, chill the cookies after piping, not the dough inside the bag.
Optimal Storage and Longevity Tactics
Butter Cookies are incredibly stable due to their high fat content. You can store them in an airtight container at room temperature for up to 7 days. If you've dipped them in chocolate, keep them in a cool, dry place to prevent the chocolate from blooming (turning white) or melting.
I actually find they taste better on day two once the vanilla has had time to fully permeate the crumb.
For long term storage, these freeze beautifully. You can freeze the baked (un dipped) cookies for up to 3 months. When you're ready to serve, let them thaw at room temperature for an hour, then do the chocolate dipping fresh. To reduce waste, any leftover melted chocolate can be stirred into warm milk for a rich hot cocoa, or drizzled over a batch of pistachio nut butter on toast.
Professional Presentation and Flavor Pairings
| Level | Key Addition | Visual Impact |
|---|---|---|
| Simple | Sanding sugar | Classic, sparkly, homestyle feel. |
| Polished | Chocolate dip | High contrast, bakery style elegance. |
| Restaurant | Sea salt + gold leaf | Ultra luxury, balanced sweet salty finish. |
If you want to take the presentation to a professional level, focus on the "Restaurant" tier. Place three cookies in an overlapping line on a long rectangular plate. Add a very thin smear of dark chocolate or nut butter underneath to keep them from sliding.
Sprinkle the chocolate dipped end with a tiny pinch of Maldon sea salt and a fragment of edible gold leaf. It’s a simple tweak that makes the plate feel connected to a high end dessert experience.
For the best pairing, you can't beat a high-quality Earl Grey tea. The bergamot notes in the tea cut through the richness of the butter perfectly. If you're serving these as part of a larger spread, they also pair beautifully with a tart lemon curd or a glass of dry sparkling wine.
The acidity in the wine cleanses the palate between bites of the velvety, buttery dough, making every mouthful feel as fresh as the first.

Recipe FAQs
What is considered a butter cookie?
A butter cookie is defined by its high fat-to-flour ratio, focusing on softened butter, confectioners' sugar, and flour to create a delicate, melt-in-the-mouth crumb. Unlike other biscuits, they rely solely on the emulsion of butter and sugar for structure rather than chemical leaveners.
What is the difference between sugar cookies and butter cookies?
Butter cookies have a much higher butter content and use confectioners' sugar. This combination creates a softer, more fragile texture, whereas sugar cookies typically use granulated sugar and more flour, resulting in a crispier, sturdier cookie meant for rolling and cutting.
Do butter cookies taste different?
Yes, they possess a distinct, rich profile. The reliance on high-quality butter and the absence of baking powder allows the pure creaminess of the dairy to shine through, which is why the 3-4 minute whipping process in our stand mixer is vital for success.
What are some common butter cookie mistakes?
Overmixing the dough after adding flour is the most frequent error. This develops gluten and results in a tough cookie instead of the desired tender melt, so always mix on the lowest speed until just combined.
How to achieve the perfect texture?
Beat your softened butter and sifted confectioners' sugar for at least 3 minutes. If you enjoyed mastering this creaming technique, see how the same dough handling principle creates consistency in our other recipes.
Is it true the oven temperature must stay at 350°F?
Yes, this is critical for the intended outcome. Baking at 350°F for 10-12 minutes ensures the edges turn lightly golden without browning the butter flavor, preserving the delicate balance of the ingredients.
How to ensure the cookies hold their shape while baking?
Ensure your butter is exactly 65°F before you begin mixing. If the butter is too warm, the emulsion will break, causing the cookies to spread excessively on the parchment paper during those 12 minutes in the oven.
Meltaway Butter Cookies

Ingredients:
Instructions:
Nutrition Facts:
| Calories | 104 calories |
|---|---|
| Protein | 1.1g |
| Fat | 6.7g |
| Carbs | 10.1g |
| Fiber | 0.4g |
| Sugar | 4.6g |
| Sodium | 33mg |
