Corn on the Cob: Shuck-Free Microwave Method
- Time: Active 2 minutes, Passive 4 minutes, Total 6 minutes
- Flavor/Texture Hook: Snap crisp kernels with a concentrated, buttery sweetness and a hint of smoky heat.
- Perfect for: Busy weeknight dinners, streamlining meal prep, and keeping the kitchen cool during summer.
- The Fastest Way to Perfect Corn on the Cob
- Why the Husk Steam Method Wins
- Analyzing Component Role in Every Ear
- Selecting Best Ingredients for Flavor
- Microwave and Kitchen Tools You Need
- Step-By-Step Guide for Flawless Results
- Solving Common Texture and Heat Issues
- Scaling the Recipe for Large Crowds
- Debunking Common Myths About Microwaving Corn
- Storage Guidelines and Reducing Food Waste
- Elevating the Visual Appeal of Your Side
- Recipe FAQs
- 📝 Recipe Card
The Fastest Way to Perfect Corn on the Cob
Imagine the smell of a summer afternoon, but without the sweltering heat of a boiling pot of water fogging up your kitchen windows. There is a specific, high pitched pop that happens when you bite into a kernel that has been steamed perfectly inside its own natural packaging.
It is a clean, bright sweetness that hits the back of your throat, followed immediately by the earthy warmth of smoked paprika and a sharp, citrusy zing of fresh lime. When you cook Corn on the Cob this way, you aren't just heating it up; you are intensifying everything that makes fresh produce incredible while streamlining your entire evening routine.
I used to be a traditionalist, standing over a massive stockpot, waiting forever for gallons of water to reach a rolling boil just to cook a few ears of corn. It felt like such a waste of energy and time, especially when the resulting corn often tasted "watered down." Then I discovered the efficiency of using the microwave as a high precision steamer.
The first time I tried this, I was skeptical. I expected rubbery, sad kernels. Instead, what slid out of that charred looking husk was the most vibrant, silky textured corn I had ever tasted.
It changed how I viewed my microwave not just as a tool for reheating coffee, but as a legitimate appliance for high-quality vegetable cookery.
The beauty of this method lies in its simplicity and the lack of cleanup. You aren't scrubbing a heavy pot or fishing out soggy silks from a colander. You are working with the plant’s own design to achieve a result that rivals any high end restaurant side dish.
We've all had those nights where we want something fresh and healthy but the thought of "real" cooking feels like a mountain. This recipe is the answer. It’s about working smarter, using modern appliances to respect the ingredients, and getting dinner on the table in six minutes flat without sacrificing a single ounce of flavor.
Why the Husk Steam Method Wins
Understanding the "how" behind this method makes it much easier to trust the process. When we talk about streamlining our kitchen tasks, we often look for shortcuts that don't compromise quality. This technique is the gold standard because it actually improves the final product.
- Pressure Cooker Effect: The tight layers of the husk trap the moisture naturally present in the kernels, creating a high pressure steam environment that cooks the corn from the inside out.
- Sugar Preservation: Unlike boiling, where the sugars and nutrients leach out into the surrounding water, this method keeps every molecule of sweetness contained within the kernel walls.
- Silky Texture: The steam softens the internal starches without drying out the exterior, ensuring each bite has that characteristic "snap" followed by a velvety interior.
- Thermal Efficiency: Microwaves target water molecules directly, meaning the energy goes straight into the corn rather than wasting time heating up a pot of water and the air around it.
| Method | Time | Texture | Best For |
|---|---|---|---|
| Microwave | 4 minutes | Crisp, snappy, juicy | Maximum flavor and speed |
| Boiling | 15 minutes | Soft, slightly hydrated | Large batches (10+ ears) |
| Grilling | 20 minutes | Charred, smoky, chewy | Outdoor parties and aesthetics |
Choosing the right method depends entirely on your goals for the evening. If you are aiming for peak efficiency and the purest expression of the corn's natural flavor, the microwave is the undisputed champion.
It allows the natural sugars to caramelize slightly against the husk, providing a depth of flavor you simply cannot get from a pot of water.
Analyzing Component Role in Every Ear
When we look at the ingredient list, it seems minimal, but each item is doing heavy lifting to balance the natural profile of the corn. This isn't just about throwing things together; it's about a smart layering of fat, acid, and spice.
| Ingredient | Science Role | Pro Secret |
|---|---|---|
| Fresh Sweet Corn | Structural starch and sugar base | Keep husks on to maintain a sealed steam chamber. |
| Extra Virgin Olive Oil | Heat carrier and flavor emulsifier | Use a high-quality oil to add a peppery, fruity finish. |
| Smoked Paprika | Provides aromatic depth and color | The "smoke" mimics the flavor of grilled corn without the charcoal. |
| Fresh Lime | Acidic brightness to cut sweetness | Squeeze just before eating to keep the kernels from softening. |
Each component is selected to enhance the natural characteristics of the vegetable. The olive oil acts as a vehicle for the salt and paprika, ensuring they stick to the curved surfaces of the kernels rather than falling to the plate.
Meanwhile, the lime wedge provides a necessary counterpoint to the heavy sweetness of summer corn, making each bite feel refreshed rather than cloying.
Selecting Best Ingredients for Flavor
For this recipe, the quality of your primary ingredient is everything. Since we aren't hiding the corn behind a thick sauce or a heavy batter, the ears need to be top tier.
- Fresh Sweet Corn (4 ears): Look for husks that are bright green and slightly damp, not brown or papery. Why this? Moisture in the husk is the "fuel" for the steam that cooks the kernels.
- Extra Virgin Olive Oil (4 tsp): A robust, cold pressed oil provides a better mouthfeel than butter in this specific application. Why this? It stays liquid and glossy, creating a beautiful sheen on the yellow kernels.
- Smoked Paprika (0.5 tsp): This adds a sophisticated "outdoor" flavor profile. Why this? It provides a visual contrast and a deep, woodsy aroma that complements the sugar.
- Flaky Sea Salt (0.5 tsp): Use something with a bit of crunch, like Maldon. Why this? The large crystals provide intermittent bursts of salinity that make the corn taste sweeter.
- Cracked Black Pepper (0.5 tsp): Freshly cracked is non negotiable for the floral heat it provides.
- Fresh Lime (1 lime): This is the secret weapon for balance.
| Original Ingredient | Substitute | Why It Works |
|---|---|---|
| Olive Oil | Unsalted Butter | Classic creamy flavor. Note: Lower smoke point, but adds a nostalgic richness. |
| Smoked Paprika | Chili Powder | Adds a more complex, earthy spice. Note: Less smoky, more savory. |
| Lime Wedge | Lemon Wedge | Similar acidity level. Note: Brighter and more floral than the sharp tang of lime. |
| Flaky Sea Salt | Kosher Salt | Clean salt flavor. Note: You lose the textural crunch of the flakes. |
If you find yourself really enjoying the way the corn starch behaves in this dish, you might be interested in how different corn textures work in other cuisines. For a totally different take on corn dough and crispy exteriors, you should definitely look at this Colombian Empanadas Recipe. It’s a great way to see how the same base ingredient can be transformed into something entirely different but equally satisfying.
Microwave and Kitchen Tools You Need
The beauty of this "budget smart" approach is that it requires almost zero specialized gear. We are using the appliance you already have sitting on your counter to its fullest potential.
- Microwave: A standard 1000 watt microwave is the baseline. If yours is higher or lower wattage, you'll need to adjust by 30 seconds.
- Chef’s Knife: A sharp blade is essential for cutting through the woody base of the cob. A dull knife will slip on the rounded husk.
- Oven Mitts: The corn will be incredibly hot reaching internal temperatures of over 200°F. Do not skip these.
- Sturdy Cutting Board: You need a stable surface that won't slide around while you are applying pressure to the corn stalks.
- Kitchen Towel: Use a clean, lint free towel to grip the hot tassels.
Using the right tools ensures the process remains as efficient as possible. The goal is a "clean slip" shuck where the corn simply slides out of its jacket. For this to work, that initial cut with the chef's knife must be clean and complete, severing all the fibers that hold the silk to the base.
step-by-step Guide for Flawless Results

Now, let's get into the mechanics. The "star pattern" mentioned here isn't just for aesthetics; it’s about managing the way microwaves bounce around the interior of the appliance.
- Place the 4 whole, intact corn ears (husk and silk included) directly onto the microwave turntable. Arrange them in a star pattern with the stalks facing outward toward the walls for even cooking.
- Set the microwave to high power. Cook for 4 minutes. Note: While the total batch for four ears might take 12-14 minutes in lower powered units, 4 minutes of active microwave radiation is the standard baseline for achieving a perfect steam.
- Carefully use oven mitts to move the hot ears from the microwave to your cutting board. Wait until the steam stops whistling from the ends.
- Position your chef's knife approximately one inch above the stalk end (the woody part). Cut through the entire cob and husk in one firm motion.
- Grasp the tasseled end (the "hair" side) with a dry kitchen towel. Squeeze the cob upward from the bottom.
- The corn should slide out of the husk completely free of silk. Observe the steam rising from the golden kernels.
- Discard the husks and silks immediately while they are still hot to prevent them from becoming sticky.
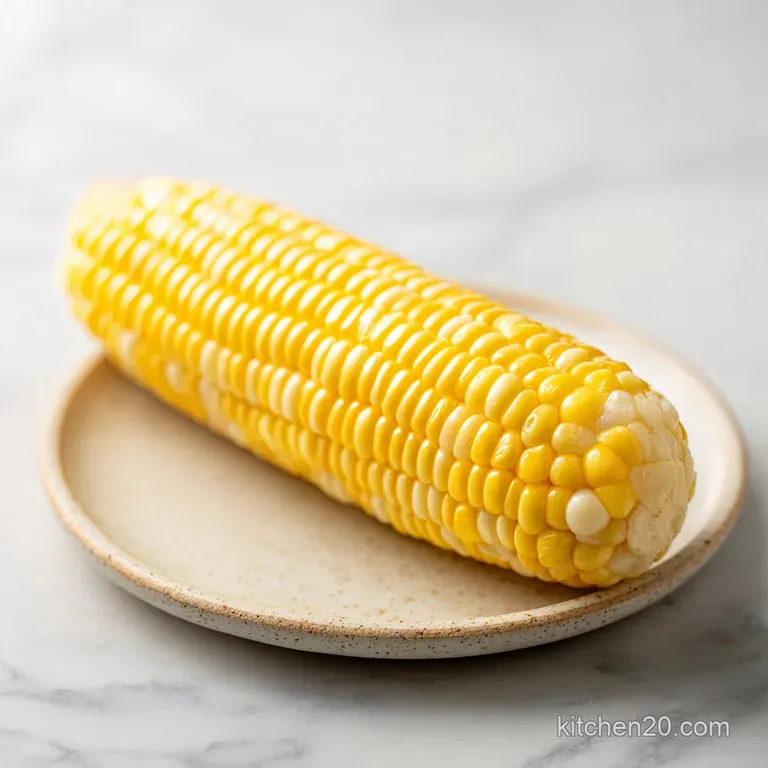
- Drizzle each of the 4 ears with 1 teaspoon of olive oil, ensuring the entire surface is coated.
- Sprinkle with a pinch of smoked paprika, sea salt, and black pepper until the kernels are speckled and vibrant.
- Serve immediately with a fresh lime wedge on the side for squeezing.
The most satisfying part of this process is step 6. If you’ve timed it correctly, the silk won't stick to the kernels at all. They will be perfectly clean, shiny, and ready for seasoning. If you're looking for other ways to use corn in a fun, handheld format, my Mini Corn Dogs recipe uses cornmeal for a totally different, nostalgic texture.
Solving Common Texture and Heat Issues
Even the simplest recipes can have a few hiccups, especially since microwave power varies so much from one household to the next. The most common "fail" is corn that feels rubbery or ears that have "cold spots."
Why Your Corn Is Rubbery
If the kernels feel tough or have a leathery skin, it’s usually because they were overcooked. When the moisture inside the kernel is heated for too long, the cell walls collapse and the starch hardens. This is why we stick to the 4 minute baseline and adjust only in small increments.
Why Some Kernels Are Cold
Microwaves are notorious for uneven heating. If you find that the center of the ear is hot but the ends are cold, it’s likely because the ears were huddled too close together. The "star pattern" solves this by ensuring the thickest parts of the cob are receiving the most direct energy.
| Problem | Root Cause | Solution |
|---|---|---|
| Silks sticking to corn | Not enough steam generated | Soak the husks in water for 2 mins before microwaving. |
| Dried out kernels | Husk was too thin or damaged | Wrap the ear in a damp paper towel before cooking. |
| Uneven cooking | Turntable not rotating | Ensure ears aren't touching the microwave walls, allowing rotation. |
Common Mistakes Checklist:
- ✓ Never shuck the corn before microwaving; the husk is the actual cooking vessel.
- ✓ Don't skip the "rest" period; letting the corn sit for 1 minute helps the heat equalize.
- ✓ Ensure you cut far enough above the stalk to sever the silk attachments.
- ✓ Use a dry towel for gripping; a wet towel will transmit heat and cause burns.
- ✓ Avoid piling the corn in a stack; the microwave needs space to penetrate each ear.
Scaling the Recipe for Large Crowds
If you are hosting a summer BBQ and need to prep 20 ears of corn, the microwave is still your friend, but you have to change your strategy. You cannot simply put 20 ears in at once; the microwave will be overwhelmed, and the cook time will become astronomical.
Scaling Down (1-2 ears): If you are just cooking for yourself, the "4 minute" rule still applies as a safe maximum, but you can usually get away with 3 minutes for a single, large ear. Reduce the oil and seasonings proportionally.
For a single ear, use a smaller microwave safe plate to keep it from rolling around.
Scaling Up (8+ ears): Work in batches of four. While one batch is cooking, you can be shucking and seasoning the previous batch. This creates a "conveyor belt" of fresh, hot corn. For the seasonings, don't just multiply the paprika and salt by five start with 1.5x and taste. Spices can become overwhelming when applied in bulk. If you are doing a massive amount, you might consider my oven-roasted Corn method to clear up microwave space for other sides.
Debunking Common Myths About Microwaving Corn
There is a lot of "kitchen folklore" surrounding the microwave that keeps people from using it for fresh vegetables. Let's clear the air on why this appliance is actually a powerhouse for nutrition.
Myth 1: Microwaving kills the nutrients in corn. Actually, it’s the opposite. Because microwaving uses very little water and cooks food quickly, it preserves more water soluble vitamins (like B and C) than boiling or steaming in a large pot.
Boiling corn actually sends a significant portion of its nutritional value down the drain with the water.
Myth 2: You need to soak the husks for hours. Unless your corn is incredibly old and the husks are bone dry, you don't need to soak them at all. The moisture inside the kernels themselves provides enough steam to do the job.
Soaking is a technique used for grilling to prevent the husks from catching fire, but in the microwave, it’s usually unnecessary.
Myth 3: The "radiation" changes the corn's DNA. Microwaves use non ionizing electromagnetic radiation. It simply makes water molecules vibrate, which creates friction and heat. It does not stay in the food, and it doesn't "mutate" your vegetables. It’s just a very efficient way to generate heat.
Storage Guidelines and Reducing Food Waste
If you find yourself with leftovers, don't toss them! Corn on the Cob is surprisingly versatile the next day, provided you store it correctly to prevent the starch from turning chalky.
Storage: Place leftovers in an airtight container or a silicone bag. They will stay fresh in the fridge for up to 3 days. If you want to freeze them, I recommend cutting the kernels off the cob first.
Frozen corn kernels will last up to 6 months and are much better for soups or stir fries than whole cobs that have been frozen and thawed.
- Corn Silk Tea
- Believe it or not, clean corn silks can be steeped in hot water to make a mild, earthy tea that is a traditional diuretic in many cultures.
- Cob Stock
- After you've eaten the kernels, don't throw away the cobs! Simmer them with an onion and a carrot to make a "corn milk" stock that is incredible as a base for chowders or risotto.
- Compost the Husks
- Husks are high in carbon and break down beautifully in a backyard compost bin. Just tear them into strips first to speed up the process.
Elevating the Visual Appeal of Your Side
We eat with our eyes first, and even a simple side dish like Corn on the Cob can look like a centerpiece with the right presentation. Instead of just piling them on a plate, think about contrast and color.
The bright yellow of the corn looks stunning against the deep, earthy red of the smoked paprika. When you plate the ears, stagger them slightly rather than lining them up like soldiers.
Place the lime wedges in a small cluster at the end of the platter rather than scattering them it looks more intentional and professional.
If you really want to lean into the "modern" look, serve each ear on a long, narrow slate or a wooden board. The contrast between the rustic wood and the glossy, oil slicked kernels is beautiful.
A final sprinkle of the flaky sea salt right before the platter hits the table adds a diamond like shimmer that tells your guests this isn't just "microwave corn" it's a carefully considered dish.
| Style | Seasoning Tweak | Visual Cue |
|---|---|---|
| Street Style | Add cotija cheese and cilantro | Snowy white topping with green pops |
| Rustic | Use cracked peppercorns and extra oil | Dark specks and a high gloss sheen |
| Minimalist | Just salt and a lime zest | Clean, bright yellow focus |
By focusing on these small details, you transform a humble vegetable into a high impact part of your meal. It proves that efficiency doesn't have to look "cheap" or "rushed." It’s about the smart application of heat and flavor to get the absolute best out of every single ear.
Enjoy your perfectly steamed, snap crisp corn it’s probably going to be the fastest "gourmet" thing you make all week!

Recipe FAQs
How long in the microwave for corn on the cob?
Cook for 3 to 4 minutes per ear. For a full batch of four ears, expect to cook for 12 to 14 minutes total on high power.
What is the trick for microwaving corn on the cob?
Arrange the cobs in a star pattern with the stalks facing outward. This specific placement ensures the microwave energy circulates evenly, preventing uneven cooking patches. If you enjoyed mastering this spatial arrangement, see how we use similar precise heat distribution techniques to perfect our vegetable sides.
How to microwave corn that has been shucked?
Wrap the individual ears in a damp paper towel. This provides the necessary steam environment that the husk usually supplies naturally, preventing the kernels from drying out.
Is it better to microwave corn on the cob with or without husk?
Yes, the husk is far superior. Leaving the husk and silk intact during the cooking process creates a steam chamber that keeps the kernels succulent and makes the silk slide off effortlessly after cooking.
Is it true I must boil water to get tender corn?
No, this is a common misconception. Microwaving is significantly faster and locks in more natural sweetness by using the corn's own moisture rather than diluting it in a large pot of water.
How to remove the corn from the husk cleanly?
Cut through the base of the cob approximately one inch above the stalk end after cooking. Once cut, hold the tasseled end with a towel and squeeze the cob, allowing the ear to slide out completely free of silk.
How to store leftover corn?
Place leftovers in an airtight container or silicone bag in the refrigerator. They will remain fresh for up to 3 days, or you can cut the kernels off to freeze for up to 6 months.
Microwave Corn On The Cob

Ingredients:
Instructions:
Nutrition Facts:
| Calories | 132 calories |
|---|---|
| Protein | 3.3 grams |
| Fat | 5.7 grams |
| Carbs | 20.6 grams |
| Fiber | 2.7 grams |
| Sugar | 6.4 grams |
| Sodium | 295 milligrams |
