Peanut Butter Frosting Recipe
- Time: Active 10 minutes, Passive 0 minutes, Total 10 minutes
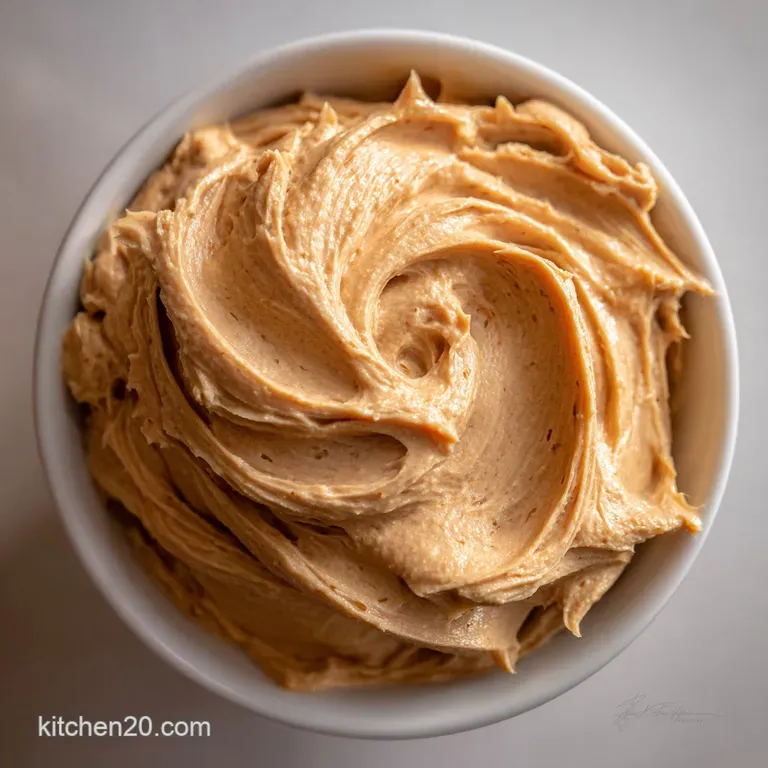
- Flavor/Texture Hook: Velvety, salt kissed, and spreadable
- Perfect for: Brownies, layer cakes, or late night spoonfuls
- Creating the Most Velvet Texture with This Peanut Butter Frosting Recipe
- The Physics of the Fluff: Engineering Stable Emulsions
- Performance Benchmarks for Your Next Batch of Frosting
- Sourcing High Quality Fats for Maximum Flavor Impact
- The Technical Platform Needed for High Speed Aeration
- A Connected Guide to Whipping the Best Frosting
- Debugging Consistency Issues for a Perfectly Smooth Result
- Revolutionizing Your Flavor Profiles with Simple Adaptations
- Data on Freshness and Smart Storage Solutions
- Optimizing Flavor Pairings for Your Finished Dessert
- Recipe FAQs
- 📝 Recipe Card
Creating the Most Velvet Texture with This Peanut Butter Frosting Recipe
I remember the first time I tried to make a quick peanut butter frosting for a neighbor's birthday. I thought I could just stir some peanut butter into a bowl of powdered sugar and call it a day. The result was a gritty, cement like paste that nearly snapped my spatula in half.
It was a total disaster, but it taught me everything I needed to know about the technical platform required to build a real frosting.
You see, getting that velvety finish isn't just about mixing ingredients, it's about the connection between temperature and air. When you get it right, the aroma of roasted peanuts fills the room, and the texture becomes so light it almost shatters like a souffle when you dip a spoon in.
We're moving away from the heavy, oily versions and revolutionizing how we think about this classic.
This specific peanut butter frosting recipe is designed to be your go to for everything from a thick chocolate cake to a batch of dark chocolate brownies. We've optimized the ratios so it holds its shape for piping but stays soft enough to melt into the crumbs.
If you've ever struggled with frosting that's too sweet or too stiff, you're in the right place to fix that once and for all.
The Physics of the Fluff: Engineering Stable Emulsions
Aerobic Suspension: High speed whipping introduces micro bubbles into the butter and peanut butter matrix, creating a structural web that holds the sugar. This process prevents the frosting from feeling like a dense block of fat on the tongue.
Molecular Friction: As the sugar crystals collide with the fats during mixing, they break down into a suspension. This ensures a velvety mouthfeel rather than a gritty, sandy texture that often plagues poorly made frostings.
| Method | Time | Texture | Best For |
|---|---|---|---|
| Stand Mixer | 5 minutes | Ultra fluffy | Professional layer cakes |
| Hand Mixer | 8 minutes | Creamy and dense | Brownies or cookies |
| Hand Whisk | 12 minutes | Rustic/Heavy | Small batches or exercise |
Choosing the right method depends on your desired finish. A stand mixer, such as a KitchenAid, provides the most consistent platform for aeration, which is the secret to a light peanut butter frosting for cake.
If you're looking for something more substantial for brownies, the hand mixer offers a slightly denser, fudgier result.
Performance Benchmarks for Your Next Batch of Frosting
To ensure you're on the right track, keep these precision checkpoints in mind. First, your butter must be exactly 18°C to 20°C (room temperature) to allow for proper expansion.
Second, the total whipping time for the fat base should be no less than 3 minutes before you even think about adding sugar. Finally, the heavy cream should be added one tablespoon at a time to prevent the emulsion from breaking.
| Ingredient | Science Role | Pro Secret |
|---|---|---|
| Creamy Peanut Butter | Protein Base | Use "no stir" brands for the most stable structure. |
| Unsalted Butter | Fat Carrier | Cold butter will clump; ensure it's truly softened. |
| Confectioners' Sugar | Bulk & Structure | Always sift to prevent microscopic lumps. |
Using the right peanut butter is a decision shortcut. If you want a smooth, pipeable result, use processed creamy brands. If you prefer a rustic, chunky style, you can use natural brands, but be prepared for a bit more oil separation. For those experimenting with different nut bases, you might find my Pistachio Nut Butter recipe offers a similar technical challenge with a completely different flavor profile.
Sourcing high-quality Fats for Maximum Flavor Impact
The foundation of any great frosting recipe is the quality of your fats. For this version, we are using 115g of unsalted butter and 250g of creamy processed peanut butter. This 1:2 ratio is what gives us that punchy peanut flavor without the frosting feeling too greasy.
- 115g Unsalted butter: Softened to room temperature. Why this? Allows for maximum air incorporation during the initial cream phase.
- 250g Creamy peanut butter: Use a standard brand like Jif or Skippy. Why this? These contain stabilizers that keep the frosting from separating.
- 5ml Pure vanilla extract: Don't use the imitation stuff. Why this? It bridges the gap between the salty nuts and the sweet sugar.
- 1.5g Fine sea salt: Essential for depth. Why this? It cuts through the sugar to highlight the roasted peanut notes.
- 240g Confectioners' sugar: Sifted to perfection. Why this? Provides the "spine" of the frosting without adding grit.
- 45ml Heavy cream: Cold or room temp is fine here. Why this? Adjusts the final viscosity for spreading or piping.
For the Creamy Base
The interaction between the butter and the peanut butter is where the magic happens. We're effectively creating a "fat platform" that can support the weight of the sugar. If the butter is too cold, it won't bond with the peanut butter, leading to a lumpy, broken mess.
For the Sweet Structure
The 240g of confectioners' sugar isn't just for sweetness; it provides the structural integrity. In a fluffy peanut butter frosting, the sugar acts as a stabilizer. If you find the frosting too soft for your kitchen's temperature, adding an extra 30g of sugar can often save the day.
The Technical Platform Needed for High Speed Aeration

You don't need a professional kitchen, but having the right tools makes this easy peanut butter frosting even faster. A sturdy stand mixer is the gold standard because it allows you to walk away while the aeration happens.
However, a high-quality hand mixer works just as well if you're willing to put in a few extra minutes of effort.
- Stand mixer or hand mixer: Essential for the 3 minute "fluffing" stage.
- Sifter or fine mesh strain: Do not skip sifting the sugar; it's the difference between velvet and sand.
- Silicone spatula: For scraping the sides of the bowl to ensure every bit of fat is incorporated.
- Measuring scale: Weighing your 240g of sugar is much more accurate than using cups.
Chef's Tip: Freeze your mixing bowl for 10 minutes before starting. This keeps the fats from melting during high speed friction, resulting in a much more stable fluffy peanut butter frosting.
A Connected Guide to Whipping the Best Frosting
- Cream the fats. Place 115g of softened butter and 250g of creamy peanut butter in your bowl. Whip for 3 minutes until the mixture turns a pale tan color. Note: This aeration is what makes it light.
- Add aromatics. Pour in 5ml of vanilla extract and 1.5g of fine sea salt. Mix for 30 seconds until fully integrated.
- Sift the sugar. Use a fine mesh strainer to sift 240g of confectioners' sugar directly into a separate bowl. Note: Never skip this if you want a velvety finish.
- Incorporate sugar slowly. Turn your mixer to low and add the sugar in three stages. Mix until the white powder disappears after each addition.
- Add the liquid. Pour in 45ml of heavy cream. Increase speed to medium high and whip for another 2 minutes.
- Check the consistency. Stop the mixer and drag a spatula through the frosting. Look for a smooth, matte finish that holds a stiff peak.
- Adjust the moisture. If it's too thick, add 15ml more cream; if too thin, add 20g more sugar. Whip for 30 seconds after any adjustment.
- Final scrape. Use your spatula to scrape the bottom of the bowl. Ensure no pockets of unmixed butter remain.
- Remove air bubbles. Turn the mixer to the lowest setting for 1 minute. This knocks out large bubbles for a silky look.
- Apply immediately. Use a piping bag or offset spatula. Spread until the surface is glossy and smooth.
| Feature | Freshly Made | Shortcut (store-bought) |
|---|---|---|
| Texture | Airy and light | Dense and waxy |
| Flavor | Deep roasted peanut | Artificial vanilla/sugar |
| Control | Adjustable salt/sweet | Fixed profile |
If you are looking for a different style of topping for a more traditional cake, you might want to try this Silky Vanilla Buttercream recipe. It uses a similar aeration technique but focuses on a pure dairy flavor rather than the nut heavy profile we've built here.
Debugging Consistency Issues for a Perfectly Smooth Result
Sometimes the environment affects your results. If your kitchen is hot, the butter might start to weep oil. If it's too cold, the frosting might look "curdled." Don't panic; most issues are easily fixed with a little temperature management.
To Fix Grainy Frosting
This usually happens because the sugar wasn't sifted or the whipping time was too short. The sugar needs time to be fully coated by the fats.
| Problem | Root Cause | Solution |
|---|---|---|
| Frosting is runny | Too much cream or warm room | Chill for 20 mins, then re whip with 20g sugar. |
| Frosting is grainy | Sugar not fully incorporated | Add 5ml cream and whip on high for 3 mins. |
| Oil separation | Over whipped or natural PB | Fold in 15g of cornstarch to absorb excess oil. |
To Fix "Oily" or Separating Frosting
If you see beads of oil forming, it means the emulsion has broken. This is common when using natural peanut butter. The best fix is to add a stabilizer. A tablespoon of cornstarch or an extra bit of confectioners' sugar can help pull the fats back into the matrix.
Common Mistakes Checklist: - ✓ Ensure butter is soft enough to leave an indentation when pressed, but not shiny. - ✓ Sift the sugar even if it looks fine in the bag. - ✓ Add the heavy cream at the very end to control final viscosity.
- ✓ Scrape the bowl frequently to avoid "butter streaks" in your piping. - ✓ Don't over mix once the cream is in, or you might lose the air you worked so hard to build.
Revolutionizing Your Flavor Profiles with Simple Adaptations
This recipe is a versatile platform. While the 3 ingredient peanut butter frosting approach is popular for speed, adding just a few more elements can truly change the experience. For instance, a quick peanut butter frosting with cool whip can be achieved by folding in 1 cup of whipped topping at the very end for a mousse like feel.
For a Tangy Twist: Peanut Butter Cream Cheese Frosting
Replace half of the butter (57g) with softened full fat cream cheese. This adds a beautiful lactic acidity that pairs perfectly with carrot cake or banana bread. It becomes a more complex peanut butter frosting for brownies, cutting through the rich chocolate.
For Dietary Needs: dairy-free Peanut Butter Frosting
You can easily swap the butter for a high-quality plant based stick butter and use coconut cream instead of heavy cream. The results are surprisingly connected to the original texture, though the flavor will have a slight tropical hint.
| Original Ingredient | Substitute | Why It Works |
|---|---|---|
| Butter (115g) | Vegan Butter Sticks (115g) | Similar melting point. Note: Ensure it is the stick form, not tub margarine. |
| Heavy Cream (45ml) | Full fat Coconut Milk (45ml) | High fat content maintains the creamy emulsion. |
| Creamy Peanut Butter | Almond Butter (250g) | Similar protein structure. Note: Flavor will be more subtle and floral. |
If you're feeling adventurous with nut butters, I have a guide on how to make peanut butter three ways that covers everything from honey roasted to spicy variations that can be used in this frosting base.
Data on Freshness and Smart Storage Solutions
Because this frosting is high in fat and sugar, it acts as its own preservative to an extent. However, the heavy cream does introduce a shelf life limit.
Fridge Storage: Keep the frosting in an airtight container for up to 5 days. Before using, let it sit at room temperature for 1 hour, then give it a quick whip with a whisk to restore the fluffiness.
Freezer Storage: This frosting recipe freezes beautifully. It will stay fresh for up to 3 months. To thaw, move it to the fridge 24 hours before you need it.
Zero Waste Tip: If you have leftover frosting, don't throw it away! It makes an incredible filling for sandwich cookies or a dip for apple slices. You can even melt it down slightly and drizzle it over a batch of this Monkey Bread Recipe for a decadent breakfast upgrade.
Optimizing Flavor Pairings for Your Finished Dessert
Presentation is the final step in the cooking process. How you apply the frosting determines how it's perceived. We can look at this in three different plating levels depending on the occasion.
- Simple (The Home Style): Use an offset spatula to create thick, rustic swoops. This is perfect for a 9x13 pan of brownies where you want a "messy but cozy" look.
- Polished (The Bakery Look): Use a large star tip to pipe uniform swirls onto cupcakes. This adds height and makes the peanut butter frosting recipe look intentional and professional.
- Restaurant (The Modern Twist): Place the frosting in a piping bag with a small round tip. Pipe tiny "dots" of varying sizes across the top of a chocolate tart, then garnish with flaky sea salt and crushed roasted peanuts.
| Level | Technique | Visual Result |
|---|---|---|
| Simple | Swirl & Swoop | Rustic and inviting |
| Polished | Star Tip Pipe | Professional and symmetrical |
| Restaurant | Multi dotting | Contemporary and intricate |
The ultimate pairing is, without a doubt, a dark chocolate base. The bitterness of the cocoa reacts with the salt in the frosting to create a rounded flavor profile. Whether you're making a birthday cake or just a quick treat, this frosting is the connected piece that brings the whole dessert together.
Don't be afraid to experiment with the texture if you want it to shatter slightly on the tongue, chill the finished dessert for 30 minutes before serving!

Recipe FAQs
What is the best peanut butter for frosting?
Use a standard, creamy processed peanut butter. Brands like Jif or Skippy contain stabilizers that help prevent the frosting from separating, ensuring a smooth and consistent texture. Natural peanut butters tend to be oilier and may require extra steps to emulsify properly.
What's the difference between icing and frosting?
Frosting is generally thicker and fluffier than icing. Frosting typically contains a higher fat-to-sugar ratio, often made with butter or cream cheese, giving it a richer texture suitable for filling and layering cakes. Icing is usually thinner and glossier, used for drizzling or coating pastries.
How long is homemade peanut butter icing good for?
Homemade peanut butter frosting is typically good for up to 5 days in the refrigerator. Store it in an airtight container to prevent it from drying out. Before using, allow it to come to room temperature for about an hour and give it a quick whisk to restore its fluffy texture.
How do you make 2 ingredient peanut butter frosting with canned frosting?
Combine equal parts peanut butter and canned vanilla frosting. Stir them together until well incorporated for a quick flavor boost. For a smoother consistency, you can gently warm the peanut butter first, or add a splash of milk if it seems too stiff.
Can I use natural peanut butter in frosting?
Yes, but be prepared for texture adjustments. Natural peanut butter, which separates oil from solids, can make frosting oilier or prone to separation. You might need to drain off excess oil and potentially add a stabilizer like cornstarch or an extra bit of confectioners' sugar to achieve the desired consistency. If you enjoyed mastering emulsion here, see how the same principle of stabilizing fats applies in our Pistachio Butter: Ultra Creamy Homemade Recipe in 20 Minutes.
What makes peanut butter frosting grainy?
Graininess in peanut butter frosting is usually due to unsifted confectioners' sugar or insufficient mixing time. The sugar crystals need to be fully incorporated and coated by the fats to achieve a smooth texture. Make sure to sift your sugar and whip the frosting until it's uniformly smooth.
How do I fix runny peanut butter frosting?
Chill and re-whip with more sugar. If your frosting is too runny, place it in the refrigerator for about 20 minutes until it firms up. Then, re-whip it, gradually adding a small amount of additional confectioners' sugar (about 20g at a time) until the desired thickness is reached.
This technique is similar to how we manage dough consistency in baking, where temperature and ingredient ratios are key.
Peanut Butter Frosting Recipe

Ingredients:
Instructions:
Nutrition Facts:
| Calories | 226 kcal |
|---|---|
| Protein | 3.8g |
| Fat | 15.6g |
| Carbs | 19.6g |
| Fiber | 1.0g |
| Sugar | 17.4g |
| Sodium | 105mg |
