The Foolproof Guide How to Make Perfectly Peeled Creamy Hardboiled Eggs

- Unlocking the Secret to Effortlessly Peeled, Perfect Hard Boiled Eggs
- Why This Cooking Method Ends Yolk Greening Forever
- Gathering Your Supplies: Essential Components for Success
- The Non-Negotiables: What You Absolutely Need
- The Step-by-Step Mastery of Perfect Hard Boiled Eggs
- Executing the Foolproof Boil and Steam Technique
- Maximizing Shelf Life and Serving Suggestions
- Recipe FAQs
- 📝 Recipe Card
Unlocking the Secret to Effortlessly Peeled, Perfect Hard Boiled Eggs
Forget the kitchen frustration of chipped whites and shells that refuse to surrender! The quest for truly Perfect Hard Boiled Eggs ends here. While the process of Making Hard Boiled Eggs seems elementary, achieving that perfect balance a firm but tender white surrounding a bright, creamy yellow yolk that slides free from the shell requires specific, non-negotiable steps.
This guide isn't just about boiling; it’s about employing a precise steam and-shock technique that transforms humble eggs into flawless components ready for any recipe, from a picnic platter to a hearty salad topping. We are aiming for the pinnacle of simplicity and perfection in this fundamental cooking skill.
Why This Cooking Method Ends Yolk Greening Forever
The most common culprit in disappointing hard boiled eggs is the dreaded grey green ring surrounding the yolk. This occurs when eggs are cooked too long or at too high a consistent temperature, causing a harmless but unattractive reaction between the sulfur in the white and the iron in the yolk.
Our chosen method, which involves a rapid boil followed by a controlled steam bath, keeps the internal temperature within the ideal zone, ensuring you never see that chalky discoloration again. When you learn How To Cook Perfect Hard boiled Eggs , you bypass this problem entirely.
The Ultimate Kitchen Alchemist's Approach to Egg Perfection
Our foundational approach relies on maximizing temperature shock. We begin by bringing the water to a full, aggressive boil the highest possible temperature before immediately killing the heat and covering the pot. This allows the residual heat to cook the eggs gently through steaming.
This Boiled Egg Recipe leverages science to manage temperature gradients precisely. By starting cold and finishing hot, we ensure the protein structure sets evenly and gently.
Goodbye Chalky Centers: Our Promise for Creamy Yolk Results
Chalkiness is the direct result of slow, low-temperature cooking over an extended period. When we adhere to the recommended Hard Boiled Eggs Cook Time within the steamy environment of a covered pot, the yolks set quickly but softly.
We will use approximately 12 to 13 minutes of steaming time for a firm but wonderfully creamy center. This careful timing is central to How To Make Perfect Hard boiled Eggs .
Setting Expectations: What Makes This Guide Essential
This comprehensive walkthrough elevates a mundane kitchen task into a repeatable success. We cover not just the cooking, but the preparation (using slightly older eggs is key!), the mandatory cooling process, and expert peeling strategies.
If you follow these instructions, you will master Hard Boiled Eggs Time management and produce consistently superior results, making this the definitive guide for anyone seeking Perfect Boiled Egg Time adherence.
Gathering Your Supplies: Essential Components for Success
Before we even touch the stove, having the right tools and ingredients prepared ensures a seamless cooking process. For roughly a dozen eggs, you will need about 12 large eggs, enough water to cover them by an inch, a generous amount of ice, and a large saucepan with a tight fitting lid.
The preparation phase is brief about two minutes of prep time but critical to the final outcome.
Related Recipes Worth Trying
- The Best Ever Scrambled Eggs Creamy Cottage Cheese Secret — Unlock The Best Ever Scrambled Eggs My cottage cheese trick creates fluffy creamy perfection A quick healthy breakfast the whole family will love Get the...
- Recipe Crispy White Beans with Eggs My Mediterranean Brunch — Recipe Crispy White Beans with garlicky greens and a poached egg Yes please This healthy vegetarian dinner is ready in 45 minutes Get the recipe
- Recipe Boiled Milk Frosting Grandmas Velvet Vanilla — Craving Grandmas Boiled Milk Frosting Recipe My easy Velvet Vanilla version is light fluffy and perfect for cakes Get the Old Fashioned Frosting Recipe here
The Non-Negotiables: What You Absolutely Need
Success in Making Hard Boiled Eggs hinges on a few simple but vital ingredient considerations and equipment choices.
Selecting Eggs: Freshness vs. Age for Optimal Peeling
It may seem counterintuitive, but super fresh eggs (under five days old) are notoriously difficult to peel because their inner membrane sticks firmly to the shell. For the easiest peeling experience when aiming for Perfect Hard Boiled Eggs , select eggs that are about a week old.
If you only have very fresh eggs, the ice bath technique we detail later will be even more crucial.
Water Quality and Pot Size: The Unsung Heroes
The water you use is straightforward tap water is perfectly adequate. However, the saucepan matters significantly. You must use a pot large enough so that the dozen eggs fit comfortably in a single layer on the bottom. Overcrowding leads to uneven heat distribution and potential breakage.
Optionally, adding a teaspoon of salt to the water can help coagulate any whites that escape if an egg happens to crack during the boil.
Tools Required: Beyond Just a Saucepan
While a good lid and saucepan are the main players, you absolutely need a reliable timer and a large bowl dedicated solely to creating an ice bath. A slotted spoon or spider strainer is essential for safely transferring the eggs directly from the boiling water into the ice bath without delay.
The step-by-step Mastery of Perfect Hard Boiled Eggs
The actual Boiled Egg Recipe process can be broken down into distinct, easy-to-manage phases. First, gently place your 12 large eggs into the prepared saucepan. Pour cold tap water over them until the water level is about 2.5 cm (1 inch) above the eggs.
This initial cold start prevents thermal shock breakage. If you are using the optional salt, add it now.
Executing the Foolproof Boil and Steam Technique
This technique moves away from prolonged simmering and embraces the power of residual heat for gentle, even cooking.
Phase One: The Initial Simmer and Temperature Shock
Place the saucepan over high heat. Allow the water to come to a vigorous, rolling boil the water must be bubbling actively across the entire surface. The moment this rolling boil is achieved, immediately turn the heat off completely. Do not let it boil for even one minute longer.
Cover the pot tightly with its lid. This stops the harsh boiling action and transitions the eggs into a controlled steaming environment.
The Crucial Cooling Bath: Why Ice Water is Mandatory
This step cannot be skipped if you are committed to learning How To Make Perfect Hard boiled Eggs . While the eggs are steaming (covered, heat off), quickly prepare a large bowl filled with ice cubes and cold water.
As soon as the steaming Hard Boiled Eggs Time is complete, use your slotted spoon to plunge every egg immediately into the ice bath. The rapid temperature drop is key; it halts the internal cooking process instantly, preventing that greenish ring, and causes the cooked egg contents to contract slightly, pulling the membrane away from the shell, which sets you up for easy peeling.
Allow them to sit for a minimum of 10 minutes until completely cool to the touch.
Mastering the Crack: Gentle Techniques for Shell Removal
Once cooled, remove an egg and place it on a hard countertop. Gently tap the wider end first, then roll the entire shell lightly between your palms until it is covered in fine cracks, almost like cracked glass.
The peeling should begin easily under cool running water, allowing the water to slip between the shell and the white, lifting the pieces away smoothly.
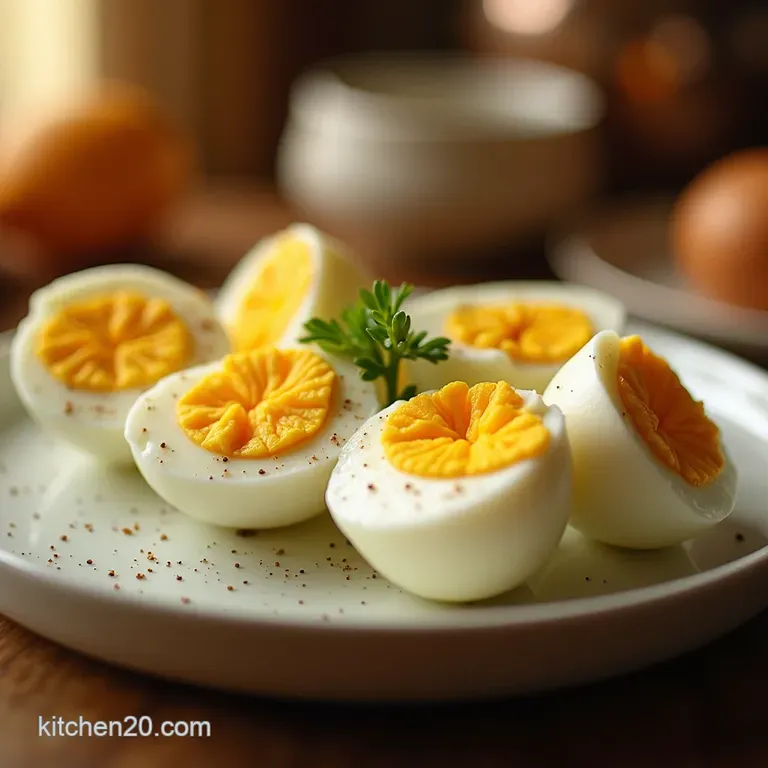
Precise Timing Chart for Varied Doneness Levels
The time spent in the covered, off-heat steam dictates the final texture. For creamy, slightly moist yolks perfect for deviled eggs, aim for 10 minutes. For fully set, firm centers ideal for slicing onto salads, use 12 to 13 minutes.
Any longer than 14 minutes risks entering the territory where the sulfur reaction begins, spoiling your Perfect Boiled Egg Time .
Maximizing Shelf Life and Serving Suggestions
Once peeled, these flawless Hard Boiled Eggs are incredibly versatile. They are ready to eat immediately, seasoned simply with salt and pepper.
Storing Your Cooked Eggs: Fridge Longevity Tips
Unpeeled, Hard Boiled Eggs stored in the refrigerator can last up to one week. Once peeled, they should be consumed within two to three days for the best texture and flavour. Keep them in an airtight container to prevent them from absorbing odours from other items in the fridge.
Creative Uses for Your Flawless Hard Boiled Eggs
These are the building blocks for endless dishes. Slice them thinly for dramatic presentation atop avocado toast. Chop them finely for the base of a classic Coronation Egg Salad. Or, for a true showstopper, use them to create classic Scotch Eggs encased in sausage meat and breadcrumbs.
What To Do If You Still Encounter Stubborn Shells
If you find a particularly clingy shell despite following the cooling instructions, don't panic. Place the troublesome egg back under cool running water and try peeling underneath the stream; the water acts as a lubricant. Never try to force it aggressively, as this tears the white.
Addressing Grey Green Rings: Preventing Overcooking
If, despite our best efforts, you see that telltale grey ring, it means the Hard Boiled Eggs Cook Time was slightly exceeded. The preventative cure is always the ice bath and correct steaming duration. Next time, shave 60 seconds off the steaming phase to ensure a bright yellow interior.

Recipe FAQs
How do I stop my Hard Boiled Eggs from having that awful green ring around the yolk?
That green ring is a sign of overcooking, caused by a harmless reaction between sulfur in the white and iron in the yolk. To avoid it, make sure you stick rigidly to the timing and, crucially, plunge those eggs into the ice bath immediately after the timer goes off. That rapid cooling is your magic trick!
Why are my Hard Boiled Eggs shells sticking like glue? What's the secret to easy peeling?
Ah, the eternal struggle! The best trick is twofold: firstly, use eggs that are at least a week old, as fresher ones cling tighter. Secondly, the ice bath (or 'shocking') is non-negotiable; the rapid temperature drop makes the cooked egg shrink away from the shell membrane.
How long should I actually cook them for? I'm aiming for a firm but still slightly creamy yolk.
For that perfect, slightly creamy but totally firm yolk ideal for things like devilled eggs aim for 10 to 11 minutes in the residual heat after turning the stove off. If you prefer them rock solid for a long haul picnic, push it to 13 minutes, but don't go much past that!
Can I make a big batch of Hard Boiled Eggs ahead of time, and how should I store them?
Absolutely, they’re brilliant for meal prepping! Store them unpeeled in the fridge for up to a week; they keep best this way. If you've already peeled them, pop them into an airtight container submerged in a little water to keep them from drying out, but aim to eat those within three days.
What's the best way to reheat a hard boiled egg without drying it out?
Honestly, hard boiled eggs are best served cold or at room temperature, much like a good ploughman's lunch! If you must reheat them, avoid the microwave, as it can make them rubbery. Instead, gently warm them in a saucepan with a little water for just a minute or two, or add them to a simmering soup right at the end.
Perfect Hard Boiled Eggs

Ingredients:
Instructions:
Nutrition Facts:
| Calories | 14 kcal |
|---|---|
| Protein | 0.9 g |
| Fat | 0.1 g |
| Carbs | 2.2 g |
| Fiber | 0.0 g |
| Sodium | 5 mg |
