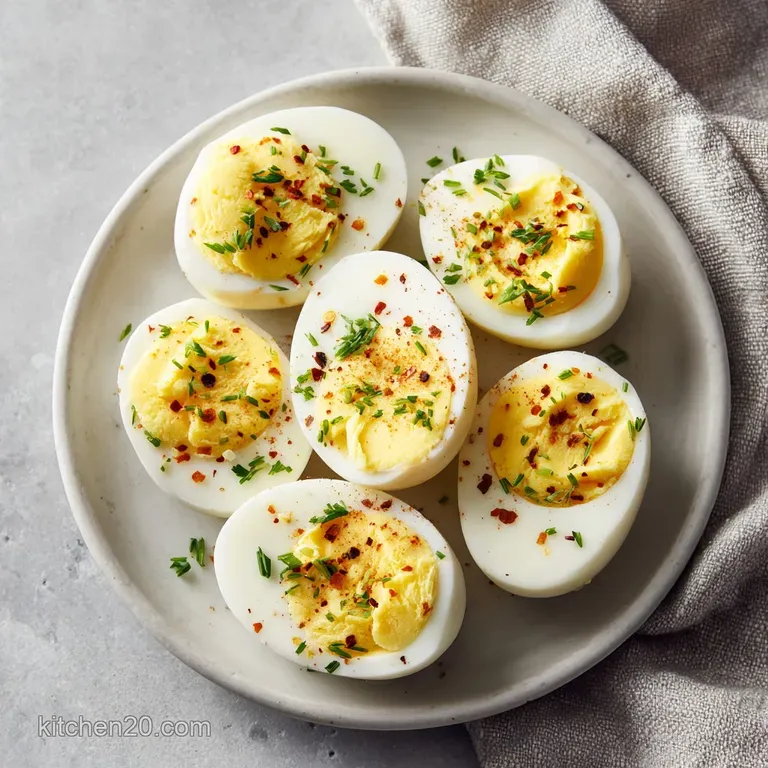
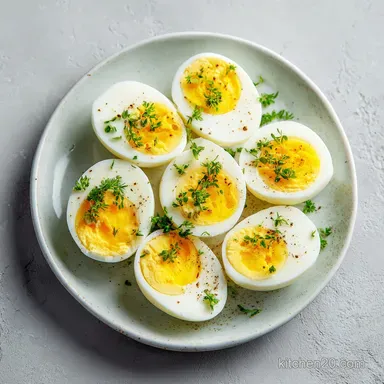
Perfect Hard Boiled Eggs: Creamy and Easy-Peel
- Time: Active 2 minutes, Passive 12 minutes, Total 14 minutes
- Flavor/Texture Hook: Velvety yolks with a snappy, tender white
- Perfect for: High protein meal prep and holiday brunch hosting
- Achieving the Perfect Hard Boiled Eggs
- Efficiency Specs for Modern Prep
- How the Membrane Releases
- Component Analysis Deep Dive
- Essential Ingredients for Flawless Results
- Modern Tools for Precision Cooking
- Precise Stovetop Execution and Flow
- Hard Boiled Eggs Cooking Time Chart
- Expert Techniques and Common Pitfalls
- Integrating Protein into Your Lifestyle
- Storage Systems and Waste Reduction
- Creative Inspiration for Modern Brunches
- Recipe FAQs
- 📝 Recipe Card
Achieving the Perfect Hard Boiled Eggs
Picture this: It is Sunday morning, the sunlight is streaming through the kitchen window, and you have a dozen guests arriving in two hours for a spring brunch. The pressure is on to deliver a platter of classic deviled eggs that actually look as good as they taste. In the past, I dreaded this moment. I would stand over the sink, desperately picking away at stubborn shells that clung to the whites, leaving me with "moon crater" eggs that looked like they had been through a battle. It was frustrating, wasteful, and honestly, a bit of a mood killer when you are trying to be the effortless host.
We have all been there, hovering over a pot of water, wondering if the green ring of doom is currently forming around our yolks. But once I transitioned to a system focused on streamlining and efficiency, everything changed.
I stopped treating egg boiling as a "vibes based" activity and started treating it like a precise kitchen operation. It is not about luck; it is about thermodynamics. When you understand how the protein responds to heat, you gain total control over the texture, from a jammy center to a firm, creamy finish.
This recipe is the backbone of my weekly efficiency system. Whether I am prepping for a busy week of gym sessions or setting the stage for a family gathering, these eggs are the reliable protein anchor I need. We are skipping the old-fashioned "cold water start" that leads to sticking shells.
Instead, we are leaning into a modern, over high heat method that guarantees a clean break and a beautiful presentation. Let's get into the mechanics of why this works so you never have to "pick" at an egg ever again.
Efficiency Specs for Modern Prep
The beauty of a streamlined kitchen is knowing exactly what to expect before you even turn on the burner. When we talk about maximizing our output, we need to look at the numbers. This system is designed for a standard dozen, but the principles of heat transfer remain constant whether you are doing six or sixteen.
Consistency Check: For a flawlessly set white and a creamy yolk, the 12 minute mark is your non negotiable finish line. Any less and you risk a soft center that won't hold up in a salad; any more and you invite that unappealing sulfur aroma.
| Cook Method | Total Time | Texture Result | Best Application |
|---|---|---|---|
| Stovetop (Hot Start) | 14 mins | Snappy white, creamy yolk | Every day meal prep |
| Instant Pot (5-5-5) | 15 mins | Very tender, easy peel | Large batches (24+) |
| Air Fryer | 15 mins | Slightly rubbery | Small spaces, no water |
Using the stovetop remains the most efficient way to handle a single dozen because of the immediate heat recovery. When you drop eggs into already boiling water, you are initiating the "thermal shock" necessary for easy peeling.
This method is the gold standard for anyone who values their time and wants a predictable result every single week.
How the Membrane Releases
Many home cooks think the secret to a good egg is vinegar or baking soda in the water, but the reality is much simpler. It all comes back to how we manage the interaction between the shell, the membrane, and the protein.
- Thermal Expansion: Dropping a cold egg into boiling water causes the egg white to shrink away from the shell membrane almost instantly.
- Membrane Shock: The ice bath at the end is not just for cooling; it creates a pressurized environment that pulls moisture between the shell and the white.
- Protein Denaturation: Maintaining a medium high simmer ensures the proteins set firmly enough to withstand peeling without becoming rubbery or tough.
Component Analysis Deep Dive
To achieve repeatable success, we have to look at our components as functional tools rather than just food items. Each element plays a specific role in the structural integrity of the final product.
| Ingredient | Science Role | Pro Secret |
|---|---|---|
| Large Eggs | Protein Structure | Use 1 week old eggs for higher pH and easier peeling. |
| Salt (1 tsp) | Integrity Guard | Helps seal small hairline cracks if they occur during the boil. |
| Ice Bath | Temperature Stop | Prevents the overcooking that leads to the green sulfur ring. |
The age of your eggs is actually one of the most significant factors in the kitchen. Fresh eggs from a farm have a lower pH, which makes the membrane stick to the shell like industrial glue.
If you are buying eggs from a modern grocery store, they are usually already about a week old by the time they hit the shelf, which is actually the "sweet spot" for boiling.
Essential Ingredients for Flawless Results
We are keeping the list lean because efficiency thrives on simplicity. You don't need a pantry full of additives to make this work; you just need the right primary elements and a bit of precision.
- 12 large eggs: Why this? The standard size for most timing charts and egg cartons. (store-bought is actually better than farm fresh for peeling).
- 1 tsp salt: Why this? Acts as a safety net for any accidental shell fractures.
- Water: Why this? You need enough to submerge the eggs by at least 2.5 cm.
- 2 cups ice cubes: Why this? Necessary for a true "shock" bath to stop the carryover heat.
- Cold water: Why this? Completes the ice bath for rapid cooling.
If you find yourself out of a specific ingredient or want to tweak the system for what you have on hand, here are some smart substitutions that won't compromise your efficiency.
| Original Ingredient | Substitute | Why It Works |
|---|---|---|
| Large Eggs | Medium or XL Eggs | Adjust timing by +/- 60 seconds to reach the same yolk set. |
| Table Salt | Kosher Salt | Same protective properties; use 1.5 tsp for similar volume. |
| Ice Cubes | Frozen Peas | If you're out of ice, any frozen small item can chill the water. |
If you are transitioning these eggs into a breakfast feast, they are the perfect companion to a silky hollandaise if you prefer a hard set version of a morning classic.
Modern Tools for Precision Cooking

Streamlining your workflow requires the right appliances. You don't need fancy gadgets, but using the correct "hard" tools makes the "soft" skills of cooking much easier to manage.
- Heavy bottomed saucepan: You want something with good heat retention. A thin pot will lose too much temperature when the cold eggs go in, throwing off your timer.
- Slotted spoon: This is your primary tool for safety. Dropping eggs by hand is a recipe for cracked shells and burnt fingers.
- Digital kitchen timer: Do not rely on your internal clock. Precision is the difference between a golden yolk and a gray one.
- Large mixing bowl: Specifically for the ice bath. It needs to be large enough to hold all 12 eggs plus the ice and water without overflowing.
- Precision scale (Optional): If you are scaling this for a massive event, weighing your salt (5g) ensures the exact same water chemistry every time.
Precise Stovetop Execution and Flow
Following this flow ensures that you aren't rushing or second guessing yourself. I like to set up my "ice station" while the water is coming to a boil to keep the process moving smoothly.
- Fill your heavy bottomed saucepan with enough water to cover the eggs by one inch (about 2.5 cm).
- Add the salt and bring the water to a full, rolling boil over high heat.
- Once the water is crashing, lower the heat to a simmer. Note: This prevents the eggs from bouncing and cracking against the bottom of the pan.
- Use your slotted spoon to gently lower the cold eggs directly from the refrigerator into the water.
- Immediately turn the heat back up to medium high to maintain a gentle, steady boil.
- Set your digital timer for exactly 12 minutes. Note: Do not guess; the margin for error is slim here.
- While the eggs are bubbling, fill your large mixing bowl with 2 cups of ice and cold water.
- When the timer sounds, use the slotted spoon to transfer the eggs into the ice bath immediately.
- Let them sit in the ice bath for at least 10 minutes. Note: This stops the cooking process and shocks the membrane for an effortless peel.
- Gently crack the shells all over and peel under a thin stream of cool water for the cleanest finish.
Hard Boiled Eggs Cooking Time Chart
Not everyone wants the same result. Some people prefer a slightly softer, "jammy" yolk for ramen, while others want a fully firm yolk for chopping into salads. This chart allows you to customize your output based on your specific needs.
| Time (Minutes) | Yolk Description | Best For |
|---|---|---|
| 6 minutes | Liquid gold, very soft | Ramen and dipping toast |
| 8 minutes | Jammy, custard like | Avocado toast and salads |
| 10 minutes | Set but tender, bright orange | Bento boxes and snacking |
| 12 minutes | Fully firm, pale yellow | Deviled eggs and egg salad |
| 14 minutes | Very firm, crumbly | Grating over asparagus |
Expert Techniques and Common Pitfalls
Even with a perfect system, variables can trip you up. The most common issues usually stem from temperature mismanagement or rushing the final cooling phase.
Why do my eggs have a green ring?
The green ring is actually a reaction between the sulfur in the white and the iron in the yolk. This only happens when the egg is overcooked or cooled too slowly. By sticking to 12 minutes and using an immediate ice bath, you completely eliminate the conditions needed for this reaction to occur.
How do I prevent the shells from sticking?
The "hot start" is your primary defense. When eggs start in cold water, the proteins heat up slowly and fuse to the membrane. By dropping them into boiling water, the proteins seize up instantly, pulling away from the shell and creating that "easy peal" gap we all crave.
| Problem | Root Cause | Solution |
|---|---|---|
| Cracked Shells | Eggs dropped too hard | Use a slotted spoon and lower the heat to a simmer before adding. |
| Hard to Peel | Eggs were too fresh | Use older store-bought eggs or add a minute to the ice bath. |
| Off center Yolks | Eggs sat too long in storage | Stir the water gently for the first 2 minutes of cooking. |
Common Mistakes Checklist
- ✓ Never start the eggs in cold water if you want easy peeling.
- ✓ Don't overcrowd the pan; eggs should be in a single layer for even heat.
- ✓ Avoid using farm fresh eggs for boiling; save them for poaching or frying.
- ✓ Always use a timer seconds matter when it comes to protein denaturation.
- ✓ Do not skip the ice bath; carryover heat will overcook the yolks in minutes.
Integrating Protein into Your Lifestyle
If you are managing a specific dietary framework, these are essentially the ultimate "fast food." They are naturally gluten-free, keto friendly, and packed with high-quality bioavailable protein.
For those on a low sodium path, you can omit the salt in the water it's mostly there as a structural safety net rather than for flavor.
If you are cooking for a larger crowd, scaling this recipe is straightforward. However, remember that adding 24 eggs to a pot will drop the water temperature significantly more than 12 eggs will.
If you double the batch, use a larger pot with more water volume to maintain the "thermal mass" so your timing doesn't get skewed.
Storage Systems and Waste Reduction
One of the best things about hard boiled eggs is their shelf life, making them the king of the "cook once, eat five times" philosophy.
- Storage: Keep unpeeled eggs in a sealed container in the fridge for up to 7 days. Once peeled, they should be eaten within 24 hours for the best texture.
- Freezing: I don't recommend freezing whole boiled eggs as the whites become tough and watery. However, you can freeze the cooked yolks for up to 3 months to grate over dishes later.
- Zero Waste: Don't toss those shells! If you have a garden, crushed eggshells are a fantastic source of calcium for your soil. You can also dry them out and grind them into a fine powder to add to bird feed.
Creative Inspiration for Modern Brunches
Now that you have mastered the "how," let's talk about the "what." A perfectly boiled egg is a blank canvas. For a modern brunch spread, I love serving these halved and topped with a tiny dollop of Greek yogurt and a sprinkle of everything bagel seasoning.
It's an efficient way to get that "fancy cafe" vibe without the $20 price tag.
If you are looking for something more substantial, chop these up for a classic egg salad mixed with Dijonnaise and fresh dill. They provide a creamy, rich base that pairs beautifully with crunchy sourdough or crisp lettuce wraps.
The precision you put into the boiling phase pays off here no gray yolks to muddy the colors of your beautiful brunch dishes. Trust the system, watch the timer, and enjoy the simplest, most efficient protein hack in your culinary arsenal.

Recipe FAQs
What is the trick to perfect hard boiled eggs?
Start by lowering cold eggs into already boiling water. This thermal shock, combined with a crucial 10-minute ice bath, ensures the membrane releases easily from the shell every time.
Are boiled eggs ok for diabetics?
Yes, they are an excellent choice. Eggs are a low-glycemic, high protein food that helps stabilize blood sugar levels without causing insulin spikes.
How long do you hard boil eggs for?
Set your timer for exactly 12 minutes. This specific duration ensures the white is fully set and the yolk reaches a firm, creamy consistency without becoming chalky.
Do boiled eggs help with constipation?
No, they do not. Eggs contain no dietary fiber, so they will not assist in relieving constipation and may even be constipating for some individuals.
Is it true I can use farm fresh eggs for boiling?
No, this is a common misconception. Extremely fresh eggs have a lower pH that causes the white to cling tightly to the shell, making them nearly impossible to peel cleanly; it is better to save those for mastering a perfect runny yolk instead.
How to store hard boiled eggs?
Keep unpeeled eggs in a sealed container in the refrigerator for up to 7 days. Once you peel them, they should be consumed within 24 hours to maintain the best quality and texture.
How to avoid green rings around the yolk?
Transfer the eggs to an ice bath immediately after the 12-minute timer ends. The green color is a chemical reaction caused by overcooking, and rapidly cooling the eggs stops the heat from reaching the yolk center.
Perfect Hard Boiled Eggs 2
Ingredients:
Instructions:
Nutrition Facts:
| Calories | 78 kcal |
|---|---|
| Protein | 6.3 g |
| Fat | 5.3 g |
| Carbs | 0.6 g |
| Fiber | 0 g |
| Sugar | 0.6 g |
| Sodium | 62 mg |
