Red Velvet Raw Meat Rice Krispies Treats: the Butchers Bargain
- Introducing The Butcher’s Bargain: Red Velvet Raw Meat Rice Krispies Treats
- The Art of Culinary Deception: Why These Treats Are a Showstopper
- Gathering Your Components: Essential Ingredients for the Raw Meat Illusion
- Crafting the Macabre Masterpiece: Step-by-Step Guide to Red Velvet Raw Meat Rice Krispies Treats
- Mastering the Technique: Turning Sweet Treats into Ghoulish Cuts
- The Science of Deception: Achieving the Perfect Raw Meat Texture and Red Velvet Flavor
- Troubleshooting and Expert Tips for Perfecting Your Ghoulish Treats
- Maximizing Freshness: Storage and Prep-Ahead Strategies
- Presenting The Haul: Serving Suggestions and Display Ideas
- Recipe FAQs
- 📝 Recipe Card
Introducing The Butcher’s Bargain: Red Velvet Raw Meat Rice Krispies Treats
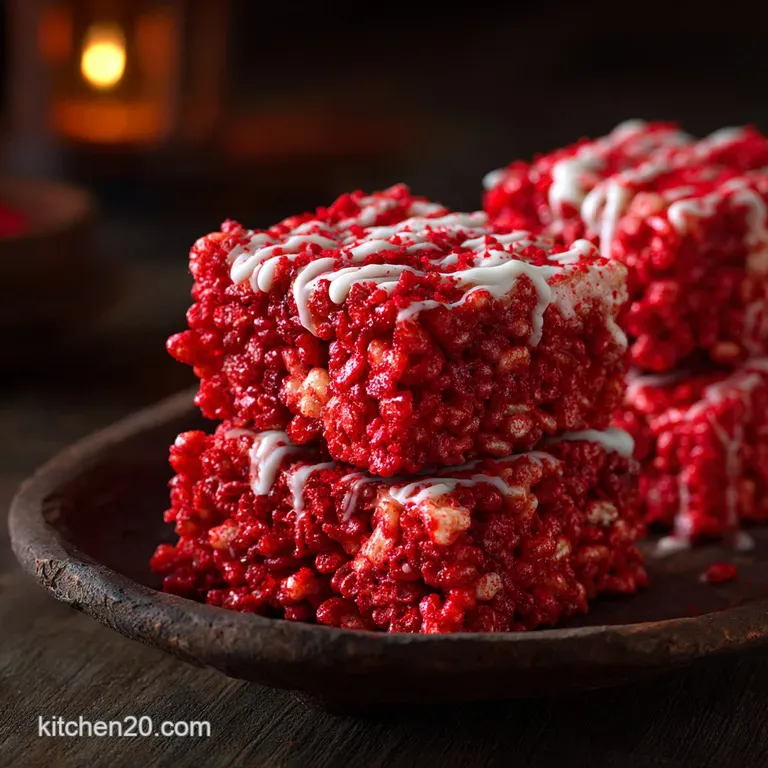
Hold onto your hats, buttercups. The first time you unveil a platter of these Red Velvet Raw Meat Rice Krispies Treats, you will hear gasps. The visual shock of that deep, arterial crimson, mottled with streaks of stark white "fat," is intense.
But then you bite into that sweet, slightly tangy cocoa flavor and the satisfying, familiar crunch of puffed rice cereal. It’s culinary theater at its most delicious and macabre.
Look, I love spending all day nursing a pot of my [Beef Cabbage Soup Deep Flavor Slow Simmered Recipe], but sometimes life demands immediate, maximum impact with minimum effort. This recipe is your answer for stress free Halloween potlucks or any themed party requiring a horrifying centerpiece.
It takes less than an hour, start to finish. Seriously, it’s brilliant.
Are you ready to elevate the humble childhood treat into something truly gruesome and unforgettable? We are moving far beyond the pale, beige square today. Get ready to fool absolutely everyone.
The Art of Culinary Deception: Why These Treats Are a Showstopper
Why Traditional Rice Krispies Need a Macabre Makeover
Standard Rice Krispies treats are fine, I guess, but they are boringly predictable. We want drama, right? This raw meat aesthetic works perfectly because the puffed cereal itself mimics the porous texture of muscle tissue.
We aren't just adding red dye; we are integrating cocoa powder to achieve that signature Red Velvet depth and a specific, dark mahogany color when wet. That deep flavor profile is critical.
Quick Glance at Difficulty, Prep Time, and Yield
This recipe is incredibly straightforward. It's essentially a one-pot melt and mix situation. The only thing you need to worry about is moving quickly once the ingredients are hot. You’ll yield 12 large, dramatic "cuts" of meat, or you can cut them smaller if you’re dealing with a massive crowd.
Designing the Ultimate Edible Horror Prop
The true genius lies in the layering and the temperature contrast. We use a deeply colored, slightly warm base, and then quickly streak it with a cold, stiff cream cheese mixture. This technique ensures the white "fat" stays distinct and doesn't just melt away into pink goo.
The goal is not perfection; the goal is realistic, uneven horror.
Gathering Your Components: Essential Ingredients for the Raw Meat Illusion
You don't need much, but the quality of your coloring and your cocoa powder absolutely makes or breaks the Red Velvet flavor. Don't skimp here.
Deep Dive into Coloring Agents: Achieving the 'Butcher Shop' Blood Red
You cannot use standard liquid food coloring for this recipe. It simply dilutes the mixture and delivers a weak, Pepto Bismol pink, which we definitely do not want. You must use a high intensity gel food color, specifically labeled "Super Red," "Deep Red," or "Crimson." This concentrated gel delivers the intense, arterial colour required for the perfect raw meat illusion.
The Non-Negotiable: Selecting the Best Puffed Rice Cereal Base
Yes, you need the standard puffed rice cereal. Its light, airy, and slightly jagged texture is necessary to mimic the natural texture of muscle fibers. Generic brands are totally fine here. Just make sure the cereal is fresh and crispy. Stale cereal makes for disappointingly chewy treats.
Cream Cheese Frosting vs. White Chocolate Swirl for the Marbling
I experimented with both, and the cold cream cheese swirl wins hands down. Why? Because Red Velvet inherently pairs with cream cheese frosting, so it delivers that essential tang, rounding out the flavor.
White chocolate is too sweet and tends to melt immediately upon contact, disappearing into the red base too quickly. The cold cream cheese mixture retains its structure, giving you those stark white marbling streaks.
| Ingredient | My Recommendation | Viable Substitute |
|---|---|---|
| Unsalted Butter | Unsalted is best for controlling flavor. | Coconut oil or vegan baking sticks. |
| Mini Marshmallows | Mini versions melt fastest and smoothest. | Marshmallow Fluff (use slightly less, reduce butter). |
| Cocoa Powder | Dutch process for deep, mellow flavor. | Standard unsweetened cocoa (texture is slightly grainier). |
| Cream Cheese | Full fat, cold, and firm. | Vanilla flavored melting wafers (melted, cooled, and drizzled). |
Alternative Binders: Can I Use Marshmallow Fluff Instead of Mini Marshmallows?
You absolutely can. Use roughly the same weight (about three cups of fluff). Just remember that Fluff is already very soft, so you may need to reduce the initial amount of butter by one tablespoon .
Fluff also tends to be slightly sweeter, so adjust your powdered sugar in the marbling accordingly.
Crafting the Macabre Masterpiece: step-by-step Guide to Red Velvet Raw Meat Rice Krispies Treats
This entire process must be done quickly. Once the marshmallow mixture cools, it becomes impossibly stiff.
Mastering the Technique: Turning Sweet Treats into Ghoulish Cuts

Phase 1: Melting and Coloring the Red Velvet Base
First things first, line your work area with parchment paper and grease your rubber spatula generously. In a large saucepan, melt the butter over medium low heat until it is bubbling gently, smelling slightly nutty.
Add the marshmallows and stir continuously until they are fully melted into a smooth, shiny liquid; this usually takes about five minutes. Remove the pan immediately from the heat. Now stir in the vanilla extract and the high intensity red gel coloring.
Add the cocoa powder, mixing until you achieve a deep, consistent, frighteningly dark red. This step is non-negotiable for the raw meat look.
Phase 2: Incorporating the Puffed Rice Cereal Quickly and Evenly
Pour the puffed rice cereal directly into the saucepan. Use your greased spatula to fold the cereal into the red mixture. You need to work fast, turning the mixture over and over until the cereal is mostly coated. Don't stir so much that you crush the cereal.
Leave a few dry pockets; they add to the rustic, rough texture.
Phase 3: Shaping, Pressing, and Applying the Vein Like Marbling Swirl
While the mixture is still hot, dollop your cold cream cheese marbling mixture randomly over the sticky red mass. Now is the moment for artistic restraint. Gently, and I mean gently , run your spatula or knife through the mixture two or three times.
This creates the streaks of white fat without turning the whole batch pale pink.
Chef's Note: Remember, you want streaks, veins, and pockets of white fat. If you mix beyond four folds, you lose the marbling and end up with merely pink treats.
Phase 4: Setting the Treats for Optimal Slicing and Presentation
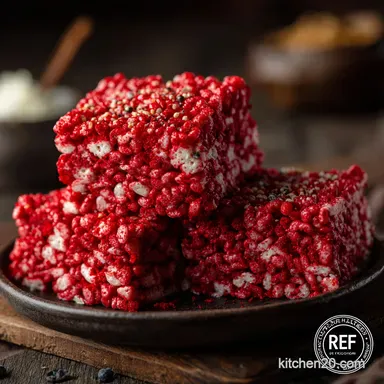
Dump the entire sticky mess onto your prepared parchment paper. Instead of pressing it into a smooth rectangle, use your hands (lightly greased!) or the spatula to loosely gather and press the mixture into a thick, irregular slab about 1.5 inches deep. We are going for "butcher shop off-cuts," not tidy slices.
Place the entire slab on a tray and chill in the refrigerator for a minimum of 30 minutes until the slab is firm.
The Science of Deception: Achieving the Perfect Raw Meat Texture and Red Velvet Flavor
Balancing Cocoa and Tang: The Essential Red Velvet Flavor Profile
Red velvet isn't just chocolate cake with red dye; it's chocolate cake with a subtle tang usually provided by buttermilk and vinegar. Here, we achieve that necessary tanginess by using the cream cheese in the marbling, which cuts through the overwhelming sweetness of the marshmallow base.
This makes the treats taste sophisticated, not just sugary.
Preventing Oily/Dry Treats: The Butter Temperature Rule
The most common mistake is burning the butter and marshmallows, or mixing the cereal in too slowly. If your butter is too hot, it will separate and leave oily streaks when cooling. If you mix too slowly, the treats will become tough and dense, losing that delightful crispness.
Keep the heat low and work swiftly once the cereal is added.
Troubleshooting and Expert Tips for Perfecting Your Ghoulish Treats
Avoiding the Pink Disaster: How to Achieve Deep, Blood Red Coloring
If your treats look pink instead of deep red, you used liquid coloring or you didn't use enough of the high intensity gel. The cocoa powder is meant to deepen the tone to a mahogany red, mimicking aged blood or muscle tissue.
If your mix looks light, stop mixing immediately and stir in another half teaspoon of gel color.
Preventing Oily/Dry Treats: The Butter Temperature Rule
The moment the marshmallows are melted, you must remove the pot from the heat. Cooking them too long will cook off the water content, resulting in extremely tough, brick like treats once cooled.
If you notice separation (oil pooling), try stirring in a tablespoon of extra marshmallow or powdered sugar off the heat to emulsify it back together.
Creative Packaging: Displaying Red Velvet Raw Meat Rice Krispies Treats on Foam Butcher Trays
For the ultimate visual gag, purchase a few clean, foam butcher trays and plastic wrap from a party store. Arrange your cut "steaks" on the foam trays, cover them tightly with plastic wrap, and apply a fake "Price per Pound" sticker. The guests go wild for this presentation!
You can even serve them next to a batch of my easy [Crockpot Honey Garlic Meatballs: Effortless Weeknight Sticky Classic] for contrast.
Maximizing Freshness: Storage and Prep Ahead Strategies
Storage & Freezing
Storage: Unlike a delicate dessert, these treats hold up beautifully at room temperature for up to three days, provided they are stored in an airtight container. The container protects them from getting stale. They tend to harden slightly on the third day, but they are still perfectly edible.
Freezing: Yes, they freeze well! Wrap individual 'meat cuts' tightly in plastic wrap, then place them in a freezer safe bag. They will keep in the freezer for up to six weeks.
Reheating/Serving After Freezing: Do not microwave them to reheat! Simply pull them out and let them thaw at room temperature for about an hour. They will retain most of their texture.
If they seem too hard, you can briefly warm them in a 200°F (95°C) oven for about five minutes to soften the marshmallow slightly, just like softening the crust on my [Strawberry Shortcake: The Chefs Flaky Buttermilk Recipe] before serving.
Presenting The Haul: Serving Suggestions and Display Ideas
When serving something this wildly themed, the presentation is everything.
- The Bloody Garnish: Offer small bowls of raspberry coulis or thickened cherry juice for dipping. Call it "Blood Sauce."
- The Butcher Shop: As mentioned above, use foam trays and faux pricing stickers. Place them on a metal sheet tray to lean into the industrial vibe.
- Dessert Contrast: Since these are intensely sweet, they pair well with fresh, slightly acidic elements. Try serving a side of fresh berries or a dark espresso. If you want another great contrast, perhaps something tangy like my [Strawberry Muffins: Bakery Style Domes, No Soggy Bottoms Recipe] would be a perfect companion piece.
Go forth and gross out your friends! Trust me, they will never look at a Rice Krispies Treat the same way again.

Recipe FAQs
How do I achieve the realistic ‘marbled raw meat’ look?
Achieving the authentic marble requires high saturation gel food coloring, such as super red or burgundy, mixed thoroughly into the marshmallow base. The 'marbling' effect comes from lightly swirling the colored mixture with the reserved, uncolored cream cheese portion just before pressing the mix into the pan.
Avoid over mixing, as this will blend the colors completely and remove the striking veiny appearance.
Why are my Red Velvet Treats too hard and crunchy?
This common issue occurs when the butter and marshmallows are overheated, causing the sugar structure to become crystallized and brittle. To prevent this, melt the butter and marshmallows very gently over low heat, removing them from the stove immediately once they are mostly smooth.
Using fresh marshmallows also helps ensure a softer, chewier texture.
What is the best way to store these treats, and how long do they stay fresh?
These treats keep best at room temperature in an airtight container for up to three days. Because they contain a cream cheese element, refrigeration is necessary for longer storage, though they may become quite stiff.
If refrigerated, let them sit out for 15 20 minutes prior to serving to return them to a soft consistency.
Can I use marshmallow fluff instead of bagged marshmallows?
While marshmallow fluff can be substituted, it will yield a final treat that is significantly softer and less structured than those made with whole marshmallows. If you choose to use fluff, you will need approximately 7 ounces (one standard jar) to replace the required weight of whole marshmallows, and the cooking time will be substantially shorter.
I’m serving these outside for a party. Will the red color leak or melt in warm weather?
The gel coloring is stable, but the high fat and sugar content of the base means the treats can quickly lose their shape in temperatures exceeding 80°F (27°C). If serving outdoors, keep them in the shade or on ice until the last moment, or consider chilling them thoroughly before transport to extend their structural integrity.
Can I skip the cocoa powder for a traditional vanilla Krispies flavor?
Yes, the cocoa powder is easily omitted without affecting the texture of the treats, allowing for a standard vanilla flavor profile. Ensure you maintain the heavy use of red food coloring to keep the critical 'raw meat' visual effect.
You may also want to slightly increase the vanilla extract to enhance the pure vanilla essence.
Are there any suitable gluten-free or vegan substitutions for this recipe?
Yes, this recipe is adaptable; ensure your puffed rice cereal is explicitly certified gluten-free, as some brands contain malt. For a fully vegan version, substitute the dairy butter for a plant based butter stick and use commercially available vegan marshmallows, which function nearly identically to the traditional variety in this type of recipe.
Raw Meat Red Velvet Krispies Treat
Ingredients:
Instructions:
Nutrition Facts:
| Calories | 172 kcal |
|---|---|
| Protein | 2.0 g |
| Fat | 4.0 g |
| Carbs | 34.0 g |
