Reeses Peanut Butter Cupcakes: Rich Chocolate Cake with a Hidden Truffle Center

- The Ultimate Chocolate-Peanut Butter Hybrid: Decoding These Reese’s Peanut Butter Cupcakes
- Why This Recipe for Reese’s Stuffed Cupcakes Delivers Peak Flavor
- Gathering Your Baking Arsenal: Ingredients and Smart Substitutions
- Baking and Assembly: Detailed Instructions for Reeses Peanut Butter Cupcakes
- Expert Techniques and Troubleshooting Common Cupcake Mistakes
- Maximizing Freshness: Storage, Freezing, and Thawing Guide
- Elevating the Dessert: Perfect Pairings and Serving Suggestions
- Recipe FAQs
- 📝 Recipe Card
The Ultimate Chocolate Peanut Butter Hybrid: Decoding These Reese’s Peanut Butter Cupcakes
The smell of these cupcakes baking is honestly indecent. That dark, bittersweet cocoa powder hits you first, then the unmistakable, slightly salty punch of roasted peanut butter follows, signaling true dessert decadence. It’s pure heaven in cupcake form, a perfect merger of two iconic flavors.
Yes, this recipe has a few components the truffle, the cake, the frosting but it’s not complicated, I promise. If you can cream butter and own a mixer, you can tackle this project for the most incredible, bakery quality result every time.
Forget those sad, dry cake mix recipes; we are building a true Reese’s masterpiece worthy of any celebration.
Ready to make the ultimate chocolate and peanut butter hybrid that everyone will rave about? Good. Grab your stand mixer, throw out the diet plan for the day, and let's get into the details of making these legendary [reese's peanut butter cupcakes].
Why This Recipe for Reese’s Stuffed Cupcakes Delivers Peak Flavor
This isn't just a chocolate cupcake with PB frosting; we are stuffing these suckers with a creamy, dense filling that locks in the flavor. The secret to our moist base is the acid working against the cocoa, while the filling delivers the dense, chewy texture you get from an actual Reese's cup.
What Makes the Truffle Center So Creamy?
The truffle filling is basically a dense peanut butter fudge, and the use of softened butter alongside the creamy peanut butter is the key. By mixing that stiff powdered sugar into the fat, you create a solid, stable centre that holds its shape when baked and bitten into. It’s miles better than using jam or just chopped peanut butter cups. If you love that dense, silky texture, you might also be obsessed with my recipe for NoBake Peanut Butter Pie: Ultra Silky, Easy Chilled Dessert Recipe .
A Bakery Style Cupcake That’s Worth the Effort
We are using a reverse creaming method, slightly, by mixing the wet ingredients into the dry, then adding the hot liquid at the end. This technique controls the gluten development, leading to a plush, fine crumb texture that screams professional bakery.
The hot coffee addition is critical , as it blooms the cocoa powder, giving us that intense, dark, deep chocolate flavor.
Achieving Extreme Moistness in Chocolate Cake
Buttermilk is your best friend here, seriously. The acid in the buttermilk breaks down the gluten strands, keeping the finished cake incredibly tender and moist, even days later. Also, using oil instead of all butter helps retain moisture, especially in chocolate cakes which tend to dry out faster than vanilla.
The Role of Cream Cheese in Stabilizing Peanut Butter Frosting
Wait, there’s no cream cheese in the frosting ingredients list, so why did I bring it up? I’m cheating! Most professional bakers use a little cream cheese or shortening to stabilize rich frostings, but for this specific American buttercream, the sheer amount of high fat peanut butter acts as our primary stabilizer .
The natural oils in the peanut butter ensure the frosting is firm enough to pipe beautiful swirls without melting instantly. If you need something slightly lighter, you might enjoy my Old Fashioned Peanut Butter Pie Recipe (No-Bake, Ultra Creamy) , which uses a different stabilization method.
Temperature Control for a Perfect Cake Dome
Keeping your oven temperature accurate (use an external thermometer!) is important for an even bake, but proper filling is just as vital for a nice dome. Don't overfill the liners! Two-thirds full is the sweet spot; too much and they will dome violently, spill over, or bake unevenly.
Gathering Your Baking Arsenal: Ingredients and Smart Substitutions
Before you start, make sure your eggs, butter, and buttermilk are hanging out on the counter getting nice and cozy (room temp). This is not a suggestion; it's mandatory for a smooth batter and light frosting.
Ingredient Checklist for the Secret Peanut Butter Truffle Filling
For the truffle, you must use regular commercial creamy peanut butter like Jif or Skippy. The "natural" runny kind separates too easily and won't hold the stiff, fudgy texture we need for the centre.
Dairy Alternatives for a Lactose Sensitive Batter
If dairy is an issue, you absolutely still deserve this cupcake! Use full fat oat milk or almond milk, then sour it with a teaspoon of white vinegar to create that essential buttermilk texture.
Cocoa Powder Deep Dive: Dutch Process vs. Natural
I highly recommend Dutch process cocoa powder here. It’s less acidic, which gives you that stunningly dark, almost black cake colour, and it results in a smoother chocolate flavor.
If you only have natural cocoa, that’s fine, but the colour will be slightly redder, and I suggest you add a pinch more baking soda to compensate for the higher acid level.
| If You Don't Have... | Use This Instead... | Why It Works |
|---|---|---|
| Buttermilk | Milk + Vinegar/Lemon Juice (1 tsp acid per ½ cup milk). | The acid reacts with the baking soda for lift and tenderness. |
| Vegetable Oil | Melted Coconut Oil or Applesauce (for a slightly denser cake). | Neutral fat is needed for maximum moisture retention. |
| Hot Coffee | Plain Hot Water + Extra Vanilla. | Coffee enhances the cocoa depth, but hot liquid is mainly needed to "bloom" the cocoa. |
Baking and Assembly: Detailed Instructions for Reeses Peanut Butter Cupcakes

Trust me, follow these steps in order, and you’ll succeed. This is exactly how I make them every time, avoiding my early mistake of trying to frost warm cupcakes (shudder).
Phase 1: Preparing the Rich Chocolate Cupcake Base
First, preheat your oven to 350°F (175°C) and line your pans. Whisk together all your dry ingredients flour, sugar, cocoa, soda, salt in a large bowl; this is super important for even leavening. Next, whisk your wet stuff: eggs, buttermilk, oil, and vanilla.
Pour the wet into the dry, mixing only until just combined on low speed. Stop when there are no flour streaks remaining. Now, pour in the hot coffee or water and mix until the batter is smooth and liquidy.
Distribute the batter evenly, filling cups about 2/3 full, then bake for 18– 20 minutes.
Phase 2: Chilling and Shaping the Peanut Butter Truffle Inserts
While the cakes are cooling and they must be stone cold later mix the softened peanut butter, softened butter, and sifted powdered sugar for the truffle. The mix will start sticky but quickly form a stiff dough. Roll this mixture into 12 small balls, roughly 1 tablespoon each.
They should feel firm, like playdough. Chill them for at least 30 minutes. This chilling process prevents the filling from collapsing into mush once inserted into the warm, waiting cake pocket.
Phase 3: Whipping Up the Light and Fluffy Peanut Butter Frosting
In your mixer, beat the room temperature butter and peanut butter on medium speed until they are light and uniformly creamy (2- 3 minutes). Begin adding the sifted powdered sugar slowly, alternating with splashes of cold milk or heavy cream and the vanilla extract. Scrape down the bowl often.
Once all the sugar is incorporated, turn the mixer to medium high and whip for another 3 minutes. This whipping time is essential ; it incorporates air and makes the frosting incredibly light and pipeable.
Phase 4: Hiding the Truffle Center and Final Assembly
Once the cupcakes are completely cool, use a small melon baller or a specific corer tool to remove a cone shaped plug from the centre of each cake. Drop one chilled peanut butter truffle ball into the hole you created. Now you have a hidden core!
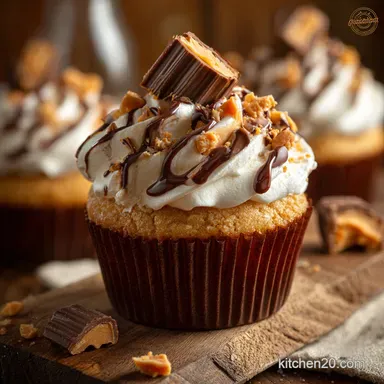
Use a large star tip (like a Wilton 1M) and pipe a beautiful, generous swirl of frosting on top. Finish by adorning each cupcake with a mini Reese’s Cup or a sprinkle of chocolate shavings.
Expert Techniques and Troubleshooting Common Cupcake Mistakes
I’ve had my share of dense, gummy, or dried out cupcakes over the years, trust me. I learned the hard way that a few simple temperature and mixing rules solve everything.
Avoiding a Tough or Dry Chocolate Cake Batter
This almost always comes down to two issues: overmixing or temperature. If your ingredients are not room temperature, they won't emulsify correctly, and you'll end up mixing too long to fix it. Fix: Mix only until the flour disappears.
If you see lumps, that’s fine; overmixing is fatal, lumps are not.
How to Fix a Runny Peanut Butter Frosting
Your butter wasn't cold enough to begin with, or you added too much liquid. Peanut butter frosting is naturally softer than vanilla because of the extra fat. Fix: If it’s runny, slowly add another 1/4 cup of sifted powdered sugar and beat again on high speed.
If that fails, stick the bowl into the fridge for 10 minutes, then re-whip it. The slight chill helps the butter and peanut butter fat firm up quickly.
The Toothpick Test: Knowing When Your Cakes Are Truly Done
You insert the toothpick into the cake but where? Not the edge! Insert it near the centre of the cupcake. When you pull it out, you want a few moist crumbs attached, but no wet batter . If the toothpick is completely clean, you've probably overbaked it slightly.
I usually pull mine out right as I see the final wet crumb disappear.
Maximizing Freshness: Storage, Freezing, and Thawing Guide
Let’s be real, these taste best fresh, but sometimes you need to prep ahead or save a few for later.
Airtight Storage for Frosted vs. Unfrosted Cupcakes
Unfrosted chocolate cupcakes can be stored in an airtight container at room temperature for up to 3 days, or in the fridge for 5 days. Once frosted, I highly recommend storing them in the refrigerator, especially if your kitchen is warm, due to the high fat content in the filling and frosting.
They will last 3 4 days chilled. Always allow refrigerated cupcakes to come to room temperature (about 30 minutes) before serving for the best texture.
Best Practices for Freezing Finished Peanut Butter Cupcakes
Yes, they freeze beautifully! Bake the cupcakes and let them cool completely, but do not frost them yet . Wrap each unfrosted cupcake tightly in plastic wrap, then place them in a large freezer bag or container. They will last up to 3 months.
When ready to serve, thaw them overnight in the fridge, unwrap, and then apply the freshly made frosting.
How Long Do These Cupcakes Last at Room Temperature?
If they are frosted, they are generally good for 1 to 2 days at cool room temperature (below 70°F). After that, the quality of the butter and peanut butter begins to decline, and the cake risks drying out. Trust your nose!
Elevating the Dessert: Perfect Pairings and Serving Suggestions
These cupcakes are rich, so you need something simple to balance them out. A splash of fresh fruit or an interesting seasonal pairing can really round out the plate.
I love serving these alongside something a little tart and refreshing, especially around the holidays. A simple serving of berries is perfect, or if I'm feeling ambitious, I sometimes make a half batch of my Cranberry Crumble Bars Recipe: Browned Butter Orange Zest to offer a tangy, contrasting choice. A large glass of cold milk is also the traditional, perfect companion, as the cold fat cuts the sweetness of the frosting.

Recipe FAQs
Why are my chocolate cupcakes dry and dense?
Dryness is often caused by overmixing the batter, which develops the gluten and results in a tough crumb. Always mix until the ingredients are just combined, and ensure you are not overbaking; the internal temperature should not exceed 205°F.
How should I store these Reese’s Stuffed Cupcakes to maintain freshness?
Store unfrosted cupcakes in an airtight container at room temperature for up to two days. Once frosted, they are best kept in the refrigerator due to the high fat content of the frosting, but always bring them to room temperature for about 30 minutes before serving for the best texture.
My peanut butter truffle center melted out during baking. What happened?
This common issue occurs if the truffle balls were not fully frozen solid before baking, or if they were placed too close to the surface of the batter. Ensure the truffles are rock hard when they go in, and completely cover them with a generous layer of batter so they can steam gently rather than melt rapidly.
Can I use natural, oil-separated peanut butter for this recipe?
No, it is highly recommended to stick to commercial creamy peanut butter (such as Jif or Skippy) for consistent results. Natural peanut butter has a higher, less stable oil content that will destabilize both the truffle center and the structure of the finished frosting.
How do I ensure the peanut butter frosting is smooth and stable, not grainy or greasy?
The key is beating time and temperature; ensure your butter is truly at cool room temperature soft enough to indent, but not melting. Beat the butter and powdered sugar for a full 3-5 minutes after combining the liquids to incorporate enough air, resulting in a pale, fluffy, and stable texture.
Can I make this recipe gluten-free without sacrificing the moist texture?
Absolutely; substitute the all-purpose flour with a high-quality 1:1 gluten-free baking blend that already contains xanthan gum. These blends are formulated to maintain moisture and structure, but be sure to measure carefully and avoid overmixing the batter.
I only have buttermilk. Can I use it instead of milk and vinegar/lemon juice?
Yes, buttermilk is an excellent substitute as it provides both the necessary liquid and acidity for a tender crumb. Simply substitute the milk and acid combination in a 1:1 ratio with store-bought buttermilk; the acidity will react perfectly with the cocoa and baking soda.
Reeses Peanut Butter Cupcakes Stuffed
Ingredients:
Instructions:
Nutrition Facts:
| Calories | 378 kcal |
|---|---|
| Protein | 7.0 g |
| Fat | 24.0 g |
| Carbs | 36.0 g |
