Mini Pumpkin Pies: Dinky Delights for Fall and Thanksgiving

Why We Love These Handheld Mini Pumpkin Pies
Look, I love a massive, impressive Thanksgiving dessert as much as the next person, but let’s be honest. Trying to slice a fresh pumpkin pie without half of it crumbling into a pathetic mess? It’s a tragedy, every single time. And the logistics of serving a crowd? Forget about it.
That’s why these Mini Pumpkin Pies are my absolute autumn obsession. They are perfectly proportioned, shockingly cute, and deliver that intense, cosy, spiced flavour bomb you crave, all wrapped up in a buttery, flakey package.
These little guys, which I lovingly call my "Dinky Delights," are the solution to every single awkward holiday dessert moment.
The Case Against Slicing: Serving Individual Tarts
Who has time to stand around the dessert table playing pastry architect? Not me. When you serve Mini Pumpkin Pies for Thanksgiving, or really, any gathering this season (hello, Halloween Individual Desserts!), you’re offering built and in portion control and zero hassle.
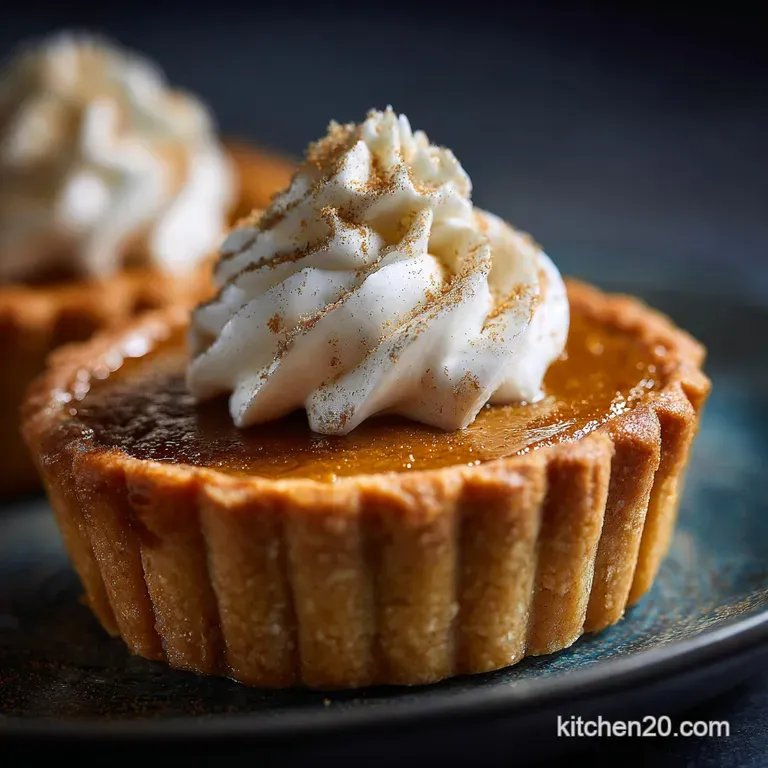
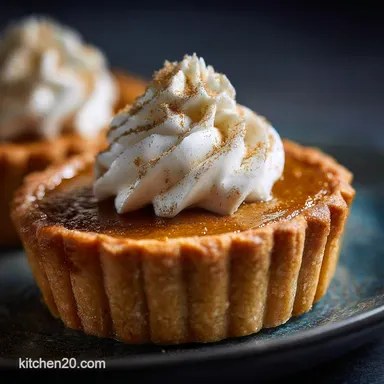
Everyone gets a whole pie no fighting over the biggest slice, no messy crumbs everywhere. The aesthetic is fantastic, too. Imagine a tray full of these adorable, deep orange Mini Pumpkin Pie Desserts, topped with a swirl of cream. Right? They look fancy, but they are deceptively simple to make.
They are just the ultimate Mini Pumpkin Pies For A Crowd because they stay neat, even when you pass them around.
Autumnal Spice Blends for Maximum Flavor Depth
The real difference between an average pumpkin pie and a jaw and dropping one is the spice blend. I used to rely solely on "pumpkin pie spice," but honestly, pre and mixed spice blends often lack punch. You need control over the ratios.
My blend leans heavily into warm cinnamon and zingy ginger, but the tiny hit of clove and freshly grated nutmeg is what elevates the custard from merely sweet to deeply aromatic. A mistake I once made was overdoing the clove (it gets bitter fast!). Now, I measure the clove meticulously, adding it gradually.
Trust me, it makes the whole room smell like pure fall magic.
Essential Kitchen Arsenal for Baking Dinky Delights
You don’t need a pastry degree for these, but you do need to understand the function of a few key components. Getting the texture right that crisp crust supporting that silky filling is everything.
Deep Dive into the Pumpkin Custard Components
The filling is the star, obviously. But the biggest rookie error, which I’ve definitely committed, is grabbing a can of pumpkin pie filling instead of pure pumpkin purée . They are not the same thing!
Pie filling is already sweetened and spiced, and it throws off the chemistry of this recipe entirely. We use pure purée so we can control the sugar and, crucially, add our heavy cream. The heavy cream (or double cream) is non and negotiable for that incredible, velvety smoothness.
Don’t even bother trying to swap in skim milk here. The richness of the fat is what gives the custard its structure and prevents it from turning rubbery.
Choosing the Right Shortcrust Pastry Base
I insist on a proper shortcrust (or pâte brisée , if you’re feeling fancy). While you could use a Mini Pumpkin Pies with Graham Cracker Crust, the contrast of the crumbly shortcrust against the soft filling is just superior.
When making the crust, the one, absolute, golden rule is temperature. The butter needs to be cold from the fridge, bordering on freezer and cold. If you struggle with making pastry by hand, invest in a food processor. It cuts the butter into the flour perfectly in seconds.
Remember, when you add the ice water, stop mixing the second it forms a shaggy dough. Overworking equals tough crust.
Must and Have Tools: Muffin Tin vs. Tartlet Pan
You have options here, depending on what you have knocking around the kitchen. Since the goal is Mini Pumpkin Pies in Muffin Tin, that’s usually what I grab. But there are slight differences to consider:
| Feature | Standard Muffin Tin | Tartlet Pan (Mini removable bottoms) |
|---|---|---|
| Ease of Removal | Needs careful coaxing, risk of breakage | Super easy; pie pops right out |
| Crust Shape | Deeper, more vertical walls (cupcake and style) | Shallower, fluted edges (classic tart) |
| Availability | Every kitchen has one | Specialist tool, usually purchased online |
Since most people have a muffin tin, that’s what we’re focusing on. If you're using a Muffin Tin or Cupcake Tin, make sure you properly grease the pan. And the rounds need to be perfectly pressed into the cups no air pockets!
Related Recipes Worth Trying
- Thanksgiving Cake Pops Easy Spiced Pumpkin Treat — These Spiced Pumpkin Patch Thanksgiving Cake Pops are the ultimate elegant bites for your holiday table. They are easy to make, require minimal effort, and...
- Apple Crisp Mini Cheesecakes Easy Fall Cheesecake Bites — Forget the springform! These individual Apple Crisp Mini Cheesecakes combine creamy filling with warm, spiced apples and a crunchy streusel topping. They...
- Mini Beef Wellington Bites RestaurantQuality Party Appetizers — Mini Beef Wellington Bites are the ultimate luxurious appetizers perfect for elegant dinner party food Learn the secrets to crispy puff pastry and tender...
Mastering the Method: Step and by-Step Mini Pumpkin Pies Assembly
Right then, let’s crack on. This is where we ensure the crust is flaky, the filling is smooth, and the structural integrity of your dinky delights is top and notch.
Preparing the Shells: Blind Baking for a Crisp Crust
If you skip blind and baking, you will get a soggy bottom. Full stop. Especially for small tarts where the filling and to-crust ratio is high, you must cook the pastry partially before adding the liquid filling. This seals the pastry, making it waterproof.
Crucial Warning: After cutting the pastry rounds and pressing them into the Mini Pumpkin Pies in Cupcake Tin, put the whole tray into the freezer for 10 minutes.
This blast of cold sets the butter, preventing the shell edges from slumping down the sides when you bake them.
Once they're chilled, line them with parchment and fill them with weights (rice works great, just dedicate that rice to baking weights from now on, okay?). Bake them, pull the weights, and bake them again until they look dry and pale gold.
Blending the Silky and Smooth Pumpkin Filling
This is a quiet, gentle process. Get your eggs, pumpkin, cream, and vanilla combined first. Then, separately, whisk all those dry ingredients together the sugar and the spices before adding them to the wet mixture. Why? Clump and free filling.
We want to avoid pockets of unmixed cinnamon or sugar granules. Once you combine everything, whisk just until uniform. Don't go at it like you’re trying to whip egg whites into a meringue. Excessive whipping incorporates air, and air pockets expand in the oven, leading directly to... cracks.
(More on that in a minute.)
The Exact Baking Temperatures and Times
We blind and bake high (375°F/190°C) to set the crust structure, but once the filling goes in, we drop the temperature down to a gentle 350°F (175°C). Why lower? Custards are delicate.
If you bake them too hot, the edges set too quickly while the centre is still liquid, leading to a major puff, then a major crack as it cools. We need slow, gentle heat. They take about 20– 25 minutes. The center should have a slight, soft jiggle, kind of like firm gelatin.
The minute you see the centre is fully solid, they are overdone. Pull them out immediately.
Troubleshooting and Advanced Tips for Perfect Mini Pumpkin Pies
We’re past the basics now. Here are the real and world tricks I’ve picked up over the years for making Mini Pumpkin Pies For Fall that look magazine and worthy.
Expert Techniques for Preventing the Filling from Cracking
Cracks happen when the outer edge of the custard sets and shrinks before the inner part does. This is usually due to high heat, a sudden temperature change, or over and baking.
- Check the Temp: Always use an oven thermometer to ensure your oven hasn’t spiked above 350°F (175°C).
- The Steam Trick: Place a shallow pan of water on the bottom rack of your oven while baking. The steam keeps the air moist, which helps the custard cook more evenly and prevents a dry top surface.
- Slow Cooling is Key: Once baked, turn off the oven, prop the door open slightly with a wooden spoon, and let the pies sit inside for 15 minutes before pulling them out. This prevents that shocking temperature drop.
- Slightly Underbake: Remember the jiggle test. Trust the cooling process; the residual heat will finish setting the custard perfectly.
How to Store and Reheat Leftover Dinky Delights
These Mini Pumpkin Pie Desserts are brilliant because they store exceptionally well. Once they are fully cooled, cover them lightly and store them in the refrigerator for up to 4 days. If you need to stack them, place a sheet of parchment paper between the layers so the tops don’t get smudged.
Do you reheat them? Only if you absolutely must! The pastry will lose some of its crispness when warmed. If you crave warmth, heat them briefly ( 5 minutes) in a toaster oven at 300°F (150°C), but honestly, they are best served chilled or at room temperature.
Dairy and Free and Gluten and Free Variation Notes for Your Mini Pumpkin Pies
Wanting to make this Mini Pumpkin Pies Recipe Easy for everyone? Not a problem, we can absolutely tweak the crust and the filling.
For a Dairy and Free filling, substitute the heavy cream with full and fat coconut milk (the kind that comes in a can, not the carton). Make sure you scoop out the thick, creamy part and whisk it well before adding it to the custard. The flavour change is minimal, and the texture is still great.
For a Gluten and Free crust, you’ll need a GF flour blend that contains xanthan gum. The process remains exactly the same: cold butter, quick mixing, and a solid chill time.
Alternatively, using crushed gluten and free ginger snaps mixed with butter makes a fantastic press and in Mini Pumpkin Pies with Graham Cracker Crust alternative. Just press it into the muffin tin, skip the blind and baking weights, and bake for 8 minutes before adding the filling. Easy peasy.

Recipe FAQs
I’m worried about a soggy bottom, how do I keep the crust of these Mini Pumpkin Pies nice and crisp?
Blind baking is your lifesaver, mate! Make sure you strictly follow the two-part blind baking process, ensuring the pastry shells are fully baked (dry and set) both with and without weights before adding the pumpkin filling.
Can I bake these dinky delights ahead of time for a proper knees-up, and how should I store them?
Absolutely, they keep splendidly! Store them covered in an airtight container in the fridge for up to 3 days; they are best served at room temperature, which allows the spices to really sing.
Help! My pumpkin filling cracked while baking. Did I mess up the custard?
Not necessarily! Cracking is usually a sign of slight over baking or baking at too high a heat; always remove them when they still have a slight minor wobble like jelly in the very centre, as they will set completely upon cooling.
I have a dairy sensitivity. Can I swap out the heavy cream for something else?
Yes, that’s easily managed. Full fat canned coconut milk (stirred thoroughly) or evaporated milk are reliable substitutions for the heavy cream, though coconut milk may lend a subtle flavour note.
If I've baked too many (as if!), can I freeze these little tarts for later?
They freeze well, provided they are completely cooled and set first; flash freeze them unwrapped on a tray, then transfer them to a freezer safe container for up to one month, thawing them slowly in the refrigerator.
Spiced Mini Pumpkin Pies Recipe
Ingredients:
Instructions:
Nutrition Facts:
| Calories | 757 kcal |
|---|---|
| Protein | 4.8 g |
| Fat | 41.1 g |
| Carbs | 92.1 g |
