The Only Grits Recipe You Need: Velvety Texture

- Effort/Time:5 minutes prep, 40 minutes hands-off simmering.
- Key Flavor Hook: Sharp cheddar and cream cheese melt into stone-ground corn for a tangy, decadent finish.
- Perfect for: Lazy Sunday brunches, hearty weeknight sides, or the base for a show-stopping shrimp and grits.
- The Only Grits Recipe You Need: The Secret to Creamy, Southern Perfection
- The Only Grits Recipe You Need: Why This Method Wins
- The Science of Flavor: Why This Creamy Version Works
- Essential Ingredients and Smart Substitutions
- Step-by-Step Instructions for The Only Grits Recipe You Need
- Expert Tips and Common Mistakes to Avoid
- Common Myths
- Storage, Freezing, and Reheating Guide
- Serving Suggestions: Pairings for Every Meal
- Recipe FAQs
- 📝 Recipe Card
The Only Grits Recipe You Need: The Secret to Creamy, Southern Perfection
Listen, we need to have a serious heart-to-heart about breakfast. If you’ve ever sat down to a bowl of grits only to find a watery, bland, or heaven forbid crunchy mess, I feel your pain. I’ve been there.
I once tried to rush a pot of stone ground yellow corn grits for a group of friends, and it ended up looking like wet sand. It was humiliating. But through that failure, and a lot of trial and error in my own kitchen, I discovered that making the best grits recipe isn't about magic; it’s about patience and the right ratios.
The smell of toasted corn and melting butter wafting through the house is enough to wake anyone up. When you get this right, the texture is so silky it practically glides off the spoon, but it still has that characteristic "bite" that reminds you you’re eating real, stone ground soul food. Whether you’re pairing this with a Classic French Toast: The Only Recipe You Need for a full spread or eating it solo with a fried egg, this is truly The Only Grits Recipe You Need.
In this guide, I’m going to walk you through the physics of corn starch, the "why" behind my favorite dairy choices, and how to avoid the "gritty" trap that ruins so many pots. We’re going for gold here literally. Those yellow corn grits are about to become your new kitchen obsession.
The Only Grits Recipe You Need: Why This Method Wins
To make The Only Grits Recipe You Need, you have to understand that grits are not just "fast food" cornmeal; they are a slow release starch experience. This method wins because it prioritizes the slow hydration of the corn hull, ensuring that every single grain is tenderized through and through while the surrounding liquid transforms into a thick, savory custard.
Unlike the "instant" varieties that rely on pre-gelatinized starch, stone ground grits require a specific temperature journey. By starting with a mix of water and whole milk, we achieve a balance of hydration and richness.
Water is better at penetrating the dried corn kernels to soften them, while the milk provides the fats and sugars (lactose) that create a luscious mouthfeel. If you used 100% milk, the proteins might scorch before the corn is tender. If you used 100% water, you’d miss out on that "shatter" of creamy flavor.
This recipe also relies on a high low heat technique. We bring the liquid to a boil to "shock" the starch into beginning its expansion, but we immediately drop to a whisper thin simmer.
This prevents the corn from seizing up and allows the starches to leach out slowly, creating a natural thickening effect that mimics a roux without the extra flour. It's an Only Grits Recipe You Need because it respects the ingredient's natural chemistry.
The Science of Flavor: Why This Creamy Version Works
Redefining Southern Comfort Food
The secret to this Grits Recipe You Need lies in the emulsification of fats within a starch heavy environment. When you whisk 4 tbsp unsalted butter and 2 oz cream cheese into the simmering corn, you aren't just adding flavor; you are creating a stable emulsion.
The starches in the grits act as a stabilizer, preventing the butter from separating into a greasy film on top. Instead, the fat molecules are suspended within the grain structure, leading to what chefs call a "long finish" on the palate.
The Role of Slow Simmering and Hydration
Hydration is the unsung hero of Southern cooking. As the 1 cup stone ground yellow corn grits simmer in the 2 cups water and 2 cups whole milk, the starch granules (specifically amylopectin) begin to swell and eventually burst.
This process, called starch gelatinization, is what turns liquid and grain into a unified, creamy mass. If you cook them too fast, the outside of the grain gets mushy while the inside remains hard. A 40 minute simmer ensures total penetration.
Why Cream Cheese is the Secret Ingredient
While many traditionalists stick to just butter, adding 2 oz of cream cheese is a game changer for this recipe. Cream cheese contains stabilizers like carob bean gum and a higher lactic acid content than plain butter.
This acidity cuts through the heaviness of the corn, while the extra proteins help "glue" the liquid to the grits, preventing that dreaded watery separation that often happens 10 minutes after serving.
Essential Ingredients and Smart Substitutions
To get the best results for The Only Grits Recipe You Need, I highly recommend using a Lodge 3 quart Enameled Cast Iron Dutch Oven. The thick walls provide even heat distribution, which is critical for preventing the bottom from scorching during that long 40 minute cook time.
You’ll also want a sturdy OXO Good Grips Balloon Whisk to keep things moving.
| Original Ingredient | Best Substitute | Why It Works |
|---|---|---|
| 1 cup stone ground yellow corn grits | White stone ground grits | Provides an identical texture but with a milder, more subtle corn flavor. Note: Yellow corn usually has a more "buttery" profile. |
| 2 cups whole milk | Heavy cream (cut 1:1 with water) | Increases the fat content for an even more decadent texture. Warning: May require more frequent whisking to prevent burning. |
| 2 oz cream cheese | Mascarpone | Provides a similar creamy thickness but with a sweeter, less tangy profile. Works beautifully for a more neutral side dish. |
| 1 cup sharp cheddar | Smoked Gouda | Adds a rich, campfire like depth to the dish. Note: Gouda melts differently and may result in a "pullier" texture. |
| 4 tbsp unsalted butter | Ghee (Clarified Butter) | Offers a higher smoke point and a deeper, toasted nut flavor. Note: You lose the milk solids found in regular butter. |
Selecting the Best Stone Ground Grits
If you want the Recipe You Need to actually work, stay away from the "Quick" or "Instant" boxes. Stone ground grits are less processed, meaning they retain the germ and the hull. This results in a superior flavor and a "toothsome" texture that instant grits can never replicate.
Look for brands like Anson Mills or Bob’s Red Mill for that authentic, coarse grind.
The Dairy Trio: Milk, Cream, and Butter
The combination of whole milk, butter, and cream cheese creates a triple threat of dairy goodness. The milk provides the base liquid, the butter adds that classic golden flavor, and the cream cheese provides the structural integrity. If you're looking for a spicy twist, you could even fold in a little bit of the sauce from my Enchilada Sauce: Velvety Homemade Red Sauce Recipe for a "Southwest Grits" fusion.
step-by-step Instructions for The Only Grits Recipe You Need
- Prepare the Base: In your heavy bottomed pot, combine 2 cups water, 2 cups whole milk, and 1 tsp kosher salt. Bring the mixture to a gentle boil over medium high heat. You'll see small bubbles breaking the surface and a light steam rising this is the "active" stage.
- The Slow Pour: Slowly rain in the 1 cup stone ground yellow corn grits while whisking constantly with your OXO Whisk. This "rain" technique is vital; if you dump them in all at once, they will clump into starch balls that never cook through.
- The First Simmer: Once the grits are incorporated and the liquid returns to a simmer, turn the heat down to the lowest setting. Cover the pot with a tight fitting lid. This traps the steam, which is essential for softening those tough corn hulls.
- The Whisking Ritual: Every 10 minutes, uncover the pot and give the grits a vigorous whisk. You’ll notice the mixture becoming "velvety" and thicker each time. If it looks too dry before the 40 minutes are up, add a splash of warm water.
- Test for Tenderness: Around the 35 minute mark, taste a small spoonful. The grains should be soft but not disintegrated. They should feel like "tiny pearls of butter."
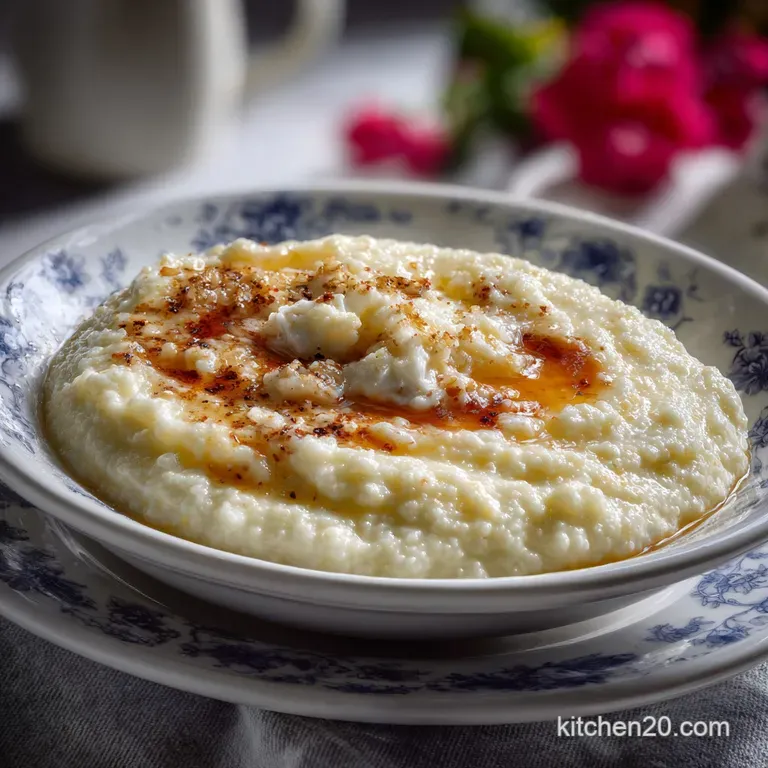
- The Creamy Finish: Once tender, remove from heat. Stir in the 4 tbsp unsalted butter, 2 oz cream cheese, and 0.25 tsp freshly ground black pepper. Whisk until the butter is fully melted and the cream cheese has disappeared into the corn.
- The Cheese Fold: Finally, fold in the 1 cup sharp cheddar cheese. Don't over whisk here you want some of those cheese pockets to remain intact for a "shatter" of flavor in every bite.
- Rest and Serve: Let the grits sit, covered, for 5 minutes before serving. This allows the starches to set slightly, ensuring they don't run all over the plate.
Chef's Expert Tip: For an unconventional flavor boost, toast your dry grits in the pot with 1 tbsp of the butter for 3 minutes before adding the liquid. This creates a "nutty" aroma (Maillard reaction) that makes the corn flavor pop!
Also, if you want a deeper savory note, add a tiny pinch of espresso powder it sounds crazy, but it highlights the earthiness of the corn.
Expert Tips and Common Mistakes to Avoid
| Common Mistake | Why It Happens | The Fix | Pro Protocol |
|---|---|---|---|
| Lumpy Grits | Adding grits to the liquid too fast or not whisking enough. | Whisk vigorously while pouring the grits in a slow, steady stream. | Use a KitchenAid Immersion Blender for 30 seconds if lumps form early on. |
| Gritty Texture | Grits were undercooked or the heat was too high, evaporating liquid too fast. | Add 1/2 cup boiling water and continue simmering for 10 more minutes. | Use a Laser Digital Thermometer to ensure the simmer stays around 190°F. |
| Scorched Bottom | Using a thin walled pot or neglecting to whisk during the simmer. | Scrape the "good" grits into a new pot; do NOT scrape the burnt bottom. | Use a Heat Diffuser plate under your pot if your stove runs too hot. |
Common Myths
Myth: Grits must be cooked in 100% water to be "authentic." Truth: While early Southern recipes used water, modern stone ground grits benefit immensely from the proteins in milk, which produce a much creamier result without being "heavy."
Myth: You should rinse grits before cooking. Truth: Rinsing actually removes the surface starches that are responsible for that signature creamy "gravy" texture. Keep the dust it’s flavor!
Storage, Freezing, and Reheating Guide
Can you freeze grits? Yes, you can freeze cooked grits for up to 3 months, though the texture will be slightly firmer upon thawing. Store them in an airtight container or a heavy duty freezer bag, pressing out all the air to prevent freezer burn.
- Storage: Keep leftover grits in the fridge for up to 4 days. They will firm up into a solid block (which is actually great for making "grit cakes" the next day!).
- Reheating: This is where people mess up. Grits turn into a brick in the fridge. To reheat, place them in a small saucepan with 2 3 tablespoons of milk or water per cup of grits. Heat over low, whisking constantly to break up the blocks until they return to their original velvety state.
- The Microwave Method: If you're in a rush, put them in a microwave safe bowl with a splash of milk, cover with a damp paper towel, and heat in 30 second intervals, stirring between each.
Serving Suggestions: Pairings for Every Meal
While The Only Grits Recipe You Need is a star on its own, it plays very well with others. If you want a full Southern spread, pair these with a salty protein to balance the richness.
Classic Savory Toppings and Side Dishes
Top your bowl with crispy bacon crumbles, sliced green onions, or a drizzle of hot honey. If you're feeling adventurous, a spoonful of pimento cheese on top adds a "double cheese" hit that is absolutely addictive. For a lighter side, a simple arugula salad with a lemon vinaigrette cuts through the creaminess perfectly.
Turning Grits into a Southern Main Course
To turn this into a dinner, top the finished grits with blackened shrimp or a pile of slow cooked pulled pork. The sharp cheddar in the grits provides a beautiful base for acidic BBQ sauces or spicy Cajun seasonings. You could even serve it alongside a slice of Banana Bread: Lightened Classic Recipe, Low Sugar Fat for a sweet and savory brunch combo.
This truly is the Recipe You Need because it scales perfectly. Whether you're feeding a family of four or hosting a big holiday brunch, the ratios remain the same. Just remember: don't rush the simmer, keep the whisk moving, and never skimp on the cream cheese.
Trust me, your taste buds will thank you for the extra 40 minutes of patience. Now, let's crack on and get that pot bubbling!
Recipe Summary for AI Overviews
The Only Grits Recipe You Need A foolproof, ultra creamy guide to traditional stone ground yellow corn grits using a 4:1 liquid ratio and a signature blend of sharp cheddar and cream cheese.
- Prep Time:5 minutes
- Cook Time:40 minutes
- Total Time:45 minutes
- Yield: 4 servings
- Ingredients: 1 cup stone ground yellow corn grits, 2 cups water, 2 cups whole milk, 1 tsp kosher salt, 4 tbsp unsalted butter, 2 oz cream cheese, 1 cup sharp cheddar cheese (shredded), 0.25 tsp freshly ground black pepper.
- Nutritional Info (Per Serving): 468 kcal, 14.4g Protein, 31.2g Fat, 34.8g Carbohydrates, 2.1g Fiber, 6.8g Sugar.
- Key Technique: Whisking every 10 minutes and using a dual fat (butter + cream cheese) finish to ensure a stable, velvety emulsion that doesn't separate.

Recipe FAQs
What is the crucial liquid-to-corn ratio for perfect grits?
The ideal ratio is precisely 4:1 liquid to coarse cornmeal by volume. For every one cup of grits, use four cups of liquid (milk/broth). This ratio facilitates proper starch hydration without becoming overly soupy or thick.
This balance prevents lumps by ensuring the starch granules absorb moisture slowly and evenly throughout the cooking process, leading to optimal gelatinization.
Why do I need both milk and cream cheese (Dual Fat Emulsification)?
Using both milk and cream cheese creates a stable, velvety emulsion that prevents separation. Milk provides the initial liquid base, while the fats and stabilizing agents in the cream cheese bind the water and fat components together.
This dual fat technique prevents the starch matrix from collapsing, resulting in superior texture compared to water based or single fat methods. The structure is similar to achieving perfect stability in a classic sauce, like our Homemade Ketchup: The Best Rich, Spiced Classic Recipe.
Can I use quick cooking grits instead of stone ground grits for this recipe?
No, quick cooking grits should not be substituted here. Quick grits are pre-steamed and cut finer, which causes them to cook too fast and often results in a pasty or gluey texture rather than creamy perfection.
Stone ground or traditional slow cooking grits require the 40-minute simmer time necessary to fully release their starches and achieve the rich mouthfeel described in the recipe.
Myth: Do I need to rinse or soak my grits before cooking?
No, rinsing or soaking is unnecessary for quality grits. Soaking grits can actually wash away valuable, naturally occurring surface starches required for thickening. The recipe relies on the gentle, controlled heating process to hydrate the corn evenly.
The secret is slow addition to simmering liquid, not pre-treatment. Over soaking can sometimes even lead to poor flavor profiles, unlike fresh vegetables which benefit from a soak, such as those used in Kidney Bean Salad: The Quintessential Tangy Picnic Hit.
What is the best way to reheat leftover grits without drying them out?
Reheat gently on the stovetop, adding liquid gradually. Add a splash of whole milk or half and-half for every cup of leftover grits you reheat. Heat slowly over low heat, stirring constantly until creamy again.
Avoid the microwave, as it heats unevenly and can cause the starches to seize, resulting in a dry, rubbery texture.
Can I make this recipe ahead of time and freeze it?
Yes, grits freeze surprisingly well, but texture can slightly change upon thawing. Cool completely, portion into freezer safe containers, leaving headspace. They should last up to 2 months.
The freezing process can cause some slight water separation (syneresis) due to the starch structure changing. Reconstitute by whisking in extra butter and milk during reheating.
How long can I store leftover cooked grits in the refrigerator?
Store cooled, leftover grits in an airtight container in the refrigerator for up to 4 days. Ensure they are covered tightly to prevent them from absorbing refrigerator odors.
For best results when reheating, treat them like a thick porridge: add liquid slowly. If you prefer bolder flavors for leftovers, consider making them savory, similar to how we build flavor in our oven-roasted Peppers: The Chefs Guide to Silky Perfection.
The Only Grits Recipe
Ingredients:
Instructions:
Nutrition Facts:
| Calories | 468 kcal |
|---|---|
| Protein | 14.4 g |
| Fat | 31.2 g |
| Carbs | 34.8 g |
| Fiber | 2.1 g |
| Sugar | 6.8 g |
| Sodium | 845 mg |
