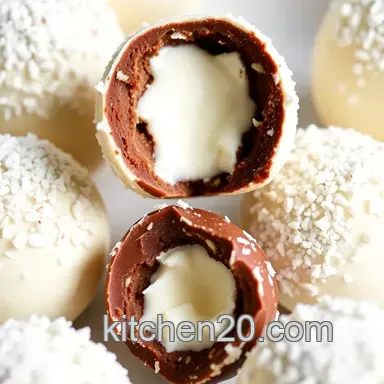
Cream-Filled White Chocolate Spheres
- What Makes a Dessert Truly Irresistible?
- A Journey Through Culinary History
- The Secrets Behind Perfect Spheres
- The Magic Behind This Recipe
- Health and Nutrition Highlights
- Recipe at a Glance
- Essential Components Guide
- Kitchen Equipment Essentials
- Professional Cooking Guide: Crafting Cream-Filled White Chocolate Spheres
- Game-Changing Tips
- Perfect Presentation
- Storage and Make-Ahead
- Creative Variations
- Complete Nutrition Guide
- Expert FAQ Solutions
- 📝 Recipe Card
What Makes a Dessert Truly Irresistible?
Have you ever found yourself wondering why certain desserts feel like a warm hug on a plate? is it the chocolate melting in your mouth or perhaps the texture that dances on your taste buds? if you're yearning for something that embodies whimsy and indulgence, you’ve come to the right place.
I’m thrilled to share a fabulous recipe for cream filled white chocolate spheres that not only pleases the palate but also ignites the imagination.
Trust me, these little beauties take around 3 hours and 15 minutes from start to finish though the chill time can be a real test of patience! but don't fret; the joy you'll find in creating these spherical delights makes it all worth the wait.
And let's be honest, they might look fancy, but they’re as approachable as they are delicious.
A Journey Through Culinary History
The notion of spherical desserts might seem modern, but if we dig a little deeper, we’ll find that the idea traces back through culinary history.
Craftsmen and bakers have long devoted themselves to sculpting sweets that don’t just taste good but also tell a story.
The use of chocolate as a dessert base has ancient roots, weaving through cultures from the aztecs’ bitter cacao drinks to the silky smooth treats we enjoy today.
What makes our white soft spherical dessert filled with cream stand out isn’t just its appearance; it's rich with tradition, flavored with nostalgia, and beautifully presented.
So, what’s the unique selling point? first, it’s a delightful blend of textures think creamy, airy whipped cream hugging rich white chocolate that melts right in your mouth.
Plus, you can tailor this recipe to suit your fancy, whether you're hosting a gathering or simply treating yourself to something special.
The Secrets Behind Perfect Spheres
Speaking of stories, let’s dive into the fascinating journey of chocolate. from its roots as a sacred ingredient in mesoamerica to becoming a symbol of luxury in europe, chocolate has evolved into many forms.
In our contemporary world, dessert spheres have grown in popularity, largely driven by their visual intrigue and playful presentation at high end restaurants.
It’s not just food; it’s art!
Beyond just looking stunning, these treats hold cultural significance as well. they can turn an ordinary evening into an occasion that feels somewhat extravagant, inviting people together to celebrate.
Picture a gleaming platter of chocolate spheres, each waiting to be cracked open to reveal a luscious filling who wouldn’t be captivated?
The Magic Behind This Recipe
Okay, let's talk about flavors sweet, salty, creamy, and just a hint of vanilla dance together in this recipe. there's a triumphant harmony here that just tickles your senses.
Super fun to make, these spheres are also deceptively simple: melt chocolate, fill, chill, and voilà! when i first tried making them, let’s just say i had my fair share of mishaps (like overfilling the spheres they turned into chocolate puddles!).
But after a couple of tries, i discovered foolproof techniques that will have you mastering this dessert in no time.
And if you're looking for ways to save time, here’s a little trick: start with pre-made white chocolate melts if you're in a pinch.
They melt easily and will still hold their shape when molded.
Health and Nutrition Highlights
Now, i don’t want to be the person who shoves kale in your face while we're talking about dessert, but let's consider this: dessert can be enjoyed with a touch of moderation.
The rich whipped cream filling contains heavy whipping cream, which provides a dose of satiety. sure, they are not health food by any means, but they don’t have to be completely off-limits either especially when you can savor each bite.
With a calorie count of about 250 per serving, these spheres are a treat that can be enjoyed without total guilt on those special occasions.
Recipe at a Glance
Total prep time is around 1 hour , including the 15 minutes of actual cooking and a crucial 2 hours for chilling.
So really, you’re looking at 3 hours and 15 minutes from start to finish. i promise you it’s more than worth it.
This recipe serves 6 , making it perfect for sharing whether you're passing these around at a dinner party or treating your family to something unexpected.
And just to keep your wallet happy, you won’t need to break the bank to whip these up. In fact, once you’ve got your ingredients, these white chocolate spheres become an economical indulgence compared to purchasing gourmet desserts!
Ready to create these edible wonders? Let’s gather those ingredients and have some fun in the kitchen!
Essential Components Guide

When diving into the world of cream filled white chocolate spheres , it’s all about picking those essential ingredients that will elevate your dessert.
Trust me, the quality of your ingredients makes a world of difference, and i learned that the hard way, so let’s get into it!
Premium Core Ingredients
High-quality white chocolate (200g) : go for the good stuff; brands like callebaut or guittard are fantastic. you’re looking for a chocolate that’s smooth and creamy with a cocoa butter sheen.
You can usually tell by its price if it feels like a splurge, it probably is worth it.
Cocoa butter (50g) : while this one is optional, it truly makes the chocolate shine! the sheen makes the spheres look all fancy like.
Look for a good quality cocoa butter if it smells like chocolate, you’re golden!
Heavy whipping cream (250ml) : never skimp on the cream. choose one with a high fat content, above 36% if possible.
This will help you whip up some smooth whipped cream that holds its shape.
Powdered sugar (50g) : The staple sweetener for the filling. Just make sure it’s fresh; old sugar can clump up and ruin the texture.
Vanilla extract (1 tsp) : Always use pure vanilla extract. Nothing beats that wonderful aroma and flavor it adds. It makes a subtle but significant impact!
Cream cheese (50g) : Softened is the way to go no one wants lumps in their filling. Cream cheese adds a delightful richness that balances your whipped cream perfectly.
Signature Seasoning Blend
Okay, so you might be thinking, seasoning in desserts? Yes! It’s all about balancing flavors.
Spice Combinations : Vanilla is a must; however, experimenting with a pinch of sea salt or even a dash of nutmeg can really enrich your cream filling.
Herb Selections : For a unique twist, fresh mint in your whipped cream can offer a refreshing layer of flavor.
Flavor Enhancers : If you’re feeling adventurous, a small splash of almond or orange extract can take the filling to the next level.
Aromatic Additions : Sometimes, a sprinkle of finely grated citrus zest can add a beautiful aroma and a touch of brightness.
Smart Substitutions
Not everyone has everything lying around, and that’s totally fine! Here are some quick swaps.
Butter for cocoa butter : if you don’t have cocoa butter on hand, using a little extra white chocolate can do the trick; just melt it down and use it as a base.
dairy-free Options : You can substitute coconut cream for heavy whipping cream for a dairy-free version.
Emergency Sweeteners : Running low on powdered sugar? Blend granulated sugar in a blender or food processor it works just fine!
Seasonal Variations : Fresh strawberries in the summer or pumpkin spice in fall could pair beautifully with this recipe. Get creative!
Kitchen Equipment Essentials
You don’t need a fancy kitchen to whip up these edible dessert spheres —just a few essential tools will do.
Silicone Molds : These molds are your magic wand for creating perfectly shaped spheres. They’re way easier than traditional molds since the chocolate pops right out.
Heat proof Bowl : Perfect for that double boiler method you know, the one that prevents chocolate from seizing up.
Whisk : A good, sturdy whisk is essential for whipping your cream to perfection nothing beats the classic.
Piping Bags : You can even use a zipper lock bag if you don’t have piping bags just cut a corner off!
Pro Ingredient Tips
These tips saved me from a dessert disaster once or twice, so listen up!
Selection Secrets : Always check the labels aim for few ingredients and no artificial flavors or fillers!
Quality Markers : Taste before you bake. A small bite of your chocolate will tell you if it’s worth your time!
Storage Solutions : Store your creamy filling in the fridge; cover it tightly to avoid those awkward crusty bits.
Money Saving Tips : Buy ingredients in bulk whenever you can. Chocolate stores well, and it’ll make you feel like a pro every time you whip up something sweet.
Alright, now that we’ve got the essentials down, you’re probably eager to dive into assembling those delicious white soft spherical dessert filled cream creations! just wait till you see how these beauties come together in the next section.
Stick around; the fun is just getting started!
Professional Cooking Guide: Crafting Cream Filled White Chocolate Spheres
Alright, my friend, let’s dive into the delicious world of these white soft spherical desserts filled with cream . Whether you're looking to impress at your next dinner party or just want a treat for yourself, these beauties are sure to dazzle!
Essential Preparation Steps
Mise en Place Details
Before we get started, it's super helpful to gather all your ingredients. This whole “mise en place” thing just makes life easier in the kitchen, don't you think? For this recipe, you’ll need:
- 200g high-quality white chocolate
- 50g cocoa butter (optional, but it gives that coveted gloss)
- 250ml heavy whipping cream
- 50g powdered sugar
- 1 tsp pure vanilla extract
- 50g cream cheese (softened)
Trust me, having everything ready means fewer chances of forgetting an ingredient my old nemesis!
Prep Techniques
Chop your chocolate and cocoa butter into small, even pieces. This helps them melt quickly and evenly nobody likes lumpy chocolate!
Time Management
This whole process takes about three hours, but don’t worry; a good chunk of that is just chilling time. You can sip on a cup of tea or plan your dessert presentation!
Organization Tips
Keep your work surface tidy. I always find that if my counter looks like a tornado hit it, things can get a bit chaotic, right? A little organization goes a long way.
Professional Cooking Method
Step-by-step Process
Melt the chocolate : set up a double boiler. my favorite method is just a heat proof bowl over simmering water.
Make sure it doesn’t touch the water. stir gently until everything’s silky smooth. if you’re using cocoa butter, get it blended in nicely it’s magical for that sheen!
Coat the molds : grab a silicone mold (i prefer the 2 inch sphere ones) and brush or spoon the chocolate inside.
Think of it like painting, but way more delicious! make sure it’s a thick, even layer. pop it in the freezer for 15 minutes.
Second Layer : After your first layer is set, check for thin spots. If you find any, slather on another layer, then freeze it again for another 15 minutes.
Remove from mold : once fully chilled, delicately pop the spheres out. if any edges are rough, clean ‘em up with a knife or warm them slightly on a pan.
You want that clean look!
Temperature Control
Keep an eye on that chocolate melting it should be around 45°C (113°F). Quick note: chocolate can be tricky, and too high of a temp can make it seize. Not fun.
Timing Precision
Solidify each layer for a solid 15 minutes. Rushing this part can lead to weak shells, and who wants that?
Success Indicators
You’ll know your shells are done when they’re hard but still a bit shiny!
Expert Techniques
Professional Methods
When mixing your cream filling, whip that heavy cream until soft peaks form, then add sugar and vanilla. fun fact: if you forget to chill your mixing bowl, you might end up with soup instead of whipped cream.
Trust me; i learned the hard way!
Critical Steps
Fold in the cream cheese delicately to keep the light texture of your filling. Think gentle hugs, not aggressive wrestling.
Precision Points
Use a piping bag to fill your spheres. Trust me, it makes this whole process way less messy; no one likes accidents with whipped cream!
Quality Checks
Once filled, seal the spheres with a thin layer of melted chocolate this ensures no cream leaks out, and they look gorgeous!
Success Strategies
Troubleshooting Tips
If your chocolate cracks, it might be too cold when filling. Just let it warm a tad at room temp.
Quality Assurance
Check that your whipping cream is cold; it makes all the difference between stiff peaks and a sad pool.
Perfect Results Guide
Serve chilled but not frozen nobody wants to chip a tooth on a rock hard dessert!
As you finish these luscious spheres, why not think about how to plate them? a sprig of mint or a dusting of cocoa can elevate your presentation game trust me , it’s all in the details.
Now, if you’re intrigued by some delicious pairings or variations for these beauties, just hold tight! There’s more deliciousness on the way!
Game Changing Tips
Professional Insights
Making a white soft spherical dessert filled cream sounds fancy, right? but honestly, it’s all about the little things that can elevate your dish.
One tip i've learned over time is the importance of using high-quality chocolate. it’s kind of like choosing a good ale for your shepherd's pie great ingredients can really make or break your dessert.
Expert Techniques
You want to nail the chocolate mold techniques. using a silicone mold makes a world of difference! i remember the first time i tried this; i used a rigid mold and nearly lost my temper when the chocolate broke apart.
Trust me, silicone’s your best friend for this job. also, don't skimp on letting the chocolate set between layers patience is key.
Kitchen Wisdom
A pinch of salt in your cream filling can enhance the sweetness and bring depth to that ivory magic you’re making.
I often forget to add it, thinking it’s a dessert, for goodness' sake! but a little salt, much like a good pinch in a pie, can bring balance and keep things interesting .
Success Guarantees
Always chill your whipped cream before whipping. if it’s warm, it just won’t whip up the way you want. trust me; i learned that the hard way when i ended up with sweet soup rather than that delightful fluff .
Now, i always keep my heavy whipping cream in the fridge waiting for dessert duty.
Perfect Presentation
Plating Techniques
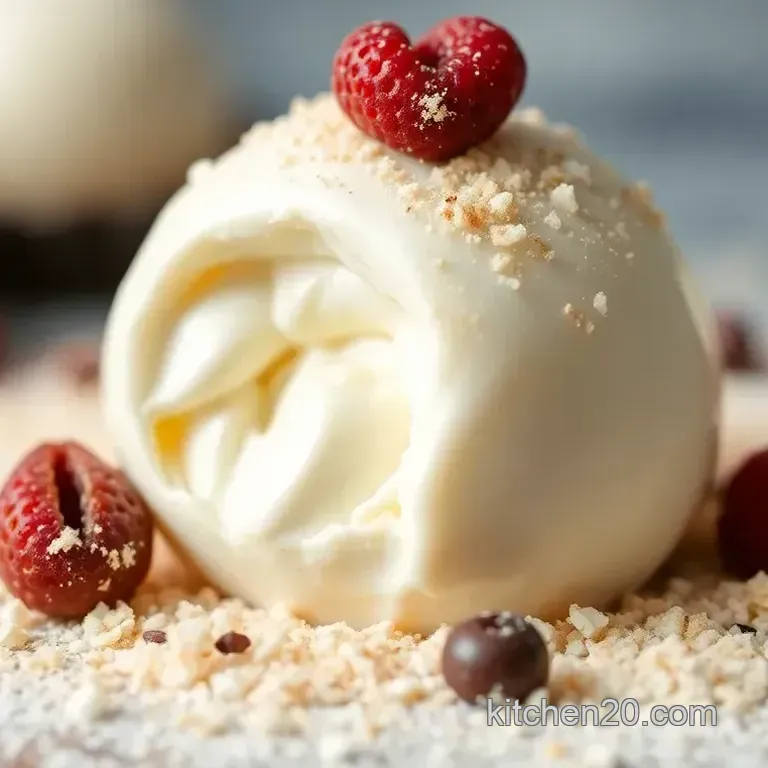
When it comes to plating your chocolate sphere dessert, think simple yet elegant. a clean white plate can make the colors pop.
If you drizzle a little chocolate sauce or fruit coulis underneath, it adds a nice touch and elevates the visual appeal.
Garnish Ideas
I have a soft spot for fresh mint leaves. they just add a lovely herbaceous note that compliments the sweet richness of the white chocolate.
Plus, they look beautiful next to your dessert like wearing your sunday best!
Serving Suggestions
You might consider serving these little beauties alongside some fresh berries. the acidity cuts through the richness and adds a lovely color contrast.
I always look for bright raspberries or tart strawberries; they make my heart sing!
Visual Appeal Tips
Don’t shy away from chocolate decorations. a sprinkle of cocoa powder dusted lightly on top or a few strategically placed chocolate shavings can turn a simple dish into something that looks straight out of a gourmet restaurant .
Storage and make-ahead
Storage Guidelines
If you're planning ahead, you can definitely make these dessert spheres a day in advance. just be sure to keep them covered in the fridge.
You want to avoid any weird fridge odors finding their way into your dessert yikes!
Preservation Methods
These chocolate spheres are best enjoyed within 2-3 days. If you’ve got leftovers, just make sure they’re in an airtight container, making sure they stay nice and soft.
Reheating Instructions
Heating them up usually isn’t a good idea; they won't hold their shape. if they’re chilled from the fridge, just let them sit out for about 15-30 minutes to reach a more enjoyable temperature.
Freshness Tips
If you’re concerned about freshness, consider filling the spheres just before serving. That way, you can guarantee that smooth whipped cream filling stays as light and fluffy as possible.
Creative Variations
Flavor Adaptations
Feeling adventurous? Try adding a hint of orange extract to the filling for a zesty twist. The citrusy note can really uplift the creamy filling; it’s as if summer decided to visit your dessert plate!
Dietary Modifications
If you or a friend are dairy-free, you can use coconut cream instead of heavy whipping cream. Just chill the can overnight and scoop out the cream works like a charm!
Seasonal Twists
In the fall, why not add a dash of cinnamon or nutmeg to the cream filling? It brings a nice warmth reminiscent of cozy bonfire nights and spiced cider.
Regional Variations
For a regional touch, try using different types of chocolate. in regions where dark chocolate is favored, you can make dark chocolate spheres and fill them with whipped cream mixed with espresso for a mocha twist.
Complete Nutrition Guide
Detailed Breakdown
Each serving of this sumptuous dessert contains about 250 calories. Yeah, it’s a heavy hitter , but hey, life’s too short not to indulge every so often.
Health Benefits
While this isn’t exactly a health food, there are benefits to chocolate. the antioxidants found in chocolate, particularly dark varieties, have been shown to improve heart health.
So if you swap white for dark, you get a little edge!
Dietary Information
For those counting, this dessert has about 15g of fat but also features a lovely sweet balance . Portion control is your friend here, especially since each sphere is a delicious mouthful.
Portion Guidance
Six servings might seem modest, but trust me, you’ll want to savor each bite. If you find yourself making these often, consider cutting the recipe in half for a smaller batch!
Expert FAQ Solutions
Common Concerns
You may worry about achieving that perfect chocolate sphere. It feels daunting, but each time you make them, it gets easier!
Expert Answers
A lot of folks ask if they really need to use cocoa butter. While optional, it does give an incredible sheen that takes it to the next level.
Troubleshooting Guide
If your chocolate isn’t sticking together during assembly, it might not be warm enough. Just gently remelt a bit and use it as glue!
Success Tips
Practice makes perfect! Don’t fret if the first batch isn’t a masterpiece. It takes time to master the chocolate assembly techniques, so enjoy the process I promise it pays off.
In conclusion, the joy of making and sharing cream filled white chocolate spheres is in the experience itself . grab some friends or family to help turn it into a fun, messy kitchen adventure! embrace the delightful challenge, and enjoy every creamy bite of your handiwork.
Happy cooking!
White Soft Spherical Dessert Filled Cream 7 Irre