7 Layer Bean Dip for Parties
- Time: Active 20 minutes, Passive 0 minutes, Total 20 minutes
- Flavor/Texture Hook: Velvety bean base meets a crisp, fresh tomato crunch
- Perfect for: Game day gatherings and summer backyard cookouts
- Creating a Vibrant 7 Layer Bean Dip
- Vital Specs for Party Planning
- Selecting Elements for Maximum Flavor
- Reliable Kitchen Tools for Assembly
- Mastering the Build of Layers
- Critical Techniques to Avoid Sogginess
- Innovative Ways to Customize Appetizers
- Keeping Your Layered Creation Fresh
- Finding Satisfying Pairings for Scooping
- Debunking Popular Layered Dip Misconceptions
- Recipe FAQs
- 📝 Recipe Card
Creating a Vibrant 7 Layer Bean Dip
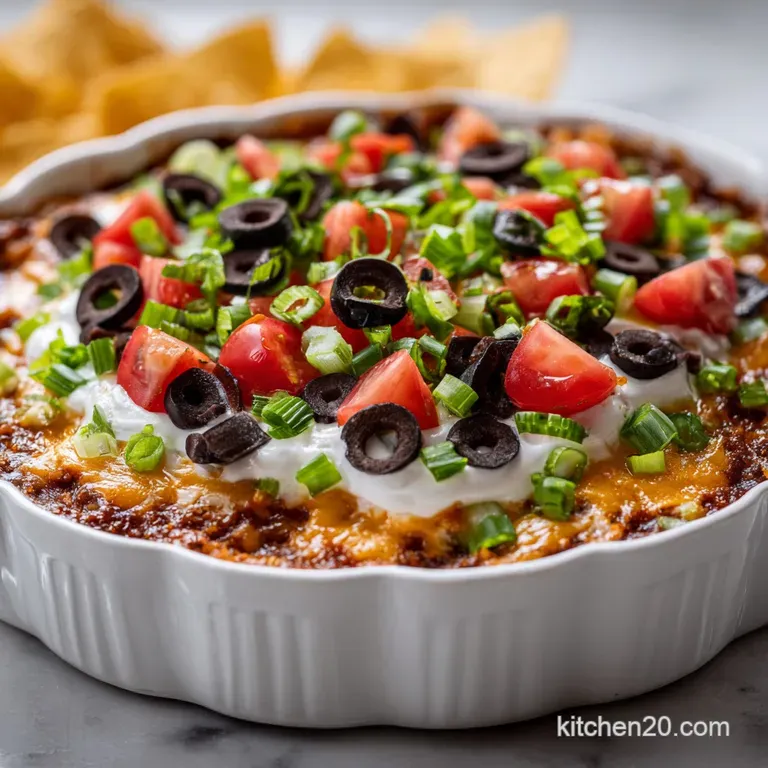
The sound of a heavy corn chip meeting the resistance of seven distinct layers is the universal signal that the party has officially started. I remember the first time I brought this to a neighborhood potluck; I hadn't yet learned the secret of the "sturdy scoop." By the time the third guest dug in, the dip had turned into a soupy mess because I hadn't bothered to drain my salsa.
We ate it anyway, but it was a lesson in structural integrity that I've never forgotten.
This recipe delivers a simple, crowd pleasing Easy to Make 7 Layer Bean Dip for Parties and Holidays No Bake Appetizer with Cheddar Cheese. It's a colorful masterpiece that looks like street food art on a platter but tastes like pure home cooked comfort.
We are going for bold, capturing the essence of a loaded taco in every single bite. You don't need an oven, and you certainly don't need to be a professional chef to get these layers looking sharp and tasting even better.
Vital Specs for Party Planning
The Physics of the Sturdy Scoop: Combining cream cheese with sour cream creates a dense, velvety barrier that prevents the heavy top layers from sinking into the beans. This structural reinforcement ensures your dip maintains its visual appeal even after the tenth person has taken their share.
- Moisture Management: Straining the salsa removes excess water that would otherwise weep into the lower layers.
- Aeration Avoidance: Spreading the guacamole with a flat spatula prevents air pockets that lead to rapid browning.
- Temperature Control: Using cold ingredients from the start keeps the fresh vegetables from wilting during assembly.
- Fat Balance: Full fat sour cream provides the necessary viscosity to hold up the 2 cups shredded Mexican Blend cheese without sliding.
| Servings | Bean Quantity | Pan Size | Chill Time |
|---|---|---|---|
| 7 People | 1 can (16 oz) | 8x8 Square | 30 minutes |
| 14 People | 2 cans (16 oz) | 9x13 Rectangular | 60 minutes |
| 28 People | 4 cans (16 oz) | Two 9x13 Pans | 90 minutes |
Finding the right balance for your crowd is essential. If you are feeding a smaller group, it's better to use a deeper, smaller dish to keep the layer thickness consistent rather than spreading it too thin.
Selecting Elements for Maximum Flavor
| Ingredient | Science Role | Pro Secret |
|---|---|---|
| 4 oz Cream Cheese | Structural Binder | Whip it before mixing to ensure a velvety, lump free texture. |
| 1 cup Chunky Salsa | Flavor Infusion | Strain through a fine mesh sieve for 10 minutes to prevent "dip soup." |
| 2 cans Refried Beans | Foundation Base | Mix with taco seasoning while room temp for better spice distribution. |
To make this Bean Dip truly stand out, you need to be picky about your components. While it's easy to grab whatever is on the shelf, these specific choices matter.
- 2 cans (16 oz each) traditional refried beans: These provide the earthy, dense foundation. Why this? They offer the necessary thickness to support six additional layers without collapsing.
- Substitute: Refried black beans for a silkier, slightly nuttier base flavor.
- 16 oz full fat sour cream: This is the cooling heart of the dish. Why this? High fat content ensures a stable, creamy layer that won't separate.
- Substitute: Greek yogurt for a tangier profile, though it is slightly less stable.
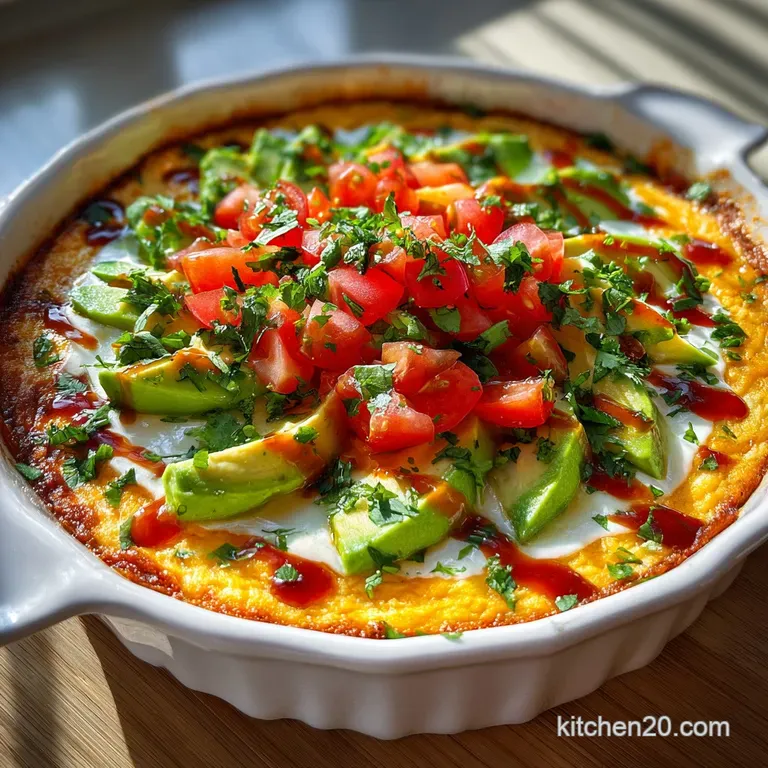
- 2 cups chunky guacamole: Adds the essential buttery richness. Why this? The fat in avocado carries the spice from the taco seasoning.
- Substitute: Smashed avocados with lime juice if you prefer a simpler, fresher taste.
- 1 cup thick chunky salsa: Provides the bright, acidic punch. Why this? Strained salsa adds flavor without the watery mess of fresh pico.
- Substitute: Rotel (drained) for a more consistent, spicy kick throughout the dip.
Reliable Kitchen Tools for Assembly
You don't need high tech gadgets, but a few specific tools make the process much smoother. An offset spatula is my secret weapon for this recipe. It allows you to spread the cream cheese mixture and the guacamole into flat, even sheets without pulling up the layer underneath.
If you use a regular spoon, you risk mixing the colors, and we want those distinct lines visible through the side of your glass dish.
A fine mesh sieve is also non negotiable for the salsa. I used to think I could just "pour off the liquid," but the sieve catches those tiny droplets that eventually ruin the bean layer. If you are looking for more vibrant flavors for your next party, you might also enjoy making a Spring Roll Peanut Sauce recipe to add variety to your appetizer spread.
Mastering the Build of Layers
- Prep the beans. Mix 2 cans traditional refried beans with 2 tablespoons taco seasoning in a bowl. Note: Mixing before spreading ensures every bite is seasoned.
- Spread the base. Smooth the bean mixture into the bottom of a 9x13 glass dish until even and flat.
- Whip the cream. Combine 16 oz sour cream and 4 oz softened cream cheese in a separate bowl. Note: The cream cheese provides the "glue" for the upper layers.
- Layer the cream. Spread the sour cream mixture over the beans until the beans are completely covered.
- Add the green. Carefully spread 2 cups chunky guacamole over the cream layer until the edges are sealed.
- Strain the salsa. Pour 1 cup thick chunky salsa into a sieve for 10 minutes.
- Layer the salsa. Distribute the strained salsa over the guacamole until it forms a thin, red sheet.
- Shower with cheese. Sprinkle 2 cups shredded Mexican Blend cheese evenly over the salsa until no green or red shows through.
- Garnish with fresh. Top with 3 diced Roma tomatoes, 1 can drained olives, 0.5 cup green onions, and 0.25 cup fresh cilantro.
- Chill and set. Place the dish in the fridge for 60 minutes until the layers are firm and cold.
Critical Techniques to Avoid Sogginess
Managing Excess Salsa Liquid
When the salsa sits on top of the guacamole, the salt naturally draws out moisture from the tomatoes. This is why a "soggy bottom" is the most common complaint with a Layer Bean Dip. To prevent this, you must seed your Roma tomatoes before dicing them.
The jelly like seeds hold the most water and will turn your dip into a puddle within an hour.
Preventing Weak Structural Integrity
If your cream cheese isn't soft enough, you'll end up with lumps that make it impossible to get a clean scoop. Take the brick out of the fridge at least 30 minutes before you start. If the layers are too soft when you serve them, the chips will snap off inside the dip.
Chilling for at least one hour is a mandatory step, not a suggestion. It allows the fats to solidify, creating a dip that stands up to even the thinnest tortilla chip.
| Problem | Root Cause | Solution |
|---|---|---|
| Watery layers | Unstrained salsa or unseeded tomatoes | Sieve the salsa for 10 mins and remove all tomato seeds. |
| Broken chips | Dip is too cold or base is too dry | Let dip sit out for 10 mins before serving; add 1 tbsp water to beans. |
| Brown guacamole | Air exposure | Spread guac all the way to the edges of the dish to "seal" it. |
Common Mistakes Checklist
- ✓ Forget to strain the salsa (results in a watery mess at the bottom).
- ✓ Use "light" or "low-fat" sour cream (lacks the stability needed for layering).
- ✓ Skip the cream cheese (the sour cream will be too runny to hold the toppings).
- ✓ Add the fresh tomatoes too early (they release juice the longer they sit).
- ✓ Use a deep bowl instead of a wide dish (makes it hard to get all 7 layers in one scoop).
Innovative Ways to Customize Appetizers
If you want a different texture for your foundation, consider the stovetop versus the oven for preparing your bean base. While this is a cold dip, some people prefer to heat the beans first to meld the spices.
| Method | Time | Texture | Best For |
|---|---|---|---|
| Stovetop | 5 minutes | Silky and warm | Deep flavor integration |
| Oven (Base only) | 15 minutes | Thick and crusty | Maximum structural support |
| No Bake | 0 minutes | Firm and cold | Classic quick assembly |
For those who love a bit of heat, try swapping the mild taco seasoning for a habanero blend. You can also create individual party cups by layering these ingredients into clear 9 oz plastic cups. This prevents the "double dipping" anxiety and makes for a very vibrant presentation. If you are planning a larger holiday spread, this dip pairs beautifully alongside a Homemade Green Bean recipe to balance out the richness of the table.
Chef's Tip: Freeze your block of Mexican blend cheese for 10 minutes before grating it yourself. Pre shredded cheese is coated in cellulose (wood pulp) to prevent clumping, which can give the dip a slightly gritty texture. Grating it fresh makes for a much more velvety mouthfeel.
Keeping Your Layered Creation Fresh
Storage: This dip is best served the day it is made. However, you can store leftovers in the fridge for up to 3 days. Cover the dish tightly with plastic wrap, pressing the wrap directly onto the surface of the dip to minimize air contact with the guacamole.
Freezing: Do not freeze this dip. The sour cream and tomatoes will break down during the thawing process, leaving you with a grainy, watery mess that is completely unappetizing.
Zero Waste: If you have leftovers that are starting to look a bit messy, don't throw them out! Stir the remaining dip together and use it as a filling for breakfast burritos or as a topping for a taco salad.
The green onion stems and cilantro stems can be saved in a freezer bag for your next batch of homemade vegetable stock.
Finding Satisfying Pairings for Scooping
While standard tortilla chips are the classic choice, I love serving this with thick cut "scoop" style chips that can handle the weight of all seven layers. For a healthier twist, provide sturdy vegetables like jicama sticks or thick slices of English cucumber.
The crispness of the cucumber against the velvety bean base is a texture match made in heaven.
If you want to create a full "taco bar" feel, serve this alongside warm flour tortillas and some grilled lime chicken. The dip acts as a combined condiment, providing the cream, beans, and salsa all in one go.
Debunking Popular Layered Dip Misconceptions
There is a common belief that you must use fresh guacamole to prevent browning. In reality, a high-quality store-bought guac often contains enough citric acid to stay green longer than the homemade stuff.
If you do go homemade, ensure you use plenty of lime juice and press the next layer (the salsa) firmly on top to eliminate any oxygen.
Another myth is that any salsa will work. If you use a thin, restaurant style salsa, no amount of straining will save your dip. You need a "thick and chunky" variety that has actual pieces of tomato and onion to provide the necessary bulk.
The liquid is the enemy of the 7 Layer Bean Dip, and choosing the right salsa is half the battle. Finally, don't listen to anyone who says you should skip the olives; they provide the essential salty "pop" that cuts through the richness of the cheddar cheese and sour cream.
Decision Shortcut If you want a spicier dip, swap the Mexican blend for Pepper Jack cheese. If you want it to stay fresh longer, add an extra tablespoon of lime juice to the sour cream layer. If you want a smoky flavor, mix a teaspoon of chipotle in adobo into the refried beans.

Recipe FAQs
Can I make the 7 Layer Bean Dip ahead of time?
Yes, but only for the base layers. Assemble the beans, cream cheese, and guacamole layers up to 24 hours in advance, but keep the fresh salsa and cheese toppings separate until just before serving.
How to prevent the dip from becoming watery?
Strain the salsa thoroughly. The liquid released from the tomatoes is the primary culprit for a soggy dip; use a fine mesh sieve for at least 10 minutes to remove excess moisture.
Why does my guacamole turn brown quickly on top of the dip?
Air exposure causes oxidation, not just the guacamole itself. You must immediately cover the guacamole layer completely with the strained salsa layer to seal it off from oxygen before adding the cheese.
How to make sure the layers stay separate and firm?
Use full fat dairy products and chill for at least one hour. The fat in the sour cream and cream cheese acts as a binding agent, and chilling solidifies this structure so it stands up to dipping.
Is it okay to substitute Greek yogurt for sour cream?
No, it is generally not recommended for structural integrity. Greek yogurt is thinner and tangier; the higher fat content of standard sour cream is necessary to create the stable, velvety layer required to support the heavy toppings.
What is the best chip to use for this heavy, layered dip?
Use thick, sturdy corn chips designed for scooping. Thin chips will break under the pressure of the dense bean and cheese layers; you need something rigid enough to handle the entire structure.
How can I achieve an even, smooth layer when assembling?
Use an offset spatula to spread each layer gently. Work slowly from the center outward, making sure not to lift the layer underneath; this technique is similar to what you’d use for leveling batter in a cake, a skill useful in our Monkey Bread Recipe.
7 Layer Bean Dip Master
Ingredients:
Instructions:
Nutrition Facts:
| Calories | 283 kcal |
|---|---|
| Protein | 8.5 g |
| Fat | 19.7 g |
| Carbs | 16.1 g |
| Fiber | 5.4 g |
| Sugar | 3.2 g |
| Sodium | 678 mg |
