Autumns Best Bake Spiced Pumpkin Cheesecake Whoopie Pies

- The Ultimate Handheld Dessert Fusion: Cake Meets Creamy Cheesecake
- Mastering the Perfect Pumpkin Cheesecake Whoopie Pies
- Preparing Your Pantry for Spiced Autumn Baking
- Achieving Optimal Texture: Ingredient Temperatures and Substitutions
- Step-by-Step Guide to the Pumpkin Cake Shells
- Creating the Creamy Cheesecake Core and Final Assembly
- Expert Secrets for Whoopie Pie Success
- Creative Twists and Dietary Adaptations
- Recipe FAQs
- 📝 Recipe Card
The Ultimate Handheld Dessert Fusion: Cake Meets Creamy Cheesecake
There is something inherently joyful about a handheld dessert, and the Whoopie Pie stands proudly at the intersection of cake, cookie, and sandwich. But we aren’t settling for standard sweet filling today; we are elevating this classic comfort food into a magnificent autumnal masterpiece: the ultimate Pumpkin Cheesecake Whoopie Pies .
This recipe takes the deep, earthy spice of soft, fluffy pumpkin cake shells and unites them with a rich, tangy cream cheese core, delivering the experience of eating a slice of New York cheesecake and spiced pumpkin pie simultaneously, all in a tidy, portable portion.
The result is a dessert that is robustly flavored, satisfyingly moist, and utterly addictive truly living up to the promise of the best fall baking has to offer.
Mastering the Perfect Pumpkin Cheesecake Whoopie Pies
Achieving excellence in these Pumpkin Whoopie Pies requires precision, elevating the overall difficulty rating to a medium level. The techniques involved creaming fats, gentle folding, and accurate temperature control are simple in isolation, but they must be executed flawlessly to prevent the cakes from spreading into flat discs and the filling from becoming a soupy mess.
With an active prep time of about 20 minutes, followed by a mandatory 30-minute chill for the dough, patience is as critical an ingredient as the nutmeg itself.
Plan for a total duration of roughly two and a half hours, accounting for multi batch baking and the non-negotiable cooling time required before assembly.
Elevating the Classic Whoopie Pie Form
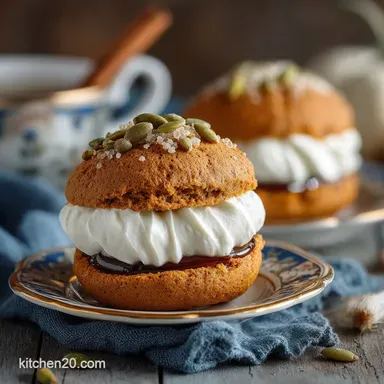
Unlike traditional cookies that aim for crisp edges, the beauty of the Whoopie Pie lies in its cakey texture. Our goal is to produce perfectly domed, Soft Pumpkin Cookies that boast a tender, springy crumb.
The precise balance of 2 1/4 cups of all-purpose flour against a substantial blend of leavening agents one teaspoon each of baking powder and baking soda ensures the necessary lift to support the heavy moisture load delivered by the 3/4 cup of pumpkin puree.
These ingredients, combined with fragrant ground cinnamon, ginger, and nutmeg, create a shell that is moist, flavourful, and structurally sound enough to contain the generous filling.
Why We Opted for Tangy Cheesecake Filling Over Standard Frosting
While many classic Whoopie Pie recipes use a marshmallow based or simple vanilla buttercream filling, we deliberately chose to create a stable, whipped cheesecake filling. The creamy, slightly acidic tang provided by the full fat cream cheese acts as a perfect counterpoint to the sweetness and warmth of the Spiced Pumpkin Whoopie Pies shells.
This rich filling transforms the dessert from a simple sandwich cookie into true Pumpkin Cream Cheese Whoopie Pies . By beating 8 ounces of cream cheese and 1/2 cup of butter until perfectly smooth before incorporating the powdered sugar, we achieve a stable structure that holds its shape beautifully even when sandwiched, mimicking the density and flavor of an actual cheesecake slice.
Preparing Your Pantry for Spiced Autumn Baking
A successful bake begins with preparation, especially when navigating a precise Pumpkin Whoopie Pie Recipe . For the shells, ensure you have fresh spices; stale spices offer little aromatic punch, and this recipe hinges on that deep autumn flavor profile.
The most critical ingredient note is the pumpkin itself: you must use 3/4 cup of pure canned pumpkin puree the unsweetened, unspiced kind and absolutely avoid using pre-mixed pumpkin pie filling, which would completely ruin the texture and sugar balance.
For the filling, make sure you acquire high-quality, full fat block cream cheese, as the spreadable tub variety contains stabilizers and higher water content that will compromise the filling’s stability.
Achieving Optimal Texture: Ingredient Temperatures and Substitutions

Temperature control is non-negotiable for achieving the light, fluffy texture desired in both the cake shells and the filling. Every ingredient matters, from the aeration achieved by creaming to the proper stability of the core.
Essential Dry Ingredients for Fluffy Pumpkin Shells
The dry ingredients 270 grams of all-purpose flour, the leavening agents, and a blend of 1 teaspoon of cinnamon with 1/2 teaspoon each of ginger and nutmeg must be thoroughly whisked together.
This guarantees that the salt (1/2 teaspoon) and the leavening are evenly distributed, ensuring a uniform rise across all your soft pumpkin cookies. This preliminary step prevents lumps and is far more effective than trying to mix them into a dense wet batter later on.
Building the Rich, Stable Cheesecake Filling Base
For the Pumpkin Whoopie Pies With Cream cheese Filling to hold their shape, the fats must emulsify perfectly. This requires the 8 ounces of cream cheese and the 1/2 cup of unsalted butter to be truly at room temperature soft enough to easily press a finger into, but not melting.
This ensures that when the 3 cups of sifted powdered sugar are added, the resulting mixture is uniformly smooth and capable of being whipped into a stiff, stable core. A small addition of 1/4 teaspoon of finely grated lemon zest provides a crucial acidic note that brightens the entire filling.
Specialty Tools That Guarantee Uniform Pies
Consistency is key to the pleasing aesthetics of the Whoopie Pie. While any spoon can drop batter, a medium cookie scoop (roughly 1.5 tablespoons capacity) guarantees that all 24 individual shells are identical in size. This ensures they bake evenly and pair up perfectly during assembly.
On top of that,, utilizing a piping bag fitted with a large star tip for the filling, while optional, drastically improves the professional look and allows for precise and consistent filling distribution between the matched shells.
Related Recipes Worth Trying
- Soft Pumpkin Cookies with Salted Caramel Frosting Recipe — Bake our Autumn Gold pumpkin cookiesincredibly soft and spicedthen top with tangy cream cheese and homemade salted caramel frosting A truly proper autumn bake
- Foolproof Stracciatella Maqui Cheesecake Recipe A Creamy Swirl — Whip up this showstopping Stracciatella Maqui Cheesecake Get the foolproof technique for a perfectly creamy texture and vibrant antioxidant swirl
- The Ultimate Dense Creamy Baked Cheesecake Recipe — Achieve that perfect restaurantstyle dense cheesecake texture at home This foolproof recipe uses a water bath for a velvety smooth finish Get the secrets here
Step-by-step Guide to the Pumpkin Cake Shells
The journey to tender shells begins by creaming the softened butter with both the granulated and light brown sugars until the mixture is visibly lightened and fluffy, which takes about three to four minutes in a stand mixer. The egg and vanilla extract are then beaten in, followed by the pumpkin puree.
Once the wet base is established, the combined dry ingredients are added. It is crucial here to mix only on the lowest speed and stop the moment you see the last streaks of flour disappear. Over mixing will develop gluten, leading to tough rather than cakey shells.
Finally, the dough must be chilled for 30 minutes; this prevents the butter from melting immediately in the oven, ensuring the cookies rise vertically into attractive domes rather than spreading flat.
Using the cookie scoop, drop the chilled dough onto prepared baking sheets, spacing them two inches apart, and bake for 12– 14 minutes until they spring back lightly when touched.
Creating the Creamy Cheesecake Core and Final Assembly
With the spiced shells cooling, the focus shifts to creating that magnificent cheesecake core that defines these treats.
Whipping the Sugars and Fats to Light Aeration
Start by thoroughly creaming the softened cream cheese and butter until the mixture is perfectly smooth and devoid of any lumps this takes patience but is essential for the final mouthfeel. Once smooth, beat in the vanilla and optional lemon zest.
The sifted powdered sugar is then incorporated gradually, starting on low speed to avoid a kitchen cloud, before increasing the speed to medium high. Whip for a full three to five minutes until the filling is dramatically aerated, light, and capable of holding stiff peaks.
The Gentle Folding Technique for Moist Batter
Reiterating the importance of technique during the batter stage, recall that the goal is not a cookie dough consistency but a cake batter. After creaming the fats and sugars, the final integration of the dry mix must be brief. Use a spatula or the mixer on the lowest setting, folding just until the flour is hydrated.
This protective folding technique is what locks in the moisture from the pumpkin and prevents the cookies from turning out dry.
Piping, Baking, and Ensuring Even Cooling
Once the shells are baked, allow them to rest on the hot sheet for five minutes to firm up slightly before transferring them to a wire rack. Adequate cooling is paramount. The shells must be completely cool a minimum of 45 minutes before coming into contact with the rich, dairy based filling.
Even slight residual warmth will cause the cream cheese filling to melt and slide out.
Filling Distribution and Finishing Touches
To assemble, sort the cooled shells into 12 matching pairs. Using your prepared piping bag, apply a generous 2 to 3 tablespoons of the creamy filling onto the flat side of one cookie.
Gently place the matching partner on top and press lightly, allowing the filling to spread outward toward the edges but not squish out entirely. A brief 30-minute chill after assembly allows the filling to set fully, resulting in a cleaner, firmer Pumpkin Whoopie Pies With Cream cheese Filling structure.
Expert Secrets for Whoopie Pie Success
True success in the world of Pumpkin Cheesecake Whoopie Pies rests on three key factors. First, respect the dough's temperature; the 30-minute chill time is mandatory, as it solidifies the butter, giving the cake structure before it melts, ensuring that perfect dome and preventing flat, greasy pies.
Second, the quality of the filling relies entirely on starting with very soft, room temperature fats; cold ingredients will leave you battling persistent lumps. Finally, do not chase a deep golden brown color in the oven; these are soft cakes, not crunchy cookies.
They are done when they appear matte and spring back softly when tapped.
Creative Twists and Dietary Adaptations
Part of the fun of a great recipe is making it your own, incorporating variations or adapting it to fit specific needs.
Preventing Flat Pies: Humidity and Leavening Adjustments
If your Spiced Pumpkin Whoopie Pies consistently fall flat despite chilling, environmental moisture may be the culprit. In high humidity, the flour absorbs more water from the air and the pumpkin puree, resulting in a wetter dough.
To compensate, try decreasing the pumpkin puree by 5 ml or adding an extra tablespoon of flour to the dry mix. Always ensure your leavening agents are fresh, as old baking soda/powder is incapable of providing the necessary lift.
Troubleshooting Runny Cheesecake Filling
A runny filling is almost always a temperature issue. If your cream cheese or butter was too warm when whipped, the structure will be weak. The simplest fix is to place the entire bowl into the refrigerator for 15– 20 minutes.
Once chilled, return the bowl to the mixer and whip again on medium high speed. If it still needs help, gradually add a quarter cup more of sifted powdered sugar until a stiff, pipeable consistency is achieved.
How Long Will These Pumpkin Cheesecake Whoopie Pies Keep?
Due to the fresh cream cheese in the filling, these assembled pies must be stored in an airtight container in the refrigerator. They will maintain their quality and flavor for up to five days.
For the best, softest cake texture, allow them to sit out at room temperature for about 15 minutes before serving.
Integrating Brown Butter Notes into the Filling
For an incredibly decadent depth of flavor, consider making Pumpkin Whoopie Pies With Maple Cream Cheese Frosting by introducing brown butter. Carefully brown the half cup of butter intended for the filling until it smells nutty and the milk solids turn amber.
Chill the browned butter until it re-solidifies to the texture of soft peanut butter, then proceed with the recipe, creaming it with the cream cheese. This adds a caramel richness that complements the pumpkin beautifully.
Making Them gluten-free or Dairy Reduced
For gluten-free adaptations, substitute the all-purpose flour with a reliable 1:1 gluten-free baking blend that already contains xanthan gum. The rest of the recipe can remain the same.
To make them dairy reduced, use high-quality plant based butter and ensure you select block style vegan cream cheese for the filling, as these mimic the firmness of dairy fats better than spreadable alternatives.
You may need to slightly increase the amount of powdered sugar to ensure the vegan filling is adequately stable for sandwiching.
Recipe FAQs
Why did my Whoopie Pies go flat as a pancake, and how do I get that lovely dome shape?
Ah, the dreaded pancake Whoopie Pie! This usually happens if the dough is too warm or you’ve used too much baking powder relative to the flour. The crucial fix here is chilling; ensure you let the dough rest in the fridge for the full 30 minutes before scooping.
Also, double check your flour measurement if you scoop directly from the bag without leveling, you might inadvertently use less flour, resulting in a thin batter that spreads like mad when heated. Keep it cool and measured, and they'll come out beautifully dome shaped.
My cheesecake filling seems a bit runny did I bodge it, and can I fix it?
Don't panic! The key to a proper, stable cream cheese filling is temperature and whipping time. If your butter and cream cheese weren't truly soft and room temperature, they won't emulsify properly, leading to a runny mess.
To fix it, try adding another 1/2 cup of sifted powdered sugar and beat the mixture on medium high for a further 2 3 minutes; this will incorporate more air and stiffen the texture.
If it's still playing up, pop the whole bowl into the fridge for 15 minutes before re-whipping sometimes a quick chill is all it needs to hold its shape.
Can I make these Pumpkin Cheesecake Whoopie Pies ahead of time for a proper knees-up?
Absolutely, they are excellent make-ahead treats! You can bake the pumpkin pies (the cookies) and store them unfilled in an airtight container at room temperature for up to three days. The cheesecake filling, due to the dairy, should be prepared and stored separately in the fridge for up to a week.
Assemble them no more than 12 24 hours before serving, as the moisture from the filling can start to soften the cake over time. Once assembled, they must be kept chilled to keep them shipshape.
I’ve only got pumpkin pie filling in the cupboard. Can I use that instead of plain puree?
I’m afraid that’s a hard 'no' if you want the recipe to work as intended. Canned pumpkin pie filling is pre-sweetened and contains extra spices and thickening agents, which dramatically changes the moisture ratio in the whoopie pie dough.
Using it instead of plain pumpkin puree will result in cookies that are far too wet, overly sweet, and likely to spread disastrously in the oven. Stick to the plain puree; it’s worth the extra trip to the shops!
What’s the best way to tackle a gluten-free or dairy-free version?
For a gluten-free pie, substitute the all-purpose flour with a high-quality 1:1 gluten-free baking blend that already contains xanthan gum; the results are surprisingly good. For a dairy-free filling, swap the butter for a plant based baking stick and ensure you use block style vegan cream cheese, not the spreadable tub variety, as the block has a higher fat content needed for stability.
The bake time and overall texture should remain very similar with these good old substitutes.
Autumn Spiced Pumpkin Cheesecake Pies