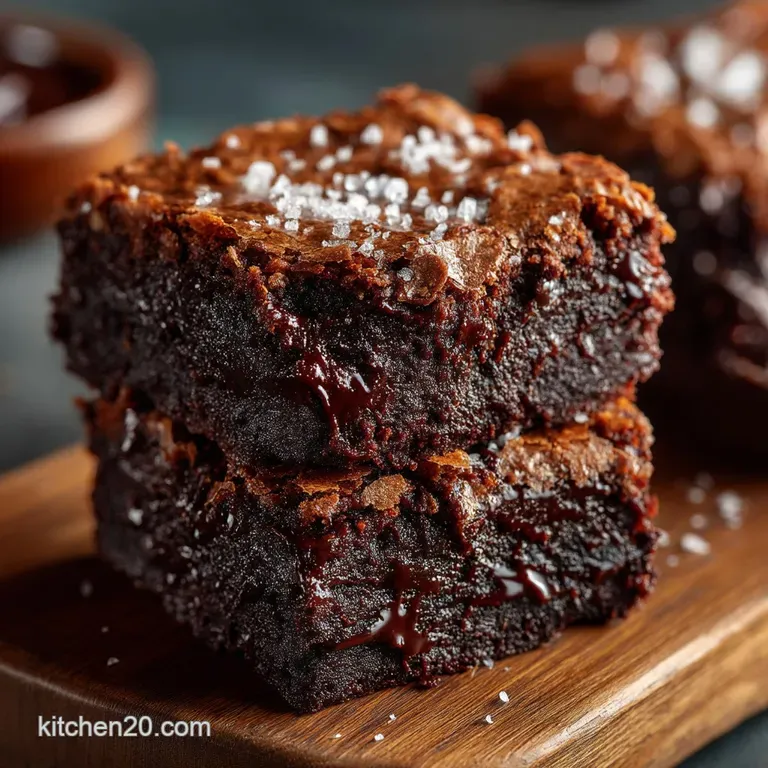
Properly Chewy Chefs Secret Soft Honeyoat Granola Bars
- Ditching the Cardboard: Why These Are the Ultimate Soft Chew Granola Bars
- The Flapjack Factor: Unpacking the Secret to Irresistible Texture
- Assembling Your Golden Binding Agents and Core Grains
- The Baking Blueprint: Step-by-Step Construction
- Mastering the Craft: Troubleshooting and Tips for Success
- Recipe FAQs
- 📝 Recipe Card
Ditching the Cardboard: Why These Are the Ultimate Soft Chew Granola Bars
We’ve all been there: you reach for a supposedly convenient snack bar only to be met with something dense, dry, and suspiciously reminiscent of packing material. Forget those brittle failures! Today, we are elevating the humble snack into something truly exceptional.
This Homemade Granola Bars Recipe is specifically engineered to deliver that delightful, yielding texture we crave soft, rich, and undeniably satisfying.
These aren't just bars; they are a proper, portable flapjack experience, perfect for everything from hectic mornings to school lunchboxes. If you've struggled to achieve that perfect, non-crumbly bite, stick with me.
We are unveiling the precise methods needed to create the Best Granola Bars you’ll ever taste.
The Flapjack Factor: Unpacking the Secret to Irresistible Texture
The key to moving beyond the stiff, brittle realm of standard granola bars lies in managing moisture retention and maximizing the stickiness of the binder. Our goal is to achieve Soft Granola Bars that maintain their integrity but yield beautifully when bitten into.
This Granola Bar Recipe Chewy focus means we rely heavily on specific ratios of butter, honey, and brown sugar, transforming the dry ingredients into a cohesive, tender mass.
Your New Go-To Breakfast Treat Unveiled
We are aiming for a straightforward process. This recipe, titled "Properly Chewy: Chef’s Secret Soft Honey Oat Granola Bars," is rated easy, meaning the results far outweigh the effort.
With only 20 minutes of active preparation, you can be well on your way to enjoying these treats, which will yield about 12 substantial bars from an 8x8 inch pan.
Setting the Stage: Equipment Needed for Perfect Baking
Before diving into ingredients, let’s ensure your kitchen is ready. For this project, you’ll require a standard 8x8 inch metal baking pan. Crucially, line this pan with parchment paper, allowing an overhang on two opposite sides these will become your natural handles for easy lifting post bake.
Beyond the tin, you’ll need a medium saucepan for melting the binding agents, a large mixing bowl for combining everything, and a sturdy rubber spatula for thorough mixing.
The Promise: Softness That Lasts Beyond Day One
The science behind long lasting chewiness is rooted in moisture. By using a higher proportion of liquid sweeteners and fats (butter and honey), we coat the oats thoroughly, inhibiting them from drying out too much in the oven.
This rich coating locks in that desirable moisture, ensuring that these Chewy Granola Bars remain wonderfully soft for days, provided they are stored correctly.
Related Recipes Worth Trying
- Chewy LowCarb Coconut Bars Easy Keto Dessert — Discover the best LowCarb Coconut Bars that are delightfully chewy and packed with tropical flavour This easy keto coconut dessert recipe is foolproofget baking
- My GoTo Chewy Banana Oatmeal Bars Recipe Better than Banana Bread — Dont chuck those black bananas These easy healthy Banana Oatmeal Bars Breakfast bars are perfect for meal prep Chewy spiced and taste just like banana bread...
- Super Easy Lemon Bars Recipe Sunshine on a Plate — Super Easy Lemon Bars recipe so simple even beginner bakers can nail it Tangy sweet and utterly addictive these are sunshine in every bite Get the recipe now
Assembling Your Golden Binding Agents and Core Grains
Creating the perfect structure requires a thoughtful selection of both the dry foundation and the syrupy glue that holds it all together. We need substance that provides chew without turning hard upon cooling.
The Perfect Ratio: Measuring Out Your Rolled Oats
The backbone of these bars must be structure providing oats. You will need 2 cups of Rolled Oats (Old Fashioned) —this is non-negotiable. Instant oats will dissolve too readily, leading to a texture closer to dense oatmeal, rather than a satisfying bar.
To this base, we introduce ½ cup of all-purpose flour. The flour acts as a minor binder and helps stabilize the structure created by the sugars and fats, further preventing crumbling.
What You Need: Beyond the Basics (Fats and Sweeteners)
This is where the magic happens. For the binding mixture, melt together ½ cup of unsalted butter. To this, add ½ cup of your chosen liquid sweetener honey works beautifully for that classic flavour, though maple syrup is a fantastic alternative along with ¼ cup of packed light brown sugar.
Heating these gently until the sugar dissolves creates a highly viscous, sticky syrup. A teaspoon of vanilla extract is stirred in off the heat to boost the overall aroma.
Optional Mix-Ins: Elevating Your Homemade Granola Bars
To enhance the nutritional profile and add textural interest to our Healthy Granola Bars , we incorporate ½ cup of dried fruit (such as chopped apricots or raisins) and ½ cup of chopped nuts (pecans are excellent here).
For an extra fibre and nutty depth, consider adding ¼ cup of ground flaxseed or wheat germ to the dry ingredients.
The Baking Blueprint: step-by-step Construction
With all components measured, the construction phase is rapid. Preheat your oven to 350° F ( 175° C) and ensure your parchment lined pan is ready for action.
Melting and Mixing: Creating the Sticky Binder Base
Start by combining all the dry components oats, flour, salt (½ teaspoon), cinnamon (½ teaspoon), and any chosen seeds/germ in your large bowl. In the saucepan, gently melt the butter, then incorporate the honey and brown sugar.
Heat this mixture just until the sugar is fully dissolved; do not let it reach a rolling boil. Once smooth, remove it from the heat source and stir in the vanilla. Pour this warm, sticky binder immediately over the oat mixture in the large bowl.
Work quickly with your spatula to ensure every single dry particle is thoroughly coated in the glossy liquid.
Pressing Technique: Ensuring Dense, Uniform Bars
Transfer the entire mixture into your prepared pan. This step is critical for achieving density. Use the back of a damp measuring cup or the bottom of a clean glass to press the mixture down as firmly as possible across the entire surface. Density equals chewiness; loose packing guarantees a crumble.
Aim for an even, compact layer across the bottom of the tin.
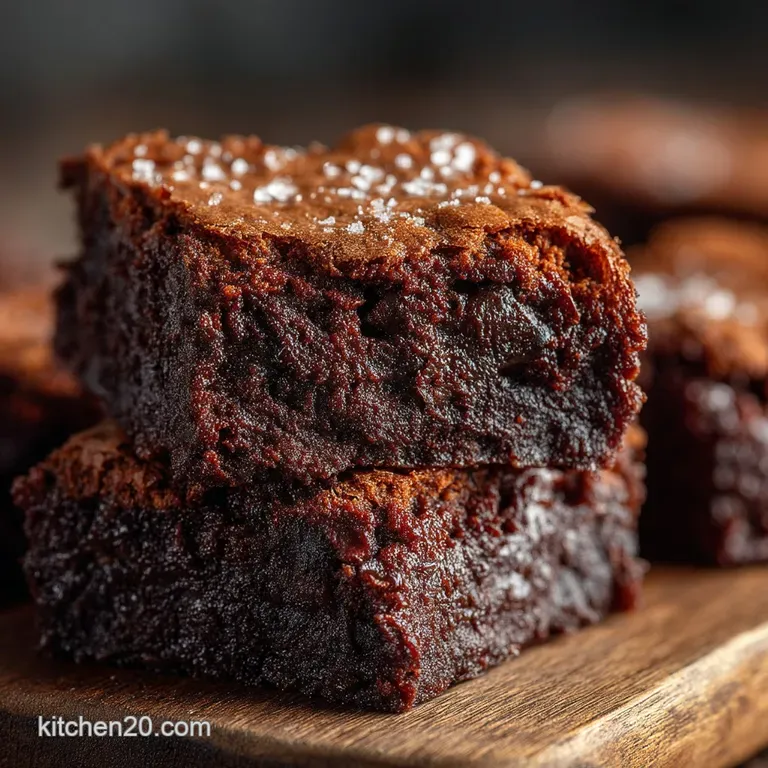
Cooling Protocol: The Patience Required for Clean Slices
Bake this dense layer for approximately 25 to 30 minutes. You are looking for the edges to turn golden brown, and the centre should appear mostly set, though perhaps still yielding slightly to a gentle poke. Remove the pan from the oven.
Immediately use the parchment paper handles to lift the entire block onto a wire cooling rack. Allow it to rest in the pan for 15 minutes before carefully lifting it out completely.
The most challenging part of making Homemade Granola Bars is waiting: resist cutting them while they are hot. Allow them to cool substantially, preferably for an hour, before slicing into 12 even portions.
Mastering the Craft: Troubleshooting and Tips for Success
Even the best recipes sometimes throw curveballs. Knowing how to correct common issues ensures your next batch rivals the current success.
Why Did My Bars Crumble? Common Fixes Addressed
If your bars fractured upon slicing, the primary culprit is usually insufficient pressing or cutting them while still warm. The dense pack creates the necessary friction to hold the bar together when handled.
If the mixture felt too dry during mixing, you can remedy this next time by adding 1 extra teaspoon of honey to the binder. Remember, these are meant to be Soft Granola Bars , not shortbread!
Nutritional Snapshot: Making Them Energy Smart
While these bars are richly flavoured with butter and honey, they offer substantial energy for sustained activity. Roughly estimating, each bar contains around 240 260 calories, providing a solid carbohydrate base supplemented by the healthy fats and fibre from the oats and nuts.
This makes them fantastic fuel for hiking or powering through an afternoon slump.
Variations: Introducing Chocolate Drizzles and Seed Boosts
Once the bars are completely cool, you can introduce a touch of indulgence. Melting 3 ounces of high-quality milk or dark chocolate and artfully drizzling it across the top adds visual appeal and richness, transforming them into delightful Chocolate Chip Granola Bars (or drizzle bars, in this case!).
Feel free to substitute any of the nuts or dried fruits based on seasonal availability or preference.
Sealing in Freshness: Optimal Storage Methods for Soft Granola Bars
To maintain that perfect chew, storage is vital. Store the finished bars in an airtight container. If you plan to eat them within a week, room temperature is fine. For longer preservation, separation by parchment paper within the container and storing them in the refrigerator will lock in the moisture and keep them perfectly fresh for up to two weeks.
This careful handling ensures that the next day’s snack is just as satisfying as the first.
Recipe FAQs
Why are my homemade Granola Bars crumbling instead of staying chewy?
Ah, the dreaded crumble! This is nearly always down to one of two things: either you haven't pressed the mixture firmly enough into the baking tin, or you've overbaked them, drying out the binding agents. Remember, a proper press is paramount treat it like you’re setting concrete!
Can I make these vegan, and what should I substitute for honey?
Absolutely, it’s a doddle to switch things up. For a vegan version, swap the butter for a solid, high-quality vegan butter block. Maple syrup works beautifully as a direct substitute for honey; it provides the necessary moisture and sweetness while keeping everything plant based.
What’s the best way to store these bars so they stay soft?
To keep that lovely, soft texture, store them in an airtight container at room temperature, layered between sheets of parchment paper don't just chuck them in loose! They’ll keep perfectly well for about a week, much better than anything shop bought, I’ll tell you that much.
My bars are too sticky! Should I have baked them longer?
If they are truly sticky after cooling, you might have underbaked them slightly, or perhaps the ratio of liquid binder was a bit high. Don't panic; try chilling them for an extra hour or two sometimes they firm up beautifully in the fridge. Next time, aim for edges that look golden brown when you pull them out.
Can I leave out the flour, or use an alternative like almond flour in these Granola Bars?
The small amount of flour is crucial for structure, acting as a gentle binder alongside the oats, so I’d advise keeping some in if you can. If you must substitute, use a gluten-free blend or oat flour for the best chance of maintaining texture, but be aware that almond flour can sometimes absorb more moisture and lead to a slightly different, possibly softer, result.
Chewy Honey Oat Bars

