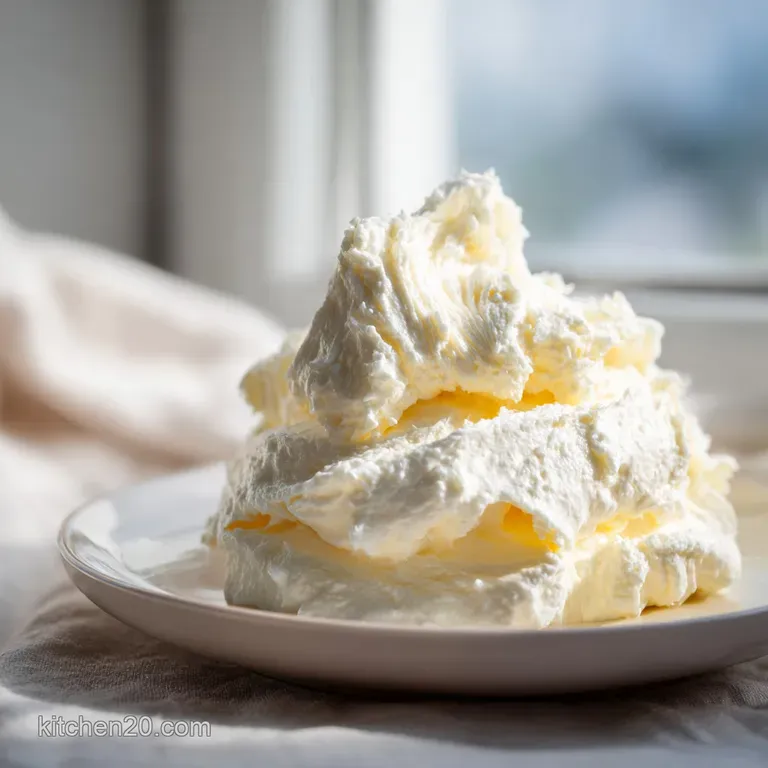
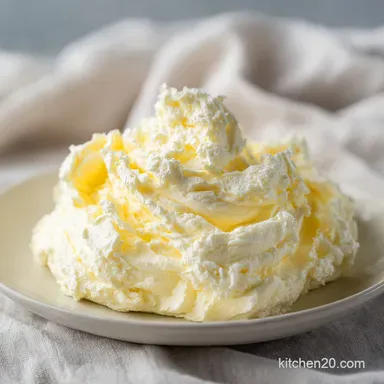
Whipped Butter: Light and Airy Spread
- Time: Active 5 minutes, Passive 0 minutes, Total 5 minutes
- Flavor/Texture Hook: Airy, ivory pale, and silk smooth
- Perfect for: Weekend brunch, budget conscious meal prep, or fancy dinner parties
- Create Light and Airy Whipped Butter
- Why This Budget Spread Wins
- Essential Metrics for Success
- Five Simple Key Ingredients
- Best Tools for Aeration
- Steps for the Perfect Whip
- Fix Common Texture Problems
- Flavor and Diet Variations
- Storage and Zero Waste
- Plating and Serving Tips
- Myths About Whipping Fat
- Recipe FAQs
- 📝 Recipe Card
Create Light and Airy Whipped Butter
The rhythmic "whirr clink" of the stand mixer is easily one of my favorite kitchen sounds, especially on a slow Saturday morning. There is something almost magical about watching a dense, yellow brick of fat transform into a pale, ivory cloud in under five minutes.
I remember the first time I tried this at home; I was tired of wrestling with cold butter that decimated my morning toast, leaving crumbs everywhere and ruining the vibe.
Once you see how much volume you gain just by adding a splash of milk and some high speed aeration, you will never go back to the store-bought tubs. It is not just about the texture; it is about efficiency. We are effectively doubling the spreadability of our fat, which is a massive win for the grocery budget.
Plus, the mouthfeel is completely different it’s not heavy or greasy, but instead feels like a velvety "poof" that melts the second it hits your tongue.
Why This Budget Spread Wins
When we talk about streamlining our kitchen systems, this recipe is a top tier example. It takes a basic pantry staple and utilizes mechanical energy to change its physical properties. By whipping the fat, we are incorporating thousands of tiny air bubbles.
This doesn't just make it fluffy; it changes the way we perceive flavor. The increased surface area allows the salt and any added honey to hit your taste buds more effectively.
Aeration Mechanics: High speed whisking forces air into the fat solids, creating a stable foam structure that increases total volume by nearly fifty percent.
Emulsification Stability: Adding a tiny amount of liquid (milk) to the fat requires a slow infusion to ensure the moisture stays trapped within the fat molecules rather than weeping out.
Temperature Precision: Starting at 65°F ensures the butter is soft enough to expand but firm enough to hold the air pockets without collapsing into a greasy puddle.
Cost Efficiency: By increasing the volume through aeration, you use less actual butter per slice of bread, making a high-quality stick last significantly longer for your family.
| Method | Prep Time | Volume Gain | Best For |
|---|---|---|---|
| Stand Mixer | 5 minutes | 40-50% | Large batches, maximum fluff |
| Hand Mixer | 7 minutes | 30-40% | Small batches, easier cleanup |
| Manual Whisk | 12 minutes | 10-15% | Building arm muscle, low volume |
Choosing the right method depends on your goals. For pure efficiency and the most cloud like results, the stand mixer is the undisputed champion. If you are just making a quick portion for one person, a hand mixer gets the job done without the heavy lifting of the large appliance.
Essential Metrics for Success
To get that restaurant style finish, we need to look at what is happening inside the bowl. Butter is an emulsion of water in fat. When we whip it, we are essentially creating a complex matrix where air, fat, and a little extra moisture coexist. If the butter is too cold, the fat is too brittle to trap air.
If it is too warm, the liquid fat won't have the structural integrity to support those air bubbles.
| Ingredient | Science Role | Pro Secret |
|---|---|---|
| Unsalted Butter | Structural base | Use high fat European style for the creamiest shatter free texture |
| Whole Milk | Emulsion aid | Ensure it is room temperature to prevent the butter from seizing |
| Fine Sea Salt | Flavor catalyst | Fine grains dissolve faster into the fat than coarse kosher salt |
Using a slightly higher fat content butter can lead to a more luxurious mouthfeel, but even standard grocery store brands work beautifully when treated with the right technique. The milk is the secret to that "spreadable straight from the-fridge" quality we all crave.
Five Simple Key Ingredients
You don't need a long shopping list for this one. In fact, you probably have everything in your pantry right now. The beauty of this recipe lies in its simplicity and the way it highlights the quality of your basic ingredients.
- 1/2 cup (113g) Unsalted butter: Must be room temperature (65°F). Why this? Provides the clean slate for flavor and the structural fat needed for aeration.
- 1.5 tbsp (22.5ml) Whole milk: This provides the moisture needed for a silky finish. Why this? The fat in whole milk helps the emulsion stay stable and smooth.
- 1/4 tsp Fine sea salt: Adjust to your preference, but don't skip it. Why this? Sharpens the dairy notes and balances the optional sweetness of honey.
- 2 tbsp (42g) Mild honey (optional): For a sweet twist that pairs perfectly with biscuits.
- 1/4 tsp Ground cinnamon (optional): Adds warmth and depth to the honey variation.
| Original Ingredient | Substitute | Why It Works |
|---|---|---|
| Whole Milk | Heavy Cream | Higher fat content makes it even richer. Note: Slightly less spreadable when cold. |
| Mild Honey | Maple Syrup | Adds a woody, autumnal sweetness. Note: Resulting butter will be slightly softer. |
| Unsalted Butter | Salted Butter | Saves a step. Note: Omit the added 1/4 tsp salt to avoid over seasoning. |
If you decide to go with the maple syrup substitute, be aware that the moisture content is slightly higher than honey, so you may need to whip for an extra thirty seconds to ensure it is fully incorporated.
Best Tools for Aeration
Efficiency in the kitchen starts with using the right gear. While you can technically do this with a fork and a lot of patience, you will never achieve that professional, shatter light texture without a bit of mechanical help.
I always reach for my stand mixer for this task. The whisk attachment is designed to pull air into the mixture far more effectively than a flat paddle. If you are streamlining your meal prep, making a double batch in the stand mixer takes the same amount of time as a single batch, and you will have enough spread for the entire week.
Chef's Tip: Before you start, wipe your mixer bowl with a little bit of lemon juice or white vinegar on a paper towel. This removes any lingering grease film and helps the butter aerate even faster.
Steps for the Perfect Whip

- Prepare the butter. Cut the 1/2 cup (113g) butter into small cubes and let it sit until it reaches 65°F. Note: It should be soft enough to indent but not look shiny or melted.
- Start the mixer. Place the butter in the bowl and use the whisk attachment. Begin on medium low speed to break the cubes down.
- Increase the speed. Turn the mixer to high and beat for 2 minutes. Wait until it turns a pale ivory color.
- Incorporate the milk. While the mixer is running on medium high, slowly drizzle in the 1.5 tbsp (22.5ml) milk one tablespoon at a time.
- Develop the peaks. Continue whipping for another 2-3 minutes. Stop when it looks like stiff peak whipped cream.
- Add the seasoning. Sprinkle in the 1/4 tsp salt and any optional ingredients like honey or cinnamon.
- Final fold. Beat for a final 30 seconds on medium speed. Watch for a fully smooth, uniform emulsion.
- Check the texture. Scrape the sides with a rubber spatula to ensure no dense butter bits are hiding at the bottom.
If you are already in the mood for whipping things up, check out my homemade whipped cream for your next dessert. The science of aeration is very similar, though cream requires a colder starting temperature than butter does.
Fix Common Texture Problems
Why is my butter grainy instead of smooth?
This usually happens when there is a temperature mismatch. If your milk was ice cold and your butter was just barely room temperature, the milk can cause tiny beads of fat to solidify instantly. This creates a gritty mouthfeel that isn't very pleasant.
To fix this, you can gently warm the bowl with a warm towel for sixty seconds and then continue whipping.
What if the liquid is separating from the fat?
If you see little puddles of milk that won't mix in, you might have added the liquid too quickly. The fat can only absorb so much moisture at a time. This is a common hurdle when learning how to make whipped butter from heavy cream or milk.
The solution is to keep the mixer running on high and be patient; it will eventually emulsify.
| Problem | Root Cause | Solution |
|---|---|---|
| Greasy/Melting | Butter was too warm (over 70°F) | Chill the bowl for 5 minutes, then re whip. |
| Not Fluffy | Didn't whip long enough | Increase speed and whip for a full 5 minutes. |
| Broken Emulsion | Added milk too fast | Add a tiny bit more soft butter and whip on high. |
Common Mistakes Checklist:
- ✓ Never use melted butter; it won't hold air and will stay flat.
- ✓ Don't skip the "pale ivory" stage before adding liquid.
- ✓ Avoid using cold milk; room temperature is much safer for the emulsion.
- ✓ Always use a whisk attachment rather than a paddle for maximum volume.
- ✓ Scrape the bowl halfway through to catch the un whipped bits at the bottom.
Flavor and Diet Variations
The versatility of this easy homemade whipped butter recipe is where the fun really begins. Once you have the base down, you can pivot in a dozen different directions depending on what you are serving. For a savory twist, I love adding a teaspoon of minced fresh rosemary and a crack of black pepper.
It makes a simple roast chicken feel like a five star meal.
Can I make this dairy-free or vegan?
You can actually use a high-quality plant based butter block for this. Just make sure it is a "stick" variety and not a soft tub spread, as the tub versions already have oils added that might prevent them from holding air. Use an unsweetened nut milk or soy milk for the liquid component.
The texture will be slightly different, but the aeration principle remains the same.
How do I make this a savory compound butter?
Skip the honey and cinnamon and add garlic powder, dried parsley, or even a dash of hot sauce. This is a great way to use up those last few sprigs of herbs in your fridge. Whipping them into the butter preserves them and makes it easy to add a burst of flavor to steaks or steamed vegetables.
Storage and Zero Waste
Since we have added milk to the butter, we have introduced a bit of extra moisture and protein, which means this won't stay fresh as long as a plain stick of butter sitting on the counter. Always store your whipped butter in an airtight container in the refrigerator. It will stay fresh for about 1 week.
If it firms up too much in the fridge, just let it sit on the counter for 10 minutes before serving.
Zero Waste Tip: Don't throw away your butter wrappers! Fold them up and keep them in a bag in the freezer. They usually have just enough butter left on them to grease a muffin tin or a cake pan.
Also, if you find yourself with leftover whipped butter that is nearing its one week limit, toss a dollop into your pan when making scrambled eggs. The extra air in the butter makes the eggs incredibly fluffy.
Plating and Serving Tips
Presentation is the final step in making this budget friendly recipe feel premium. Instead of just scooping it into a bowl, try using a small cookie scoop to create perfect spheres. If you are feeling extra, you can put the mixture into a piping bag with a star tip and pipe little rosettes onto a parchment lined tray.
Chill them until firm, and you have a beautiful addition to any bread basket.
This spread is the absolute soulmate for a stack of fluffy waffles on a Saturday morning. The way the light butter melts into the crevices of the waffle is something you truly have to experience.
Chef's Tip: For a "restaurant style" look, sprinkle a tiny pinch of flaky sea salt (like Maldon) over the top of the butter just before serving. It adds a beautiful sparkle and a crunch that contrasts perfectly with the velvety texture.
Decision Shortcut: If you want maximum fluff, whip for the full 5 minutes on high. If you want honey butter, fold the honey in after the butter is already whipped and ivory colored.
If you want a stiffer texture, reduce the milk by half a tablespoon.
Myths About Whipping Fat
There is a common misconception that you can "over whip" butter like you can with heavy cream. While it is true that you can break an emulsion if it gets too hot from the friction of the blades, you generally don't have to worry about butter turning into something else.
In fact, the more you whip it (within reason), the lighter it becomes.
Another myth is that you must use expensive, grass fed butter to get a good result. While the flavor of premium butter is lovely, this technique is actually designed to make basic, budget friendly butter taste and feel much better than it is.
The mechanical aeration does the heavy lifting, so don't feel like you have to break the bank to enjoy a luxury spread. Just follow the temperature rules, and your results will be fantastic every single time.

Recipe FAQs
How to make perfect whipped butter?
Use room temperature butter at exactly 65°F. Place the butter in a stand mixer with a whisk attachment, beat on high for 2 minutes until ivory, then slowly drizzle in your milk while whipping for another 2 3 minutes until stiff peaks form.
Is making whipped butter worth it?
Yes, it transforms the texture into a spreadable, cloud like consistency. It significantly elevates the eating experience, especially when slathered on warm carbs like our fluffy monkey bread.
What is the difference between butter and whipped butter?
Whipped butter contains incorporated air and liquid, while standard butter is a solid fat block. This aeration makes the butter lighter, less dense, and much easier to spread on delicate items without tearing them.
How long will butter stay whipped?
It remains fresh for about 1 week when stored in an airtight container in the refrigerator. Because the addition of milk introduces moisture and protein, it cannot be left out at room temperature as long as regular butter.
Is it true I can use cold butter straight from the fridge?
No, this is a common misconception. You must ensure the butter is at a pliable 65°F; if it is too cold, it will remain chunky, and if it is too warm, it will melt rather than aerate into a stable foam.
What to do if the mixture looks oily instead of creamy?
Stop immediately and check your butter temperature. If the butter reached a melting point or exceeded the 65°F threshold, it has lost the structure necessary to hold the air bubbles, resulting in a greasy texture rather than a light whip.
How to ensure the honey variation is perfectly smooth?
Fold the honey and cinnamon into the base only after the butter is fully aerated. Beat the mixture for an additional 30 seconds at the end to ensure the honey is completely emulsified throughout the butter for a consistent flavor.
Easy Homemade Whipped Butter
Ingredients:
Instructions:
Nutrition Facts:
| Calories | 103 kcal |
|---|---|
| Protein | 0.2 g |
| Fat | 11.5 g |
| Carbs | 0.1 g |
| Fiber | 0 g |
| Sugar | 0.1 g |
| Sodium | 77 mg |
