Oven-Roasted Corn on the Cob with Herb Butter
- A Taste of Summer: Oven-Roasted Corn on the Cob with Herb Butter
- Your Essential Ingredients Guide for Oven-Roasted Corn on the Cob
- Unleashing the Magic of Oven-Roasted Corn on the Cob
- Additional Recipe Information: Oven-Roasted Corn on the Cob with Herb Butter
- Frequently Asked Questions
- 📝 Recipe Card
A Taste of Summer: oven-roasted Corn on the Cob with Herb Butter
Have you ever bitten into a perfectly roasted ear of corn and felt like you were back at a summer fair, with the scent of fresh popcorn and funnel cakes wafting through the air? honestly, there’s nothing quite like it!
The sweetness of fresh corn, especially when it’s oven-roasted , will bring a smile to your face every time.
Today, we’re diving into an easy and delightful recipe for corn on the cob in the oven that will make your taste buds do a happy dance!
Where It All Began
Corn has been a staple in american kitchens since the native americans taught the pilgrims how to grow it. from the classic cream corn to tasty corn chowders, this veggie has held a place in our hearts (and stomachs!) for generations.
Nowadays, oven baked corn on the cob in foil is all the rage, thanks to its convenience and flavor. plus, who doesn’t love roasting some cob on a chilly evening when the grill's not an option?
The beauty of this dish is its simplicity. you only need about 35 minutes total 10 minutes of prep, and 25 minutes of roasting.
And trust me, it’s as easy as spreading butter! no culinary school needed here, folks!
The Good Stuff: Key Benefits
Let’s chat about the health benefits for a sec. corn, especially when kept fresh, packs a punch with vitamins like a, b, and c, plus fiber that helps with digestion.
So, that heaping plate of oven roasted corn on the cob isn’t just a guilty pleasure; it’s downright nutritious!
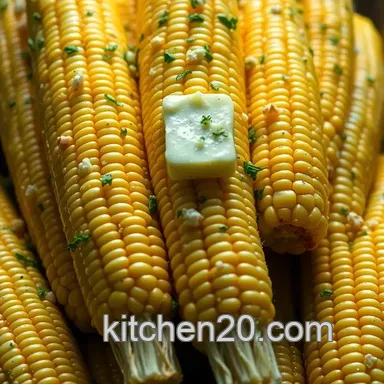
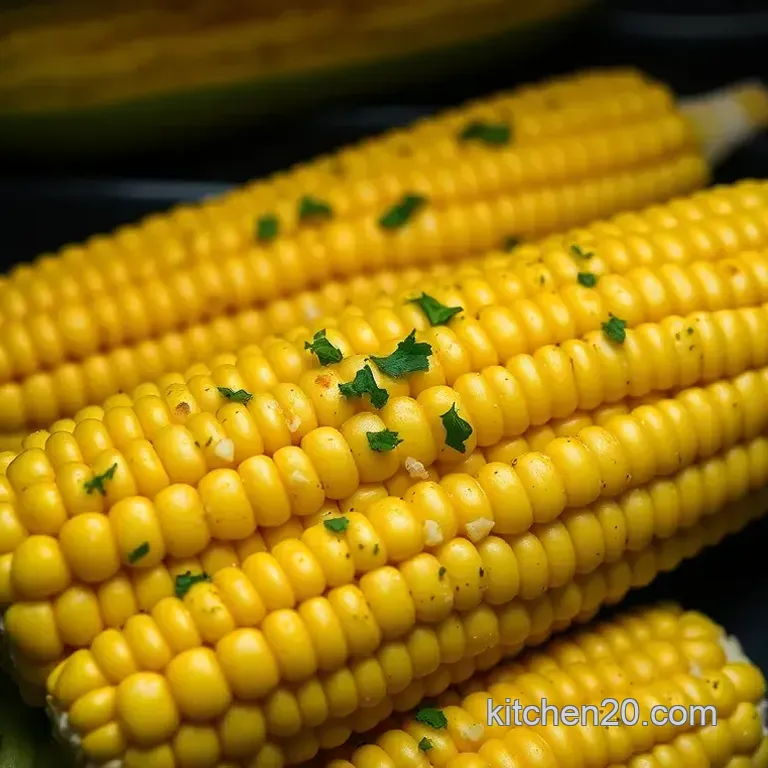
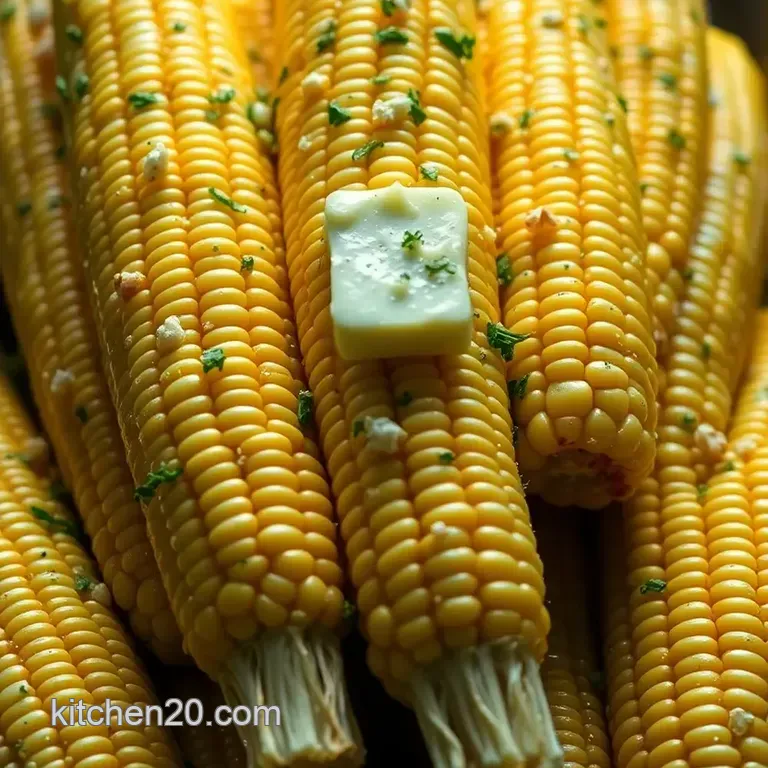
But wait, there's more! the fragrant herb butter adds a whole new level of flavor. imagine fresh parsley and chives mingling with garlic, creating a heavenly combination that elevates simple corn to gourmet status.
Serve it at your next bbq, and your friends will rave about it. it’s perfect for special occasions or just a laid back dinner; i mean, who can resist buttery corn slathered with fresh herbs? talk about a conversation starter!
And let’s not forget the versatility. want to put a twist on it? you can get a little adventurous by going for mexican corn on the cob flavors, adding cheese, lime, and chili powder.
Or, simply enjoy it as a side dish alongside grilled veggies or that tasty salad pasta you’ve been eyeing!
Corn in the Oven: The Perfect Side
When it comes to ease and flavor, nothing beats this corn on the cob recipe. you can whip up several ears at once, too.
The cost is surprisingly low, and you can usually feed a crowd without breaking the bank. can you feel the warmth of those summer picnic vibes already?
Now that we’ve got the benefits covered, let’s shift gears. you probably want to know how to whip up this deliciousness in your kitchen.
So, without further ado, let’s venture into the ingredients section and uncover what you’ll need to create this mouthwatering oven roasted corn on the cob with herb butter!
Trust me, once you try this, you’ll never look at corn the same way again!
Your Essential Ingredients Guide for oven-roasted Corn on the Cob
Hey there! so, let’s chat about one of the simplest, yet most mouthwatering side dishes you can whip up oven-roasted corn on the cob with herb butter .
It’s the kind of recipe that can remind you of summer barbecues or that last picnic in the park. but before you get cookin’, let’s dive into some essential ingredients and kitchen tips that’ll make your corn pop with flavor!
Premium Core Components
Measurements matter : whether you’re measuring in cups or kilos, getting the right amount of ingredients helps keep everything balanced.
For this corn recipe, you’ll need 4 ears of fresh corn on the cob (that's about 1 kg if you're a metric fan).
Quality Counts : Next up, look for corn that's still in its husk and gives off a sweet, grassy scent. You want kernels that are plump and firm avoid any that look shriveled.
Storage tips : fresh corn can hang out in your fridge for about 1-3 days . keep it in a plastic bag but don't husk it until you’re ready to cook it.
If you’ve got leftovers, they can last about 3-5 days in the fridge once cooked. honestly, though, there’s rarely leftover corn in my house the kids devour it!
Signature Seasoning Blend
Getting the right flavors is what makes or breaks this dish. So let’s sprinkle in some love with essential seasonings.
Spice combinations : for our herb butter, we’ve got things like fresh parsley and chives to jazz it up. you know those moments when you think, “i should have added more garlic”? use 1 teaspoon of garlic powder trust me, it’s a game changer.
Flavor Enhancers : Don’t forget the magic of lemon juice . Just a splash brightens everything up. It’s what elevates that roasted corn into something you can’t get enough of.
Smart Substitutions
Sometimes life throws you a curveball, and you find yourself short on ingredients. No biggie!
Common Alternatives : If you can’t find fresh corn, frozen corn works, too. Just throw it in a baking dish, and you’re good to go!
Dietary Modifications : Going vegan? Swap out the butter for a plant based alternative, and you’re still in the clear flavor department.
Emergency Replacements : Run out of an herb? No stress! Try dried versions or see what you have on hand. Basil instead of chives? Totally fine!
Kitchen Equipment Essentials
Time to grab your gear! Here are the must haves for this recipe:
Must have Tools : You’ll need a large baking sheet (to catch all that goodness), some aluminum foil (if you want that steamy texture), and a mixing bowl for that herb butter.
Alternative Equipment Options : Don’t have a brush to apply the butter? Use the back of a spoon works just fine!
Getting Ready to Roast!
So here’s where we’re at. You’ve got your corn, seasonings, and tools ready to roll. It’s easy as pie. Start by preheating your oven to 400° F ( 200° C) .
Prep the corn : husk those bad boys, rinse and pat them dry. coat them with a drizzle of olive oil and a sprinkle of salt.
They’ll be so delicious you won’t believe it!
Wrapping Up
This isn’t just about corn; it’s about making that perfect oven roasted corn on the cob that’ll steal the show at your next barbecue.
Now, if you're feeling ambitious, let’s get into how to make this recipe sing with the full instructions. trust me, you’ll want to serve these alongside a big platter of grilled meats or maybe toss them into a fresh salad pasta.
It’s like summer in every bite!
Next up, we’re diving into the how-to’s —stay tuned and prepare to yum!
Unleashing the Magic of oven-roasted Corn on the Cob
If there’s one summer treat that makes me feel like a kid again, it’s definitely corn on the cob ! seriously, there’s something about biting into that juicy sweetness that’s just pure magic.
Today, let’s dive into the art of oven-roasted corn on the cob with herb butter . it’s simple, it’s fun, and trust me, you’ll want to share this with friends and family!
Essential Preparation Steps
First things first, let’s talk mise en place . this fancy french term just means getting everything ready. you’ll want 4 fresh ears of corn (about 1 kg worth) and all your ingredients lined up.
Be sure to husk your corn and rinse it off no one wants sandy corn, right?
Time management is key, too. this recipe has a quick prep time of 10 minutes , followed by 25 minutes in the oven, making the total just 35 minutes .
You can even whip up your herb butter while the corn's roasting multitasking is the name of the game!
Don’t forget about safety! Always keep things clean. Washing your hands after touching raw veggies is a must, people!
Step-by-step Process
Ready to get cooking? Let’s break it down:
Preheat the Oven : Set it to 400° F ( 200° C) . This is the magic number for crispy, roasted goodness.
Prepare the Corn : Husk those suckers, rinse them off, and dry ‘em well.
Coat with Oil : Place the corn on a baking sheet, drizzle with 1 tbsp of olive oil , and sprinkle with salt. Roll those babies around to coat them evenly.
Wrap (Optional) : Want a steaming effect? Wrap each ear in aluminum foil. It keeps them super moist.
Bake the Corn : Toss ’em in your preheated oven for 25 minutes , flipping halfway through. You’re aiming for tender kernels that are lightly charred.
Ooo, that smell is going to be enough to have you drooling!
Expert Techniques
Now, let’s get a bit fancy. making that herb butter is where the magic happens. mix ½ cup of softened unsalted butter with 2 tbsp of fresh parsley , 2 tbsp of fresh chives , and a splash of lemon juice .
Stir it all together until you have a spreadable delight.
Here’s a pro tip: Don’t skip tasting. Adjust the seasoning to your liking more salt? More garlic powder? You do you!
Oh, and keep an eye on the corn in those last few minutes. Overcooking can lead to tough kernels, and we don’t want that!
Success Strategies
Now, let’s avoid some common pitfalls. Overcooked corn is a big no-no, so check for those juiciness alerts! If it’s shriveled, it’s too late.
For guaranteed quality, ensure your corn is fresh . If possible, buy it the same day you plan to cook it. Old corn tends to be starchy instead of sweet.
Want to plan ahead? You can husk and prep your corn the day before just keep it in the fridge, wrapped in a damp paper towel.
Final Thoughts & Delicious Options
When it comes to side dishes, oven baked corn on the cob in foil really shines. pair it with a crisp salad, like a refreshing pasta salad or some classic coleslaw, for the perfect summer feast.
And of course, it goes wonderfully with grilled meat think juicy burgers or bbq chicken.
With the right timing and love, you’ll have the most tender, flavorful corn on the cob that’ll become the envy of all your bbqs.
So get ready to enjoy every bite of that charred, buttery goodness!
After you've mastered this dish, there's always more to explore in the kitchen. Stay tuned for some additional information on more delicious recipes to try because who doesn’t love a good meal?
Additional Recipe Information: oven-roasted Corn on the Cob with Herb Butter
Alright, friends! let’s dive deeper into the glorious world of corn on the cob in the oven . whether you’re prepping for a backyard barbecue or just want a tasty side with your dinner, this recipe will become your go-to.
I’ve got some tips, tricks, and fun variation ideas that’ll have you and your crew raving about it.
Pro Tips & Secrets
First up, let’s talk pro tips . chef’s got some insights for ya! when you roast corn, freshness is key . look for corn with bright green husks and moist silks, trust me it makes a difference! a little olive oil does wonders too.
Just a drizzle can really amp up the flavor.
Just to save you some time in the kitchen, don’t fuss too much with the husking. it’s just corn! but to save on cleanup, you might want to wrap each ear in foil think of it like a cozy corn blanket.
It helps retain all those sweet juices.
Wanna take it up a notch in flavor? Try adding a sprinkle of smoked paprika to your herb butter. It’s a game changer! Seriously, your taste buds will do a happy dance.
Perfect Presentation
Ah, presentation let’s make your roast corn look as beautiful as it tastes! after you slather on that luscious herb butter, garnish with a sprinkle of fresh parsley or even some crumbled feta cheese for that extra pop of color.
If you're feeling fancy, plate it up with a neat row of roasted corn. use a mix of yellow and bi-color corn for a stunning display.
Also, don’t forget to serve it in a cute basket with some napkins! It’s just more fun that way. You could call it the "corn cart".
Storage & make-ahead
Now for the boring stuff storage. but hey, it’s important! if you have leftovers (not likely, but just in case), wrap the corn tightly in foil and store it in the fridge.
It should be good for about 3 days . when you’re ready to dig in again, just reheat it in the oven at 350° f for about 10 minutes .
And if you’re like me and love making things ahead of time, you can prepare the herb butter in advance and store it in the fridge.
Just make sure to take it out a bit early so it can soften up before you’re ready to use it.
Creative Variations
Now, don’t stick to just one version! let’s get creative with those creative variations . feeling adventurous? try mexican corn on the cob with a sprinkle of chili powder and a squeeze of lime after your herb butter.
Or, you can swap out the butter for a dairy-free alternative, making it vegan friendly. trust me, it’ll still be delicious!
If you're in the mood for something seasonal, try throwing in some herbs that are fresh right from your garden or farmer's market.
Basil in the summer or thyme in the fall can really make everyday into a special occasion.
Complete Nutrition Guide
And let’s chat about the good stuff nutrition! each ear of your oven baked corn on the cob in foil contains about 210 calories , with a good mix of fiber, vitamins, and minerals.
It's a satisfying addition to any meal. just keep your portion size in check; one ear usually does the trick.
You can absolutely feel great about serving this as one of your veggie side dishes . It’s packed with health benefits, especially when enjoyed fresh.
In Conclusion
So there you have it! with these tips and variations, your oven roasted corn on the cob will shine bright at any gathering.
It’s easy, delicious, and brings the best of summer right to your kitchen. give this recipe a whirl, and you’ll see! remember, whether it’s a roasted corn on the cob for a weeknight or a bbq bash it’s all about enjoying good food with great company.
Happy cooking!
Frequently Asked Questions
How do I make corn on cob in oven without wrapping it in foil?
You can easily roast corn directly on a baking sheet without foil. Simply coat the corn in olive oil and sprinkle with salt before placing it in the preheated oven. This method allows for that lovely charred effect without trapping the moisture too much, resulting in tender, flavorful corn.
What is the best way to season corn on cob in oven?
For an easy yet delicious seasoning, use an herb butter mixture as described in the recipe. Combining softened butter with fresh herbs like parsley and chives, along with garlic powder and a splash of lemon juice, creates a lovely flavor that enhances the natural sweetness of the corn.
Feel free to experiment with spices to suit your tastes!
Can I prepare corn on the cob ahead of time?
While it’s best to enjoy corn on the cob fresh out of the oven for optimal taste, you can prep the corn by husking and seasoning it, then keeping it covered in the fridge until you’re ready to cook. Just make sure to bake it the same day for the freshest flavor.
If you have leftovers, store them in an airtight container in the fridge for up to 3 days.
Is corn on the cob healthy?
Corn on the cob can be a healthy addition to your diet when enjoyed in moderation. Each ear contains fiber, vitamins, and minerals, which can contribute to a balanced diet. Just keep an eye on the butter and salt used, particularly if you're watching your sodium intake or calorie count.
What type of corn is best for roasting in the oven?
Fresh sweet corn, typically sold in the husk and with a bright yellow or gold color, is the best choice for roasting. Look for ears that feel heavy for their size with plump, moist kernels. Avoid dry or shrivelled ears, as they may not roast well and could result in a less than-pleasant texture.
Can I use frozen corn for corn on the cob in oven?
Yes, you can use frozen corn, but the method changes slightly. Instead of using whole ears, spread out the frozen corn kernels in a baking dish with your preferred seasoning. Roast in the oven until warmed through and slightly caramelized for similar delicious results even without fresh corn!
oven roasted Corn On The Cob With Herb Butter