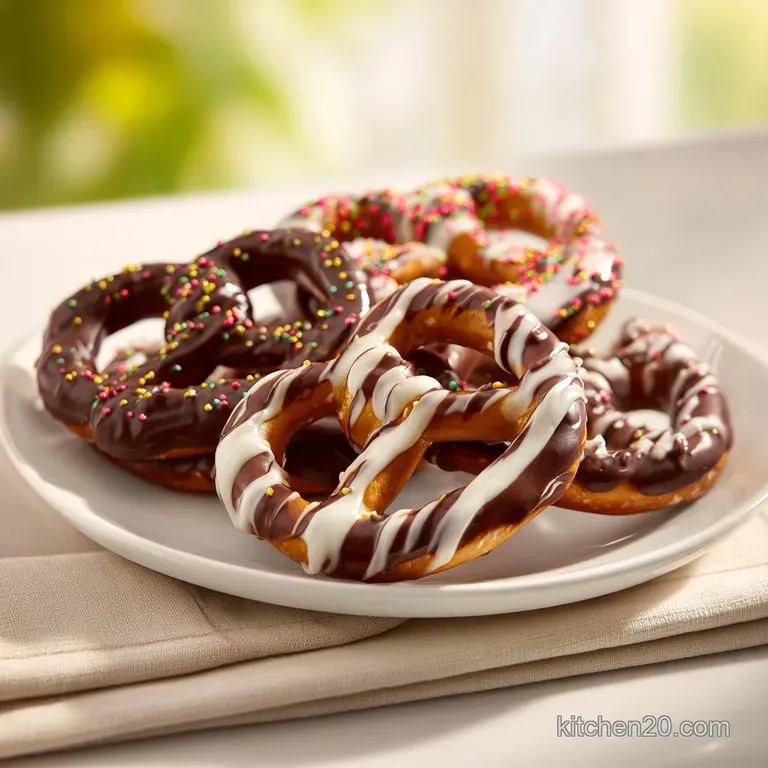
Chocolate Covered Pretzels: Pro Snap Finish
- Time: Active 10 minutes, Passive 5 minutes, Total 15 minutes
- Flavor/Texture Hook: Glossy, snap hard chocolate shell with a salty, crunch heavy finish
- Perfect for: Last minute gifting, movie nights, or a low cost party snack
- Creating Perfectly Snappy Chocolate Covered Pretzels
- Why This Recipe Works
- Essential Metrics for Sweet and Salty Success
- The Minimalist Shopping List for Maximum Crunch
- Tools to Streamline Your Dipping Workflow
- Master the Microwave Seeding and Dipping Process
- Fix Bloom and Soggy Bases with Ease
- Making Your Snacks Friendly for Every Diet
- Keeping Your Treats Crispy for the Long Haul
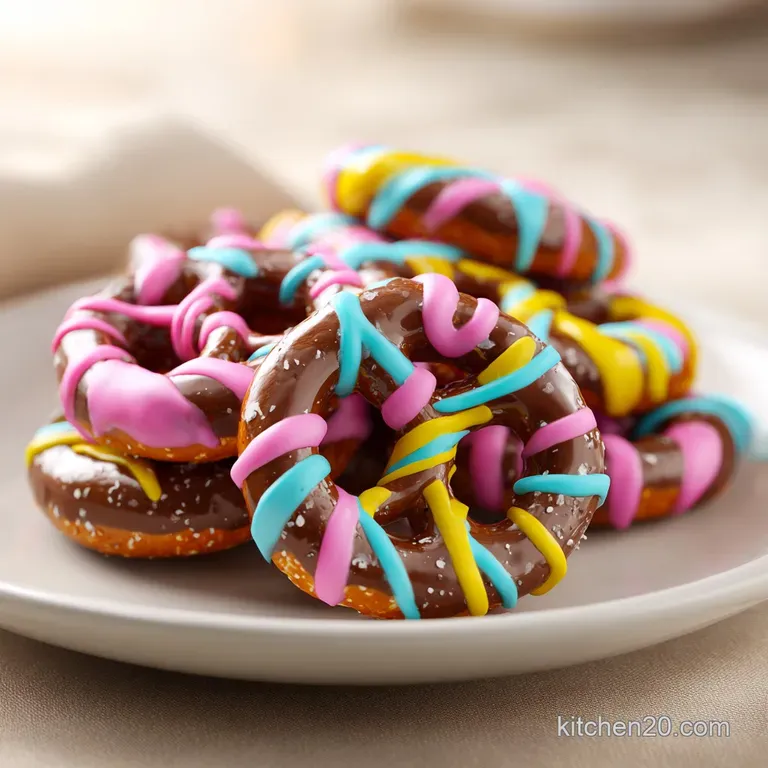
- Visual Flourishes to Make Your Snacks Pop
- Recipe FAQs
- 📝 Recipe Card
Creating Perfectly Snappy Chocolate Covered Pretzels
We've all been there. You melt a bag of chocolate chips, dip your pretzels, and wait for them to set. Two hours later, the chocolate is still tacky, it leaves smears on your fingers, and it looks matte and gray instead of glossy and deep.
It’s a mess, it's frustrating, and honestly, it’s a waste of good chocolate. That "bendable" chocolate texture happens because the cocoa butter molecules are chaotic and disorganized.
If you don't give them a "code" to follow, they just won't behave, leading to a soft, sweaty snack that loses its crunch within a day.
The fix isn't some fancy culinary school degree or a $50 digital thermometer. It’s all about a technique called seeding. By holding back a portion of your solid chocolate and stirring it into the melted pool at the end, you’re providing stable crystals that tell the rest of the mixture how to solidify.
Think of it like a software update for your dessert. Once I started doing this, my pretzels went from "home-made struggle" to "boutique level gourmet."
You want that specific sound that sharp snap when you bite through the shell followed immediately by the salt hitting your tongue. We’re using a high-quality semi sweet chocolate here because it offers a sophisticated bitterness that cuts right through the starch of the pretzel.
Plus, we're adding a tiny bit of refined coconut oil. This isn't just for shine; it thins the chocolate just enough to prevent that thick, gloopy layer that overwhelms the pretzel's natural crunch. Let’s get into how we make this happen without any of the usual stress.
Why This Recipe Works
To get that professional finish, we have to respect the thermodynamics of cocoa butter without making it feel like a chore. This recipe uses a few creative shortcuts to ensure the chocolate sets hard and stays shiny.
- Seeding Stabilization: By adding unmelted chocolate to the warm mixture, we introduce stable "Beta" crystals. These act as a template, forcing the melted fat to align in a tight, organized structure that shatters rather than bends.
- Viscosity Control: Refined coconut oil breaks the surface tension of the melted chocolate. This creates a more fluid "dip" that flows into the crevices of the pretzel twists, ensuring an even coating without a heavy, waxy buildup.
- Flash Chilling: Sending the pretzels straight to the fridge for 20 minutes "shocks" the fat into a solid state. This prevents the sugar and fat from migrating to the surface, which is exactly how you avoid those ugly gray streaks known as bloom.
- Osmotic Balance: The flaky sea salt isn't just a garnish; it pulls out the deeper notes of the cacao. The coarse grains provide a physical barrier that keeps the chocolate from feeling overly cloying on the palate.
| Method | Time | Texture | Best For |
|---|---|---|---|
| Microwave Seeding | 15 minutes | Professional snap, high gloss | Fast results, best flavor |
| Double Boiler | 20 minutes | Very smooth, consistent heat | Large batches, prevents burning |
| Candy Melts | 10 minutes | Waxy, duller finish | Beginners, humid environments |
The choice of method depends on your patience. While candy melts are the ultimate budget shortcut, they lack the cocoa butter that makes a real Chocolate Fudge texture so velvety. For this recipe, we are sticking with real chocolate because the flavor payoff is massive compared to the minimal extra effort of the seeding step.
Essential Metrics for Sweet and Salty Success
Getting the ratio right is the difference between a soggy pretzel and a crisp masterpiece. These numbers are your guardrails to ensure every dip is as consistent as the last one.
| Component | Science Role | Pro Secret |
|---|---|---|
| Semi Sweet Chocolate | Structural Base | Use bars, not chips, for a smoother melt and better fat content. |
| Refined Coconut Oil | Emulsifier/Thinner | Always use "refined" to avoid an unwanted tropical coconut aroma. |
| Pretzel Twists | Salty Foundation | Check for "extra dark" or high baked pretzels for more structural integrity. |
The humidity in your kitchen can actually change how the chocolate behaves. If you're working on a rainy day, the chocolate might seize if it catches any steam. Keep your workspace bone dry. Even a single drop of water in your bowl can cause the chocolate to turn into a grainy, unworkable paste.
The Minimalist Shopping List for Maximum Crunch
You don't need a massive pantry for this. We’re focusing on high impact ingredients that carry their weight. If you're looking for another project after this, these ingredients overlap beautifully with my Triple Chocolate Brownies if you have leftover bars.
- 1 lb mini twist pretzels or pretzel rods: Twists offer more surface area for salt to "catch," while rods are easier for mass production dipping.
- 12 oz high-quality semi sweet or dark chocolate (60% cacao), chopped: Why this? Lower cacao percentages (like milk chocolate) stay soft and don't snap as well.
- Substitute: Bittersweet chocolate (70%+) works if you prefer a less sweet, more intense bite.
- 2 tsp refined coconut oil: Why this? It provides a professional sheen without the need for complex tempering machines.
- Substitute: 1 tsp of vegetable shortening if coconut oil isn't available.
- 1 tsp flaky sea salt: Why this? The flat crystals provide a concentrated burst of salt without the chemical "sting" of table salt.
- Substitute: Himalayan pink salt, though the texture is slightly harder.
When selecting your pretzels, look for bags that haven't been crushed. You want whole, unbroken twists to ensure the dipping process is smooth. If you find yourself with a lot of broken pieces at the bottom of the bag, don't toss them they make an incredible topping for ice cream or a "trash" cookie mix.
Tools to Streamline Your Dipping Workflow
Having your "coding" station set up before you start melting is non negotiable. Chocolate waits for no one, and once it starts to cool, it thickens rapidly.
- Microwave safe glass bowl: Glass retains heat better than plastic, keeping your chocolate fluid for a longer dipping window.
- Parchment paper or silicone mat: Do not use foil; the chocolate will bond to it and you'll be peeling metal off your snacks.
- Dipping fork or a regular dinner fork: A fork allows the excess chocolate to drain back into the bowl through the tines.
- Large baking sheet: This provides a flat surface for the flash chill in the refrigerator.
Chef's Tip: If your kitchen is particularly cold, place your glass bowl of chocolate on top of a heating pad set to "low." This keeps the chocolate at the perfect dipping viscosity for twice as long without overcooking it.
Master the Microwave Seeding and Dipping Process
Success here is all about the "30 second rule." You cannot rush the melting process. If you overheat the chocolate, you'll burn the milk solids or sugar, and the whole batch will become bitter and gritty.
- Prepare the landing zone. Line a large baking sheet with parchment paper or a silicone mat. Clear a space in your fridge big enough for the sheet to sit perfectly flat. Note: This prevents the chocolate from pooling on one side.
- Divide and conquer. Place 9 ounces of your chopped chocolate into the glass bowl. Set the remaining 3 ounces aside. This small pile of "seed" chocolate is your insurance policy for a hard set.
- The gentle melt. Add the 2 teaspoons of coconut oil to the bowl. Microwave in 30 second bursts at only 50% power. Note: Full power is too aggressive and will scorch the edges.
- Stir vigorously. Between every 30 second burst, stir the chocolate for at least 15 seconds. The residual heat does more work than the microwave itself. Stop when about 90% is melted.
- Initialize the seed. Drop the remaining 3 ounces of solid chocolate into the bowl. Stir continuously until the solids disappear and the mixture looks glossy and silky. Note: This drops the temperature to the ideal "working" range.
- The immersion dip. Drop a pretzel into the bowl. Use your fork to push it under. Note: Ensure the entire twist is submerged so no moisture from the air can soften the pretzel later.
- The drainage tap. Lift the pretzel with the fork. Tap the fork handle against the side of the bowl 4 or 5 times. Cook until the excess chocolate stops dripping in a steady stream and starts to slow to a drip.
- The release. Slide the pretzel onto the parchment. If a "foot" starts to form, use a toothpick to drag the excess away.
- The salt finish. Immediately sprinkle a tiny pinch of flaky salt over the wet chocolate. Wait until you see the salt stick before moving to the next one.
- The flash chill. Transfer the sheet to the fridge for exactly 20 minutes. Until the surface is matte and firm to the touch, do not try to move them.
Fix Bloom and Soggy Bases with Ease
Even with the seeding method, things can go sideways if the environment isn't right. The most common heartbreak is the "soggy pretzel," which usually happens when the chocolate wasn't set fast enough or the pretzels were stale to begin with.
Why Your Chocolate Has Gray Streaks
This is called "fat bloom." It happens when the chocolate cools too slowly or gets too warm after it has set. The fat separates and rises to the top. It’s still safe to eat, but it looks unappealing. The fix is the 20 minute flash chill.
By forcing the fat to stay in place with cold air, you lock in that deep brown color.
Why Your Chocolate is Thick and Clumpy
If your chocolate looks like mud rather than silk, you’ve likely "seized" it. This happens if a tiny bit of water gets into the bowl. Even steam from a nearby boiling pot can do it.
If this happens, you can sometimes save it by adding a teaspoon of neutral oil and whisking like crazy, but it will never be a dipping chocolate again. It’s better for drizzling at that point.
| Problem | Root Cause | Solution |
|---|---|---|
| Soft Coating | Improper tempering/No seeding | Re melt with more "seed" chocolate or store only in the fridge. |
| Pretzel Softness | Moisture trapped under chocolate | Ensure pretzels are fresh; don't dip if they feel "bendy." |
| "Foot" at Base | Too much excess chocolate | Tap the fork more times; use a cooling rack for better drainage. |
Common Mistakes Checklist:
- ✓ Never use a wet spoon or bowl (prevents seizing)
- ✓ Don't skip the 50% power setting on the microwave (prevents burning)
- ✓ Avoid over seeding; if the chocolate gets too cold, it becomes too thick to dip
- ✓ Always use parchment paper, never wax paper for hot chocolate
- ✓ Ensure the sea salt is added while the chocolate is still "wet" and shiny
Making Your Snacks Friendly for Every Diet
This recipe is naturally vegetarian, but you can easily pivot based on who you're feeding. The budget smart approach means we don't buy expensive specialized kits; we just swap the core components.
Vegan & dairy-free Swap
Most dark chocolates (60% or higher) are naturally vegan, but always check the label for "milk solids." Swap the semi sweet for a confirmed dairy-free brand. Since we already use coconut oil, the texture will remain identical. Avoid using margarine as a thinner; the water content will seize the chocolate instantly.
Low Sugar Adaptation
You can use keto friendly chocolate chips (sweetened with stevia or erythritol). Note that these often have a higher melting point and may require an extra teaspoon of coconut oil to get the same fluid consistency. The "snap" will be slightly less pronounced, but the salty sweet vibe remains.
Same Gourmet Flavor in Half the Time
If you're in a rush, you can skip the full dip. Place the pretzels on the sheet and use a spoon to "zig zag" the chocolate over them. You get the same flavor profile with 70% less labor. It’s the ultimate "fusion" of efficiency and taste.
Keeping Your Treats Crispy for the Long Haul
Storage is where most people lose the battle. If you leave these out on the counter in a humid room, the pretzels will pull moisture from the air through the thin spots in the chocolate and turn into cardboard.
- Fridge Storage: Keep them in an airtight glass container for up to 2 weeks. The cold keeps the snap crisp and the salt crystals sharp.
- Freezer Guide: You can freeze these for up to 3 months. However, when you thaw them, do it in the fridge first. Moving them directly from the freezer to a warm counter will cause "sugar bloom" (condensation that dissolves the sugar and leaves a sticky, grainy mess).
- Zero Waste Tip: If you have leftover melted chocolate, stir in any broken pretzel bits and a handful of nuts. Pour it out onto parchment, let it set, and you have "Pretzel Bark." Nothing goes to waste.
Visual Flourishes to Make Your Snacks Pop
If you're making these for a specific holiday, the salt is just the beginning. The "coding" for a great looking snack is all about layers.
The Seasonal Finish
For Christmas, a crush of peppermint candy adds a sharp red contrast. For Easter, a drizzle of white chocolate (tinted with oil based food coloring) creates a pastel pop. Just remember that any toppings must be added within 60 seconds of dipping, or they won't adhere.
Precision Salt Placement
Instead of shaking the salt over the whole tray, aim for the "center" of the twist. This creates a focal point for the eye and ensures every bite has exactly the right amount of sodium. It looks more intentional and professional than a random dusting.
Creating the Contrast Drizzle
If you want that striped look, wait for the first layer to set in the fridge for 5 minutes. Melt a small amount of white chocolate, put it in a sandwich bag, and snip a tiny corner off. Rapidly move your hand back and forth over the pretzels.
This "fast and creative" movement ensures thin, elegant lines rather than thick, clunky globs.
This recipe proves that you don't need a massive budget or a professional kitchen to make snacks that people will actually fight over. It's about working smarter with the ingredients you have, respecting the science of the melt, and never settling for a soggy pretzel. Right then, let's get dipping.

Recipe FAQs
What is the best chocolate to use for dipping pretzels?
Use a high-quality semi sweet or dark chocolate with 60% cacao. This ensures a rich flavor profile and the proper fat content for a glossy, professional finish.
How to make chocolate coated pretzels?
Melt 9 ounces of chopped chocolate with 2 teaspoons of coconut oil in 30-second bursts at 50% power, stir in the remaining 3 ounces of solid chocolate to temper the mixture, then dip each pretzel and chill for 20 minutes on a parchment lined sheet.
How to get the easiest finish when dipping?
Immerse each pretzel fully using a fork or dedicated dipping tool, then tap the tool against the side of your bowl to remove excess chocolate before placing it on your prepared baking sheet.
How many days before a party can you make these?
You can prepare these up to two weeks in advance. Simply store them in an airtight container to maintain the signature snap of the chocolate shell.
Is it true you need a double boiler to get a shiny coating?
No, this is a common misconception. You can achieve a professional, glossy finish by using the seeding technique in your microwave, which provides stable crystals for the chocolate to set properly.
How to prevent the chocolate from turning gray or soft?
Always incorporate the final 3 ounces of 'seed' chocolate after removing the bowl from the microwave. This step stabilizes the cocoa butter molecules, preventing the messy, tacky texture that occurs when chocolate is melted unevenly.
How to ensure the salt stays on the chocolate?
Sprinkle the flaky sea salt onto the pretzels immediately after placing them on the baking sheet. Adding it while the coating is still wet ensures the salt adheres perfectly to the shell as it flash chills in the refrigerator.
Professional Chocolate Covered Pretzels
Ingredients:
Instructions:
Nutrition Facts:
| Calories | 91 kcal |
|---|---|
| Protein | 1.6 g |
| Fat | 3.2 g |
| Carbs | 13.6 g |
| Fiber | 1.2 g |
| Sugar | 3.8 g |
| Sodium | 148 mg |
