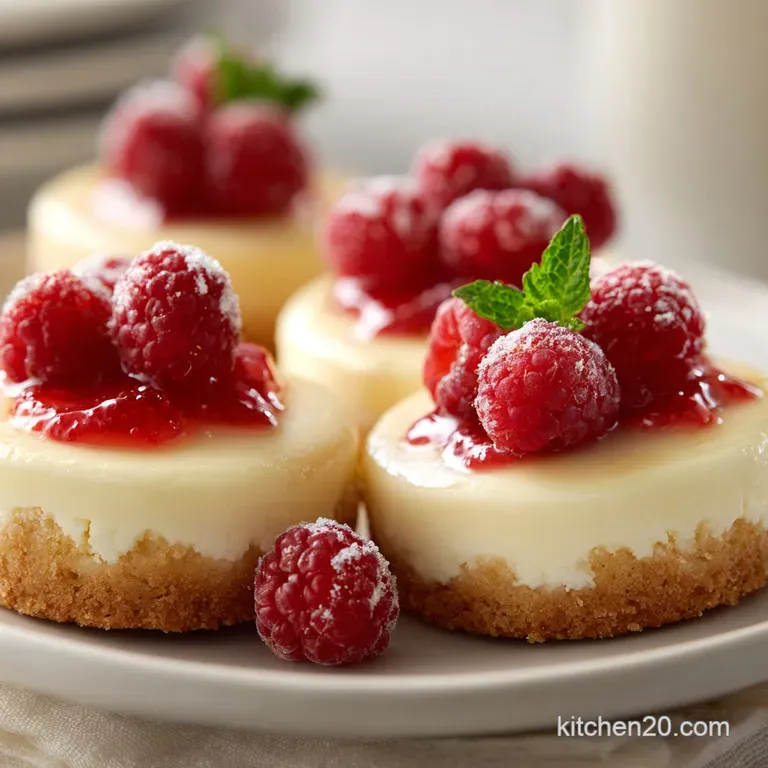
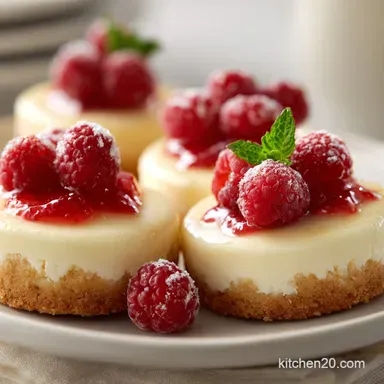
Cheesecake Cookies: Soft and Creamy

- Time: Active 20 minutes, Passive 2 hours 10 mins, Total 2 hours 30 mins
- Flavor/Texture Hook: Tangy, velvety center with a golden graham cracker shatter crust
- Perfect for: Weekend hosting, holiday gift boxes, or revolutionizing your cookie exchange
- Crafting the Perfect Cheesecake Cookies Updated Recipe for Home Bakers
- The Secret Mechanism Behind the Soft Creamy Center
- Choosing Your Strategy for Serving Size and Scale
- Essential Specs and Precise Metrics for Success
- Selecting High Quality Elements for Your Cookie Dough
- Necessary Tools for Your Innovative Kitchen Platform
- Mastering the Method for Velvety Results Every Time
- How to Resolve Common Baking Texture Issues
- Innovative Flavor Adaptations and Ingredient Alternatives
- Preservation Strategies for Long Lasting Freshness
- Next Level Plating Designs for Every Occasion
- Recipe FAQs
- 📝 Recipe Card
Crafting the Perfect Cheesecake Cookies Updated Recipe for Home Bakers
Imagine walking into a kitchen where the air is heavy with the scent of toasted graham crackers and the sharp, bright tang of warm cream cheese. It’s that specific sensory "ping" that tells you something special is happening in the oven.
I first experimented with this cheesecake cookies updated recipe during a tech themed housewarming party where I wanted to serve something that felt both classic and innovative. Most cookies are either soft or crunchy, but these are a hybrid.
They offer a velvety, almost fudge like interior that mirrors a New York style cheesecake, protected by a crumbly, buttery exterior.
The magic happens when the cold creaminess of the dairy meets the heat of the oven. You get that slight sizzle at the edges while the center remains remarkably tender. We’ve all had those "cheesecake" cookies that are just dry sugar cookies with a tiny bit of cream cheese flavor, but we are looking for a complete revolution here.
This isn't just a cookie; it's a connected experience of textures that works because we are treating the dough like a stable emulsion rather than just a pile of sugar and flour.
Right then, let's talk about why we are updating the classic. Most older recipes result in a flat, greasy disc because the fat ratios are off. By adjusting the proteins and the chilling time, we create a structural platform that holds its shape while staying soft for days.
This version is about precision and connection connecting high-quality ingredients with a method that actually respects the chemistry of dairy. You’ll see exactly what I mean the moment you take that first bite and the graham cracker crust shatters against the silky filling.
The Secret Mechanism Behind the Soft Creamy Center
Understanding how these ingredients interact is like looking at the source code of a great piece of software. It’s not just about mixing; it’s about how the molecules interface to create that specific cheesecake like bite.
- Fat Stabilization: The combination of cold butter and cream cheese creates a reinforced fat network that prevents the cookies from collapsing into a greasy puddle during the bake.
- Yolk Emulsification: Adding an extra egg yolk provides lecithin, which acts as a bridge between the water based liquids and the fats, ensuring a velvety, uniform texture that doesn't feel "bready."
- Starch Hydration: The two hour chill allows the flour to fully absorb the moisture from the cream cheese, which is the secret to getting a soft, dense crumb rather than a dry, crumbly one.
- Acid Interaction: The natural acidity in the Philadelphia cream cheese reacts slightly with the baking powder, providing a tiny bit of lift that keeps the center from becoming heavy or gummy.
Choosing Your Strategy for Serving Size and Scale
Before we get the mixer running, we need to decide on our output. Whether you are hosting a small gathering or revolutionizing a large event, scaling this cheesecake cookies updated recipe requires a bit of tactical planning.
| Servings | Ingredient Adjustments | Pan Size | Cook Time |
|---|---|---|---|
| 9 Cookies | Half all ingredients; use 1 egg yolk only | 1 Large sheet | 10 minutes |
| 18 Cookies | Standard recipe as listed in schema | 2 Large sheets | 10 minutes |
| 36 Cookies | Double ingredients; use 3 eggs total | 4 Large sheets | 12 minutes (rotate) |
When you double this recipe, the thermal mass of the dough in the fridge takes longer to cool down. If you're making 36 cookies, I suggest chilling the bulk dough for 3 hours instead of 2 to ensure the centers are properly set before they hit the heat.
Essential Specs and Precise Metrics for Success
Precision is the heartbeat of this recipe. We aren't just "eyeballing" things here; we are building a consistent flavor profile that relies on exact numeric checkpoints to ensure every batch is a success.
- Chilling Temperature: Your refrigerator should be at 38°F (3°C) or lower to ensure the fats in the Philadelphia cream cheese solidify enough to prevent excessive spreading.
- Internal Temp: For a "fudgy" cheesecake center, pull the cookies when the internal temperature hits 175°F (80°C), even if they look slightly underdone.
- Dough Weight: Each portion should weigh approximately 35-40 grams to ensure the 10 minute cook time remains accurate.
| Feature | Fresh From Scratch | Shortcut (Store Mix) |
|---|---|---|
| Texture | Velvety, dense, and rich | Airy, crumbly, and dry |
| Flavor Profile | Bright tang, deep vanilla | Artificial sweetness |
| Storage Life | 5 days (stays soft) | 2 days (hardens) |
The fresh version wins every time because of the moisture content in the real cream cheese. Using a store-bought mix often lacks the lactic acid needed to cut through the sugar, resulting in a one note flavor that lacks the "connected" depth we are looking for in an updated recipe.
Selecting high-quality Elements for Your Cookie Dough
The ingredients for this cheesecake cookies updated recipe act as the hardware for our dessert. If the components are subpar, the final output will lag. We are looking for specific brands and types to ensure the architecture of the cookie holds up.
| Ingredient | Science Role | Pro Secret |
|---|---|---|
| Philadelphia Cream Cheese | Provides acid and fat for the "tang" | Use the full fat block, never the tub or spread |
| Unsalted Butter | Creates a flaky, buttery structure | Use European style butter for higher fat content |
| Extra Egg Yolk | Adds richness and prevents toughness | Room temperature yolks blend faster into the fats |
| Graham Cracker Crumbs | Adds texture and toasted honey notes | Pulse fresh crackers instead of buying pre ground |
- 8 oz Philadelphia Cream Cheese: The gold standard for stability. Why this? Higher fat to water ratio ensures the cookie doesn't steam and become cakey.
- 1/2 cup unsalted butter: Room temperature (about 65°F/18°C) is key. Why this? It creams with the sugar to create tiny air pockets for a soft bite.
- 3/4 cup granulated sugar: Provides sweetness and helps with browning. Why this? Fine crystals dissolve better into the cream cheese base.
- 1 large egg + 1 large egg yolk: Our structural binders. Why this? The extra yolk adds a custardy richness that mimics real cheesecake.
- 2 tsp pure vanilla extract: For that deep, aromatic profile.
- 2 cups all purpose flour: The frame of the cookie.
- 1 tsp baking powder: Just enough lift to keep them light.
- 1/2 tsp fine sea salt: To balance the richness of the dairy.
- 1/4 cup graham cracker crumbs: For the signature "shatter" coating.
For those looking for a slightly different flavor profile, you can swap the granulated sugar for a 50/50 mix with light brown sugar. This will yield a chewier, more caramel forward cookie, though it will slightly mask the bright tang of the cream cheese.
Necessary Tools for Your Innovative Kitchen Platform
To execute this cheesecake cookies updated recipe properly, you need the right interface. A stand mixer is your best friend here because we need to beat the cream cheese and butter until they are completely unified.
- Stand Mixer: Use a paddle attachment to avoid whipping too much air into the dough.
- Digital Scale: For weighing dough balls to ensure even baking across the sheet.
- Silicone Baking Mats: These provide better insulation than parchment, helping the bottoms stay golden rather than burnt.
- Cookie Scoop (1.5 tbsp): This ensures your portions are consistent, which is the only way to guarantee the 10 minute cook time works for every single cookie.
- Wire Cooling Rack: Essential for stopping the cooking process immediately after the 5 minute rest on the pan.
Mastering the Method for Velvety Results Every Time
- Place the 8 oz Philadelphia cream cheese and 1/2 cup butter in the bowl of a stand mixer.
- Beat on medium speed for 3 full minutes until the mixture is ivory colored and perfectly smooth. Note: Any lumps now will show up as white spots in the baked cookie.
- Pour in 3/4 cup sugar and continue beating for another 2 minutes.
- Add the whole egg, the extra yolk, and the 2 tsp vanilla, mixing on low until the liquid is fully absorbed and the batter looks glossy.
- In a separate bowl, whisk together 2 cups flour, 1 tsp baking powder, and 1/2 tsp sea salt.
- Add dry ingredients to the wet mixture in three stages, mixing on low until just a few streaks of flour remain. Note: Overmixing at this stage will develop gluten and make the cookies tough.
- Transfer the dough to a bowl, cover tightly, and chill for 2 hours in the refrigerator.
- Preheat your oven to 350°F (175°C) and line your pans.
- Scoop 1.5 tablespoon portions, roll into smooth balls, and then roll them in the 1/4 cup graham cracker crumbs until they are fully "armored" in crust.
- Space them 2 inches apart and bake for 10 minutes until the edges are matte but the centers still look slightly damp.
- Let them rest on the hot pan for 5 minutes before moving them to a wire rack to set completely.
How to Resolve Common Baking Texture Issues
Even with a great recipe, the environment in your kitchen can change how the dough behaves. If you find your cookies aren't looking like the photos, it’s usually a small calibration issue with temperature or mixing speed.
Handling Excessive Cookie Spread
If your cookies are turning into thin pancakes, the most likely culprit is the temperature of the fats. Cream cheese is much softer than butter at room temperature, so it loses its structure quickly. Ensure the dough is truly cold before it hits the oven.
If the kitchen is hot, keep the dough in the fridge between batches.
Avoiding a Gummy or Heavy Center
A gummy center usually means the emulsification failed during the mixing process. If the eggs were cold when you added them to the creamed butter and cheese, the fat likely seized up. Always use room temperature eggs to ensure the batter stays a "connected" and smooth platform.
| Problem | Root Cause | Solution |
|---|---|---|
| Gritty texture | Sugar didn't dissolve | Cream butter and sugar longer (4-5 mins) |
| Tough, dry crumb | Overworked gluten | Mix flour only until just combined |
| Burnt bottoms | Oven rack too low | Bake on the middle rack and use silicone mats |
Common Mistakes Checklist
- ✓ Ensure cream cheese is the full fat block variety (spreads have too much water).
- ✓ Don't skip the 2 hour chill; it’s the most important step for the "updated" texture.
- ✓ Use a kitchen scale to ensure each cookie is the same size (approx 38g).
- ✓ Check your oven temperature with an external thermometer to verify it’s at 350°F.
- ✓ Let the cookies cool completely before stacking; the centers take an hour to fully set.
Innovative Flavor Adaptations and Ingredient Alternatives
One of the best things about this cheesecake cookies updated recipe is how easily it can be customized. You can think of the base dough as an operating system that accepts various "plugins" for different flavor profiles. If you're feeling adventurous, you might even consider how this tangy base would pair with other desserts, like my Mini Egg Cheesecake, which uses a similar dairy forward philosophy.
- If you want a fruity vibe, fold in 1/2 cup of freeze dried strawberry powder to the dry ingredients.
- If you want a chocolate version, replace 1/4 cup of the flour with high-quality cocoa powder and add chocolate chips.
- If you want a citrus kick, add the zest of two lemons and 1 tbsp of lemon juice to the wet ingredients.
| Original Ingredient | Substitute | Why It Works |
|---|---|---|
| All Purpose Flour | 1:1 gluten-free Blend | Xantham gum in blends mimics the structural "glue" of gluten |
| Graham Cracker Crumbs | Biscoff Cookie Crumbs | Adds a spiced, caramelized flavor profile. Note: Slightly sweeter than graham |
| Granulated Sugar | Coconut Sugar | Offers a lower glycemic option with a deep, toasty flavor |
Preservation Strategies for Long Lasting Freshness
Because of the high moisture content from the cream cheese, these cookies stay soft much longer than traditional butter cookies. However, they are also more "active" biologically, meaning they need proper storage to stay safe and fresh.
Storage: Keep these in an airtight container in the refrigerator for up to 5 days. They actually taste incredible when cold, which enhances the cheesecake sensation. If you prefer them soft, let them sit at room temperature for 15 minutes before eating.
Freezing: You can freeze the baked cookies for up to 3 months. I recommend freezing them in a single layer on a sheet pan first so they don't stick together, then transferring them to a heavy duty freezer bag.
You can also freeze the raw dough balls (pre graham cracker coating) and bake them from frozen just add 2 minutes to the bake time.
Zero Waste Tip: If you have leftover graham cracker crumbs, don't toss them! Mix them with a little melted butter and press them into the bottom of a muffin tin to make mini crusts for future baking projects.
Even the vanilla bean pods (if you use fresh) can be shoved into your sugar jar to create vanilla scented sugar.
Next Level Plating Designs for Every Occasion
Presentation is where you turn a simple bake into a revolutionizing food experience. I like to think of plating in three distinct levels, depending on who is sitting at your table. For a sophisticated finish, these cookies go beautifully alongside a slice of German Chocolate Cake if you're doing a full dessert spread.
- Level 1: Simple (The Tech Snack): Stack three cookies on a clean, white plate. No fuss, just the golden crumbs catching the light. Perfect for a casual afternoon of coding or reading.
- Level 2: Polished (The Dinner Party): Place a single cookie in the center of a slate board. Add a small dollop of raspberry coulis on the side and a single fresh mint leaf. It looks intentional and connected.
- Level 3: Restaurant (The Avant Garde): Crush one cookie into large chunks. Lay them over a "swoosh" of lemon curd. Add a few dots of toasted meringue and a sprinkle of sea salt. It deconstructs the cheesecake cookies updated recipe into a high end plated dessert.
| Plating Tweak | Effect | Best For |
|---|---|---|
| Dusting of powdered sugar | Covers imperfections, adds sweetness | Casual family brunch |
| Drizzle of dark chocolate | Adds bitterness to balance the tang | Late night dessert |
| Fresh berry garnish | Provides acid and bright color | Summer garden parties |
By focusing on these details, you aren't just baking you're creating a moment. Whether it's the specific "shatter" of the crust or the way the center stays velvety even after three days, this recipe is designed to be a reliable, high performing part of your kitchen repertoire.
Trust the process, respect the chill time, and you'll have a batch of cookies that people will be talking about long after the last crumb is gone. Enjoy the process of revolutionizing your cookie jar!

Recipe FAQs
Is it true I can skip the 2-hour chill time?
No, this is a common misconception. Chilling the dough for at least 2 hours is the single most important step to ensure the cookies hold their structure and maintain the intended chewy texture.
How to achieve the perfect cookie spread?
Use a kitchen scale to portion dough into 38g balls. Consistency in size ensures they bake evenly; if you enjoyed controlling the spread here, the same fat-to-flour ratio logic applies to our classic Italian cookies.
Why did my cookies come out too flat or oily?
You likely used a cream cheese spread instead of a block. Full fat block variety is mandatory because spreadable cream cheese contains excess moisture that ruins the dough's balance.
How to tell when the cookies are finished baking?
Remove them when the edges are set but the centers still look soft. Baking for exactly 10 minutes at 350°F is critical, as the carry over heat on the baking sheet finishes the centers during the 5-minute resting period.
Is it true I can use salted butter for this recipe?
No, stick to unsalted butter to maintain control over the salt levels. Since the recipe calls for 1/2 teaspoon of fine sea salt, using salted butter can lead to an overly aggressive flavor profile that masks the delicate cream cheese notes.
How to prevent the centers from remaining doughy?
Allow the cookies to cool completely on a wire rack for one hour. The centers require this additional time to fully set, as they are intentionally soft when first pulled from the oven.
How to properly incorporate the dry ingredients?
Add the flour mixture to the wet base on low speed until just combined. Stop immediately once the flour disappears to avoid overworking the gluten, which keeps the final cookie texture tender rather than tough.
Soft Cheesecake Cookies
Ingredients:
Instructions:
Nutrition Facts:
| Calories | 187 kcal |
|---|---|
| Protein | 2.8 g |
| Fat | 10.1 g |
| Carbs | 21.2 g |
| Fiber | 0.4 g |
| Sugar | 8.9 g |
| Sodium | 84 mg |
