The Ultimate Pan-Dripping Gravy
Recipe Introduction
Quick Hook
Ever wondered how to make gravy like your gran? The secret is homemade gravy , made with love and pan drippings. Honestly, it's easier than you think and tastes amazing .
Brief Overview
Gravy's a staple, innit? It is often thought of as a traditionally British addition to a roast. Our version is simple, quick and will elevate any roast dinner! It’s proper comfort food.
This brown gravy recipe easy peasy. Takes about 20 minutes. Makes enough for 8 hungry bellies.
Main Benefits
This homemade brown gravy is much healthier than shop bought stuff. Plus, it's the perfect addition for Thanksgiving cooking! This recipe is special because it uses the drippings for maximum flavour!
Get Ready for the Best Brown Gravy Ever
Let's be honest, no sunday roast is complete without lashings of gravy, right? and while those instant granules do in a pinch, there’s just no comparison to proper homemade gravy recipe .
Oh my gosh, the flavour!
This Beef Gravy Recipe (or turkey, or chicken whatever you fancy!) is so simple, even a cooking novice can nail it. Forget lumpy, bland gravy disasters.
This guide will help you to make a brown gravy recipe so easy. we're talking silky smooth, rich, and bursting with flavour.
Trust me, once you've tried this, you'll never go back to the packet stuff.
What You Need to Make This Magic Happen
Right then, let's gather our bits and bobs.
Here's what you need to make this beef gravy : pan drippings, flour, chicken broth, a splash of sherry (optional), thyme, and a good pinch of salt and pepper.
Remember to skim the fat!
Gravy Recipe No Drippings ? You can use butter instead of drippings with Beef bouillon or vegetable stock to add a nice flavor and mimic the richness.
Having the right tools will also make your life easier. You'll need a saucepan, a whisk (essential for lump free gravy!), and measuring spoons. And that’s it! Easy, right?
Alright, let's get down to the nitty gritty of gravy makin'! 'cause let's be honest, a roast dinner without proper homemade gravy is like a day without sunshine.
Nobody wants that! i'm gonna show you exactly what you need and why, without any of that fancy chef jargon.
Ingredients & Equipment: Gravy's Building Blocks
Here's what you'll need to whip up a batch of luscious homemade brown gravy . this brown gravy recipe is easy peasy, honestly.
No need to stress, even if you're a total beginner.
Main Ingredients
- Pan Drippings: 4 tablespoons (approx. 60ml), fat skimmed off from whatever lovely roast you've got going on. Quality Indicator: The richer the drippings, the better the gravy! Aim for dark brown, flavourful goodness, not watery stuff. We want flavour city.
- All-Purpose Flour: 4 tablespoons (30g). This is what thickens things up.
- Chicken Broth (low sodium): 4 cups (950ml). Quality Indicator: Low sodium is key so you can control the saltiness later! Nobody wants a gravy salt lick.
- Dry Sherry (optional): 2 tablespoons (30ml). This just adds a little something something if you're feeling fancy.
- Fresh Thyme Sprigs: 2-3 sprigs. Adds a subtle earthy flavour.
- Salt: To taste. Obvs.
- Black Pepper: Freshly ground, to taste. Always freshly ground, innit?
Seasoning Notes for Epic Gravy
Okay, so spices. this is where you can really make your gravy sing. for the beef gravy recipe or a rich homemade gravy recipe , you might want a pinch of smoked paprika it adds a lovely depth.
A dash of worcestershire sauce also gives it a kick. i've even thrown in a crumbled beef bouillon cube when i'm short on drippings, you know?
For a brown gravy recipe easy , don't overthink it! salt, pepper, and maybe a bay leaf simmering away will do wonders.
You can always sub the thyme for dried herbs like sage or rosemary if you're in a pinch. basically, trust your gut!
Equipment Needed: Keep It Simple
- Roasting pan. Where those precious drippings come from.
- Fat separator. (Optional, but seriously, get one. Makes life so much easier!)
- Whisk. Lumps are the enemy!
- Saucepan. To bring it all together.
- Measuring cups and spoons. For accuracy! (Mostly…)
Right then, easy brown gravy is achievable. just remember this simple equipment list. you don't need a load of fancy gear to whip up amazing beef gravy .
Honestly, sometimes i use a big spoon instead of a whisk (don't tell anyone!).
This thanksgiving cooking season or sunday roast, ditch the packet stuff. give this homemade gravy recipe a go. you won't regret it! even if your roast goes a bit pear shaped, a proper homemade gravy can save the day.
Trust me, i know! i've salvaged many a burnt offering with a generous dollop of silky smooth gravy. you've got this!
Right then, let's get this gravy train rollin'!
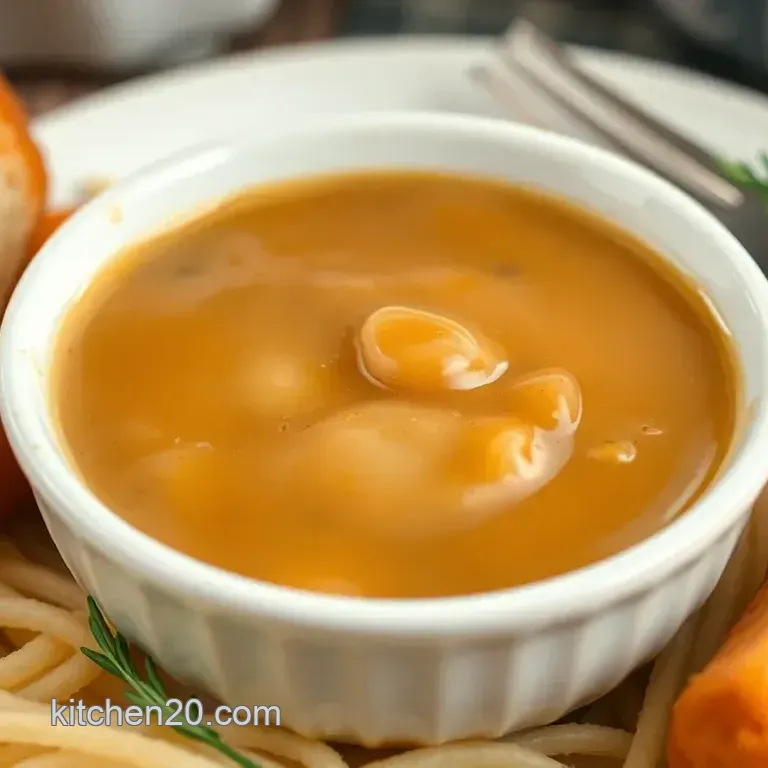
The Ultimate Pan-Dripping Gravy: Silky Smooth Every Time
Forget the granules, yeah? this homemade gravy , made from the delicious pan drippings of your roast bird (or other meat!), is a game changer.
It's rich, savory, and utterly moreish. we'll guide you through every step to achieve a perfectly smooth, lump free gravy that will have everyone fighting over the last drop.
Think proper sunday roast vibes! honestly, nothing beats real homemade gravy .
This gravy recipe no drippings also works nicely with butter instead of drippings, if you have zero pan juice!
It’s easy gravy. It’s a bit of science and a bit of elbow grease. Follow these steps and you'll nail it. The most difficult part is waiting for the roast to finish.
Prep Like a Pro: Your Essential Mise en Place
First things first, gather your troops! you need about 4 tablespoons (approx. 60ml) of pan drippings. skim off that fat; we don't want greasy beef gravy .
You'll also need 4 tablespoons (30g) of all-purpose flour, 4 cups (950ml) of low-sodium chicken broth, and a cheeky splash of dry sherry (about 2 tablespoons or 30ml, totally optional).
A few sprigs of fresh thyme, salt, and freshly ground black pepper are your flavour soldiers. having everything ready saves you from a flustered scramble later.
Nobody wants that, especially during thanksgiving cooking .
Time Saving Tip: Skim that fat while the pan drippings cool a bit. Makes it easier, trust me.
Step-by-step to Gravy Glory
Right, here's how to turn those drippings into liquid gold:
- Separate the Fat: Pour pan drippings into a fat separator or use a spoon to carefully skim off the fat, reserving the drippings.
- Make the Roux: In the saucepan, melt the reserved fat (4 tablespoons) over medium heat. Whisk in the flour and cook, stirring constantly, for 2- 3 minutes to create a roux.
- Whisk in the Broth: Gradually whisk in the chicken broth, about 1/2 cup at a time, making sure each addition is fully incorporated before adding more.
- Simmer and Thicken: Add thyme sprigs (if using). Bring the gravy to a simmer, then reduce heat to low and simmer for 10- 15 minutes , or until thickened to your desired consistency. Stir occasionally to prevent sticking.
- Strain and Season: Remove thyme sprigs. Strain the gravy through a fine mesh sieve for extra smoothness. Stir in sherry (if using). Season with salt and pepper to taste.
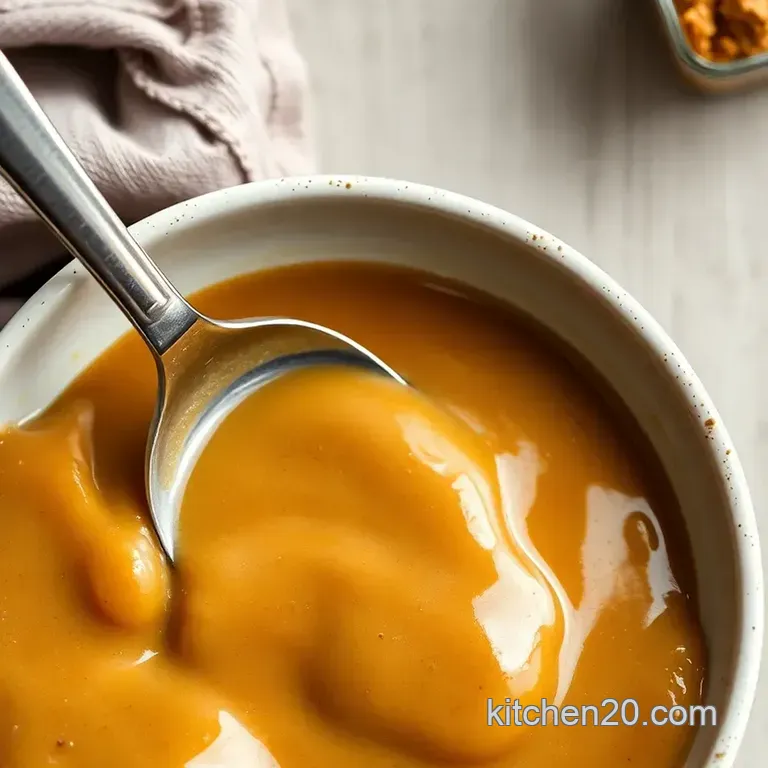
Visual cues for doneness? You want it thick enough to coat the back of a spoon.
Pro Tips: Gravy Secrets Revealed!
- Don't be shy with the whisk! Lumps are the enemy. Whisk like you mean it when adding the broth. This is how you prevent lumps in your easy brown gravy .
- Strain, strain, strain! For a truly silky smooth homemade gravy recipe , straining it at the end is a game changer. Oh my gosh, the difference it makes!
- make-ahead magic: This brown gravy recipe can be made a day ahead! Just reheat gently on the stovetop, adding a splash of broth if it's too thick. The beef gravy recipe also holds up well.
And there you have it proper gravy! Perfect for slathering on your roast and mash. Enjoy, you cheeky devils! You know?
Right, let's talk gravy , yeah? you've just roasted a cracking bird, the family's drooling, and the only thing standing between you and total sunday roast glory is… the gravy .
Fear not! i'm about to give you the lowdown.
Recipe Notes: Gravy Perfection Incoming!
Honestly, this is where the magic happens. these little tips and tricks? they're what elevate your homemade gravy from "meh" to "omg, more please!" think of it as my nanna's wisdom, passed down, but without the nagging about your love life.
Serving Suggestions: Plating Like a Pro
Alright, presentation. it’s more important than you think, and no matter what the plating is like this will be the best gravy recipe you have ever made.
Drizzle that homemade gravy artfully over your roast chicken or turkey. a jug of extra easy brown gravy on the side is a must for serious dippers (like me!).
Think about a sprig of fresh thyme for a pop of color. and, naturally, lashings of beef gravy over yorkshire puddings.
My personal fave? A swirl of gravy on top of creamy mashed potatoes. Simple, but stunning.
Storage Tips: Keeping the Gravy Good
Right then, what to do with leftover gravy ? Here's the drill:
- Refrigeration: Pop it in an airtight container and it'll keep happily in the fridge for 2-3 days.
- Freezing: Fancy being super organised? You can freeze it! Again, airtight container, and it'll be good for up to 3 months.
- Reheating: Gently does it! Reheat on the hob on low heat, stirring frequently, or in the microwave in short bursts. You might need to add a splash of broth to loosen it up if it's thickened too much.
Honestly, reheated brown gravy recipe easy is just as good as fresh, especially on chips!
Variations: Get Creative with Your Gravy
Fancy a twist on your Easy Brown Gravy ?
- Dietary Adaptations: Need a gluten-free option? Swap the flour for cornstarch. Sorted!
- Seasonal Swaps: In the autumn, a touch of apple cider adds a lovely warmth. For Thanksgiving cooking , try stirring in a spoonful of cranberry sauce for a festive twist!
Nutrition Basics: Goodness in Every Drop?
Okay, let's be real, gravy isn't exactly a health food. But a little bit won't hurt, right?
This brown gravy recipe gives you about 80 calories per serving, some protein, and a bit of fat. the key health benefit? it makes your sunday roast taste incredible.
Also, using a good beef gravy recipe with low sodium broth means you are in control. it's all about balance, yeah?
Honestly, making a homemade gravy recipe is easier than you think! so ditch the packet stuff and give this a go.
You won't regret it and you will have the best brown gravy recipe in your repertoire.
Frequently Asked Questions
How do I make sure my homemade gravy isn't lumpy? No one wants a gravy that looks like porridge gone wrong!
Lumpy gravy is a common woe, but easily avoided! The key is the roux: make sure you cook the flour and fat together for a couple of minutes before adding any liquid, this cooks out the raw flour taste and helps prevent lumps.
Then, whisk in the chicken broth gradually, a little at a time, making sure each addition is fully incorporated before adding more. Think of it like giving your gravy a little TLC!
My homemade gravy tastes bland. What can I do to give it more flavour? It's got to be more exciting than beige sadness!
Bland gravy is a culinary crime! First, ensure you're using good quality, low-sodium chicken broth watery broth equals watery gravy. Don't be shy with the salt and freshly ground black pepper; they can make a huge difference.
A splash of dry sherry or a dash of Worcestershire sauce can also add a fantastic depth of flavour, bringing it up to snuff. And finally, pan drippings from a roast bird give it that extra kick!
Can I make homemade gravy ahead of time? I'm all about prepping for Sunday lunch!
Absolutely! You can make your homemade gravy a day or two in advance. Let it cool completely, then store it in an airtight container in the refrigerator. When you're ready to serve, gently reheat it on the stovetop, stirring occasionally. If it's too thick, add a little more broth to reach your desired consistency.
Think of it as giving yourself a bit of a Sunday lie-in!
What can I use instead of pan drippings for homemade gravy? My roast was a bit dry this week.
No worries, even if your roast didn't yield much in the way of drippings, you can still make a cracking gravy. Melt butter in the saucepan instead of using drippings. For extra flavour, consider adding a tablespoon of olive oil or bacon fat.
You might also want to add a beef or chicken bouillon cube to make up for the lost flavor.
How long does homemade gravy last, and how should I store it? Don't want to end up like Oliver Twist asking for more, only for it to be off!
Homemade gravy will generally last for 3-4 days in the refrigerator, stored in an airtight container. Make sure it cools completely before refrigerating. For longer storage, you can freeze the gravy for up to 2-3 months. Thaw it in the refrigerator overnight before reheating gently on the stovetop.
Always check for any signs of spoilage before consuming; if in doubt, chuck it out!
Is homemade gravy bad for me? Got to watch the waistline, you know!
Like most good things in life, moderation is key! Homemade gravy is calorie dense due to the fat content, but you can make it a bit lighter. Using low-sodium broth and skimming off as much fat as possible will help.
Enjoy it as part of a balanced meal, and consider loading up on the veggies to balance out the indulgence. A little gravy never hurt anyone!
The Ultimate Pan Dripping Gravy

