The Ultimate Creamy Dream Restaurantstyle Baked Cheesecake
- Capturing the Diner Dream: Our Signature Creamy Cheesecake Blueprint
- Beyond the Factory Floor: Achieving Perfect New York Density
- Assembling the Elements: Essential Components for Baked Brilliance
- Curating the Components for a Superior Cheesecake Base
- The Step-by-Step Journey to a Flawless Bake
- Mastering the Bake: Techniques for Cracking Prevention
- Elevating Your Creation: Flavor Variations and Topping Insights
- Troubleshooting and Preserving Your Masterpiece
- Recipe FAQs
- 📝 Recipe Card
Capturing the Diner Dream: Our Signature Creamy Cheesecake Blueprint
When the craving strikes for that unparalleled dessert experience the kind that makes you close your eyes in satisfaction it almost always leads back to a magnificent Cheesecake .
Forget flimsy, airy versions; we are chasing the quintessential richness that defines true New York style. This comprehensive Cheesecake recipe is engineered to deliver that glorious, mouth coating density coupled with a creamy finish that rivals any high end eatery.
We’re diving deep into the mechanics required to achieve this level of dessert perfection at home.
Beyond the Factory Floor: Achieving Perfect New York Density
Many home bakers fear the baked cheesecake because of its reputation for cracking or becoming grainy. Our aim here is to demystify the process, allowing you to consistently produce a luxurious, dense cheesecake .
The secret lies not just in the ingredients, but in the methodology how you combine them, how you manage heat, and perhaps most critically, how you let it cool. This blueprint is specifically designed to mimic the depth of flavour and texture found in iconic dessert destinations.
Why This Recipe Rivals the Best Restaurant Slices
What sets an exceptional slice apart from a mediocre one? It’s often the depth of tanginess and the sheer richness derived from high-quality dairy. Our recipe utilizes a combination of full fat cream cheese, sour cream, and heavy cream. This trio builds incredible body and flavour complexity.
On top of that,, we are stabilizing the structure with a touch of cornstarch and balancing the sweetness with fresh lemon juice. This balance ensures the result is never cloyingly sweet, but has just enough tart cheesecake brightness to keep you coming back for more.
If you’ve ever dreamed of replicating that famous Cheesecake Factory style dessert, this is your ticket.
The Texture Goal: Velvety Smooth, Not Airy
The cardinal sin of homemade cheesecake is incorporating too much air. Air causes the structure to rise too quickly during the bake, only to collapse dramatically when cooled, leading to sunken centres and inevitable cracks. Our focus is purely on achieving a creamy cheesecake texture.
This means gentle mixing, low oven temperatures, and relying on the water bath to provide consistent, indirect heat. The result should be a silken texture that melts beautifully on the tongue, suitable for stunning desserts photos showcasing that perfect crumb structure.
Assembling the Elements: Essential Components for Baked Brilliance
Creating this masterpiece begins long before the oven is turned on. Every component, from the base to the filling, must be prepared with intention. Think of this as building a structural marvel; a weak foundation means the entire edifice crumbles.
We need precision in our measurements and patience in our preparation phases to guarantee a flawless outcome ready to be presented as a beautiful cute cake slice .
Curating the Components for a Superior Cheesecake Base
The crust is the anchor of any great cheesecake, providing textural contrast to the soft filling above it. For this recipe, we are sticking to the classic graham cracker style, robust enough to hold up against the weight of the rich filling.
The Cream Cheese Concoction: Temperature is King
This cannot be overstated: your cream cheese, eggs, and sour cream must be brought to full room temperature. When dairy ingredients are cold, they resist blending smoothly, forcing you to overmix them to eliminate lumps.
Lumps require aggressive beating, which introduces air, leading directly to our nemesis: cracking. Allow ingredients to sit out for at least two hours before starting.
Selecting the Ideal Graham Cracker Crumble
For the foundation, we require 1 ½ cups of finely ground graham cracker crumbs mixed with 6 tablespoons of melted unsalted butter and ¼ cup of sugar. The crumbs should resemble coarse sand not dust, but certainly not large chunks.
Press this mixture firmly into the bottom and slightly up the sides of your 9 inch springform pan. A firm base ensures that when you eventually cut a perfect cheesecake slice , it holds its shape beautifully.
Necessary Gear: Springform Pans and Water Bath Essentials
The proper equipment is vital for success with a baked cheesecake . A 9 inch springform pan is non-negotiable because it allows you to easily release the delicate sides without flipping the cake.
Crucially, you will need a large roasting pan one deep enough to hold the springform pan with room around the sides for water. Prepare your springform pan by wrapping the exterior bottom and sides thoroughly in two layers of heavy duty aluminium foil; this waterproof barrier protects the crust from the steam in the water bath.
Related Recipes Worth Trying
- The Ultimate Strawberry Cheesecake Cookies Recipe Tangy Swirls — These Homemade Strawberry Cheesecake Cookies are wonderfully rich soft in the middle and feature a vibrant cream cheese swirl A truly yummy dessert easy...
- Ultimate Strawberry Cheesecake Cookies Recipe Tangy Chewy — Capture the magic of cheesecake in a chewy cookie This Strawberry Cheesecake Cookies recipe uses cream cheese in the dough for the best texture Easy to bake
- The Ultimate Lemon Cheesecake Cake Recipe Layered Perfection — Craving something truly showstopping This Lemon Cheesecake Cake delivers a moist lemon sponge swirled with rich creamy cheesecake filling Find the foolproof...
The step-by-step Journey to a Flawless Bake
Once your components are gathered and your oven is preheating to 350° F ( 175° C), the assembly phase begins. Remember, while the active work is quick (about 30 minutes), the chilling and cooling stages require the most discipline.
Building and Pre-Baking the Robust Crust Foundation
Start by combining your 1 ½ cups of graham cracker crumbs, ¼ cup of sugar, and 6 tablespoons of melted butter until uniformly moistened. Press this mixture evenly into the prepared springform pan. A flat bottomed measuring cup works wonders for creating a perfectly level surface.
Next, place the pan into the preheated 350° F oven for a quick 8 10 minute bake. This brief pre-bake sets the butter and creates a crust that won't absorb moisture from the filling later. Remove it from the oven and allow it to cool completely to room temperature before filling.
Achieving Silkiness: The Gentle Mixing Method
This is where meticulous care pays off. In your mixer bowl, begin by beating the room temperature cream cheese (all 32 oz) on low speed until it is absolutely silken no discernible lumps whatsoever. Only then do you slowly stream in the 1 ½ cups of sugar.
Once smooth, incorporate the room temperature sour cream (1 cup), heavy cream (½ cup), vanilla extract, and the crucial tablespoon of lemon juice. Finally, take your 4 eggs plus the extra yolk, lightly whisk them with the tablespoon of cornstarch and a pinch of salt in a separate bowl until just combined (do not whip them!).
Gently fold this egg mixture into the main batter until just streaks disappear. The moment it is incorporated, stop mixing.
Implementing the Essential Water Bath Strategy
Place your foil wrapped pan, now filled with the smooth batter, inside the large roasting pan. Carefully transfer this assembly onto the middle oven rack. Now, using boiling water, gently pour it into the roasting pan until the water level reaches about halfway up the sides of the springform pan.
This Bain Marie insulates the Cheesecake from direct heat, ensuring it cooks evenly from the outside in, leading to that desirable creamy cheesecake texture.
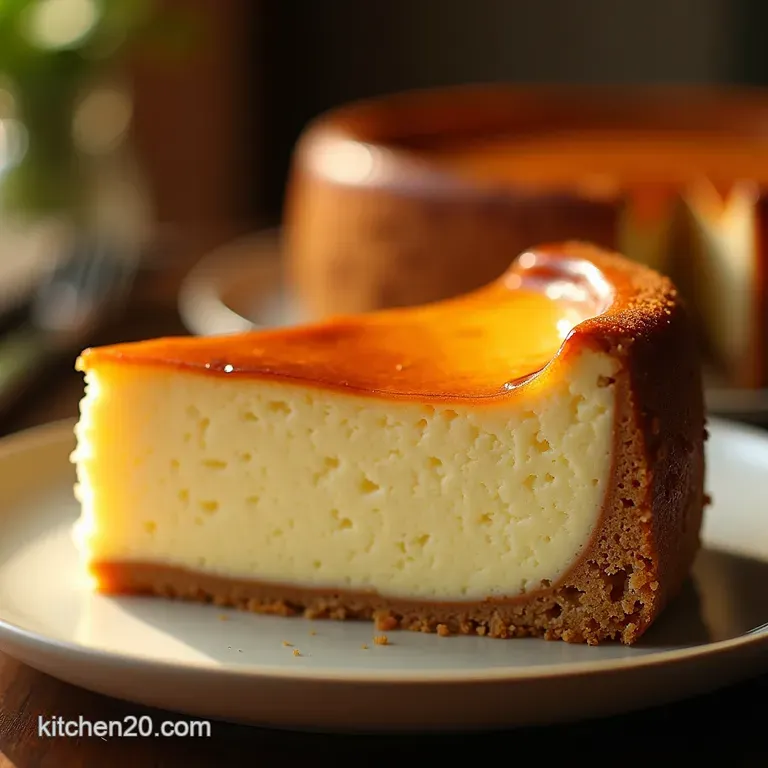
Mastering the Bake: Techniques for Cracking Prevention
The baking time is a two-stage process designed to gently set the custard without scorching the top or causing internal temperature shock.
Bake initially at 350° F ( 175° C) for 15 minutes. After this initial burst, reduce the oven temperature significantly to 250° F ( 120° C).
Continue baking for another 45 to 60 minutes. You’ll know it’s done when the edges look set and slightly puffed, but the very centre (about a 2 inch disc) still has a slight, gentle jiggle when nudged. This slight wobble means it will set perfectly during the cooling phase.
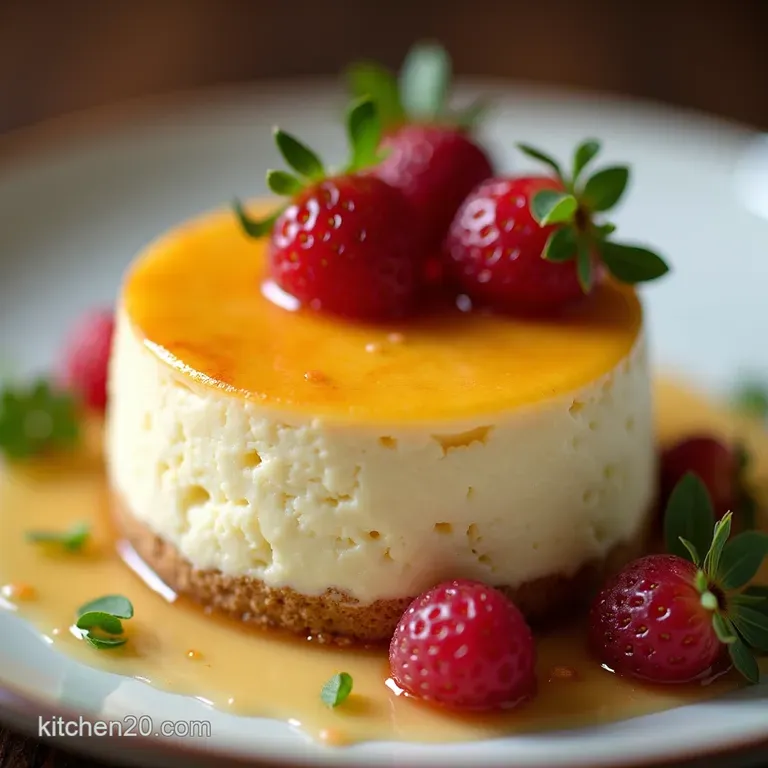
Elevating Your Creation: Flavor Variations and Topping Insights
Once the foundational Cheesecake recipe is mastered, the door opens to exciting variations. While the classic plain is sublime, experimenting with swirls and flavour infusions can turn this into an entirely new experience.
Inspired Swirls: Integrating Subtle Pumpkin or Chocolate Brownie Notes
For a festive take, consider folding ½ cup of pureed, spiced pumpkin into about one-third of the finished batter before pouring it over the crust, gently layering it to create soft ribbons.
Alternatively, a dense, fudgy brownie batter can be spooned on top, then lightly swirled using a skewer to mimic the rich inclusions often seen in those famous layered desserts. These additions add complexity without sacrificing the fundamental creaminess of the cake itself.
The Gradual Cool Down: Preventing Sunken Centers
This cooling technique is perhaps the single most important step for aesthetic perfection. Once the baking time is complete, do not remove the cheesecake from the oven. Turn the oven off entirely. Prop the oven door open about an inch (a wooden spoon handle works perfectly).
Let the Cheesecake sit inside this cooling environment for a full hour. This slow temperature reduction prevents the immediate contraction of the filling, which is the primary cause of sunken centres and cracking.
After one hour, carefully remove the pan from the water bath, remove the foil, and let it finish cooling on a wire rack at room temperature before covering and refrigerating.
Troubleshooting and Preserving Your Masterpiece
Even with the best intentions, questions arise. Understanding potential issues helps ensure your next Cheesecake slice is even better.
Optimal Storage Conditions for Maximum Freshness
Once fully chilled (which requires a minimum of four hours, but overnight is best), the cheesecake is ready. Keep it tightly wrapped in plastic wrap, preferably on the serving plate, and store it in the refrigerator. It retains peak flavour and texture for up to five days.
If you need to freeze leftovers, ensure the cake is completely thawed in the refrigerator overnight before serving to avoid weeping or textural changes.

Recipe FAQs
Why does my Cheesecake always crack on top, even when I follow the recipe?
Cracking is usually down to a sudden temperature change or overmixing the batter the bane of every baker's existence! For this rich, dense recipe, the most important step is the slow cool down: never remove it straight from the oven.
Leave it inside the cooling oven with the door propped open for a full hour to gently acclimatise. Also, ensure you don't overmix once the eggs are added; we want creamy, not airy!
Can I skip the water bath (Bain Marie) for this New York style Cheesecake?
Honestly, for a truly restaurant quality, silky texture, I wouldn't advise it. The water bath creates a humid, gentle baking environment which prevents the edges from setting too quickly before the centre, thereby stopping it from drying out and cracking.
Think of it as giving your cheesecake a lovely, warm spa day in the oven!
My cream cheese is lumpy; can I still use it for the filling?
If it's just slightly lumpy before you start mixing, it should be fine, provided it's fully softened to room temperature. However, if it's stubbornly cold, you risk lumps no matter how long you mix!
If you notice lumps after mixing, you can carefully push the batter through a fine mesh sieve, but remember to mix the eggs in very gently afterward to avoid incorporating excess air.
How far in advance can I make this Cheesecake, and how should I store leftovers?
Cheesecake is brilliant for making ahead; in fact, it tastes better the next day! It needs a minimum of four hours to chill, but overnight is best for the full flavour development.
Store it tightly covered in the fridge for up to five days, or slice it up and freeze it for up to two months; just thaw it slowly in the fridge first.
What topping goes best with this rich recipe if I don't want a fruit sauce?
Since this is modelled after that famously decadent style, you want something that complements the richness without overwhelming it. A drizzle of high-quality salted caramel sauce is divine, or perhaps a simple ganache made from dark chocolate whisked with a little heavy cream.
If you fancy something utterly simple, just dust the top with a light veil of sifted icing sugar just before serving.
Creamy Baked Cheesecake Recipe
Ingredients:
Instructions:
Nutrition Facts:
| Calories | 345 kcal |
|---|---|
| Protein | 4.7 g |
| Fat | 15.0 g |
| Carbs | 36.9 g |
| Fiber | 0.6 g |
| Sodium | 80 mg |
