The Ultimate Homemade Mochi Ice Cream Chewy Wraps Cool Centre
- Unwrapping the Joy: Why Homemade Mochi Ice Cream Reigns Supreme
- The Magic of Texture: Bridging Chewy Dough and Frozen Delight
- The Essential Toolkit: Gear Needed for Mochi Mastery
- Stage One: Crafting the Pliable Mochi Wrapper
- Stage Two: The Delicate Art of Encasing the Frosty Centre
- Putting It All Together: Final Touches for Ready-to-Eat Mochi Ice Cream
- Troubleshooting Common Mochi Ice Cream Hurdles
- Storage Secrets: Keeping Your Wraps Supple and Cold
- Recipe FAQs
- 📝 Recipe Card
Unwrapping the Joy: Why Homemade Mochi Ice Cream Reigns Supreme
There is a specific, satisfying magic that happens when you bite into a perfectly crafted Mochi Ice Cream . It’s the delicate resistance of the sweet, supple dough giving way to the cold, creamy core.
It’s a delightful collision of textures that has cemented this Japanese sweet treat as a global favourite. While store-bought versions are certainly convenient, I’m here to tell you that mastering the Mochi Ice Cream Recipe at home unlocks a superior experience.
Not only can you customize the flavours, but the texture of freshly made mochi wrapper is simply unmatched. Forget queuing for those pricey tubs! This recipe demystifies the magic behind Mochi Ice Cream, the delightful confection that perfectly balances soft, sweet, elastic mochi dough with rich, frozen ice cream.
We’ll tackle the tricky dough first, ensuring it’s pliable and never sticky, before wrapping it around your favourite quality ice cream. It’s a wonderful collision of textures a real showstopper for dinner parties or just a quiet Tuesday night treat.
We estimate this project falls into the Medium difficulty category, demanding about 45 minutes of active preparation time, plus 15– 20 minutes of steaming, culminating in about 12 perfect Homemade Mochi Dessert pieces.
The Magic of Texture: Bridging Chewy Dough and Frozen Delight
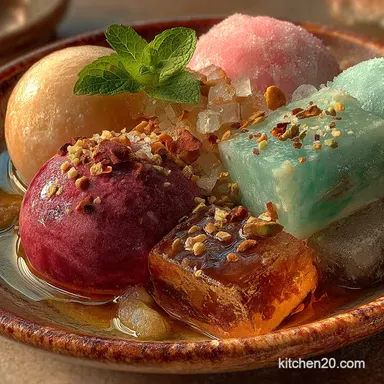
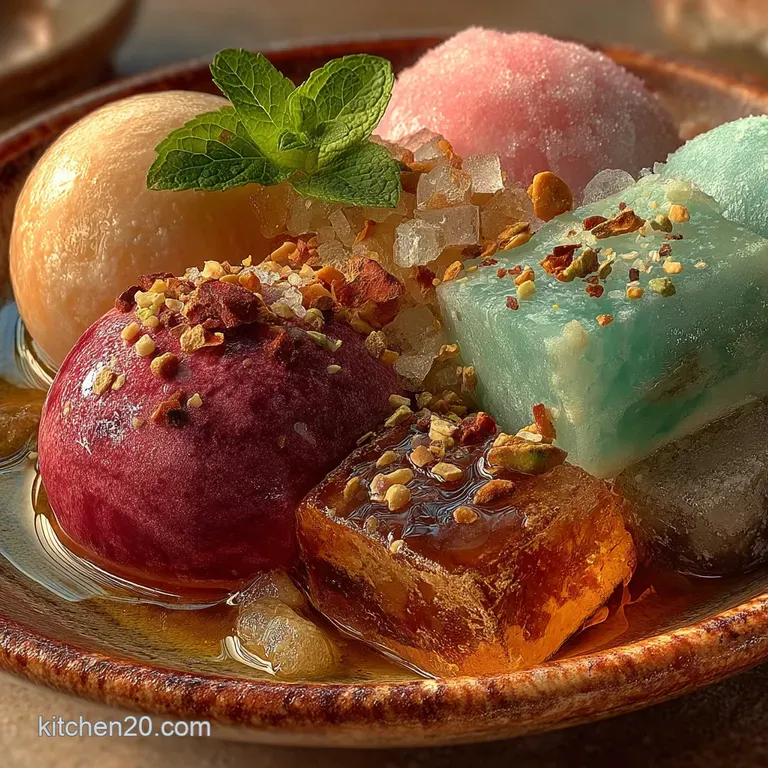
The success of this confection hinges entirely on the interplay between the wrapper and the filling. The outer layer, made from sweet rice flour, must achieve that signature elasticity that satisfying chewiness known as mochi .
It should stretch just enough to provide resistance without tearing, perfectly encasing the frozen core.
Demystifying the Dream: A Totally Achievable Home Project
Many cooks look at How To Make Mochi and immediately envision highly specialized equipment or years of training. That simply isn't the case here. While the dough requires attention specifically regarding heat application (steaming or microwaving) and kneading it is fundamentally a very simple batter turned into dough.
With the right flour and a liberal application of starch, this becomes a genuinely achievable project, offering immense satisfaction as you perfect the technique.
Beyond the Shop: Elevating Your Mochi Ice Cream Experience
When you create your DIY Ice Cream experience at home, you control the quality. You can choose the premium vanilla, or perhaps a bold salted caramel. On top of that,, you can introduce subtle flavour infusions into the mochi wrapper itself, something mass produced varieties often omit.
This level of control ensures your Japanese Sweet Treats are tailored precisely to your taste.
What to Expect: A Quick Flavor Forecast
For this core recipe, expect a classic foundation: a pure, slightly sweet, and wonderfully pliable rice wrapper surrounding intensely cold, high-quality vanilla ice cream. This foundational preparation gives you the ideal starting point before exploring some of the Mochi Ice Cream Flavors we’ll discuss later in the troubleshooting section.
Expect about 12 satisfying servings from one batch.
The Essential Toolkit: Gear Needed for Mochi Mastery
While we are steering clear of highly specialized gear, a few specific items are essential for managing the sticky dough correctly. You will primarily need a method to cook the dough via steam or microwave. A standard steamer basket set over a saucepan works perfectly for the steaming method.
If microwaving, you need a heatproof bowl. Beyond that, a rubber spatula is vital for mixing the cooked dough, a small rolling pin for thin sheeting, and parchment paper to keep your assembly area clean.
Sourcing Your Star Components for Perfect Dough
The quality of your ingredients directly dictates the texture of the final product. For the dough, there is very little room for substitution.
Gathering the Dough Foundation: Sweet Rice Flour and Sugar
The absolute cornerstone of this recipe is Sweet Rice Flour , often labelled as Mochiko or Shiratamako in specialty stores. This flour, derived from glutinous rice, contains the necessary high starch content for that characteristic chew.
You will require 1 cup (120g) of this flour, paired with 1/4 cup (50g) of regular granulated sugar, and 3/4 cup (180ml) of cold water to form the initial batter.
Selecting the Core: Choosing Your Preferred Ice Cream Bases
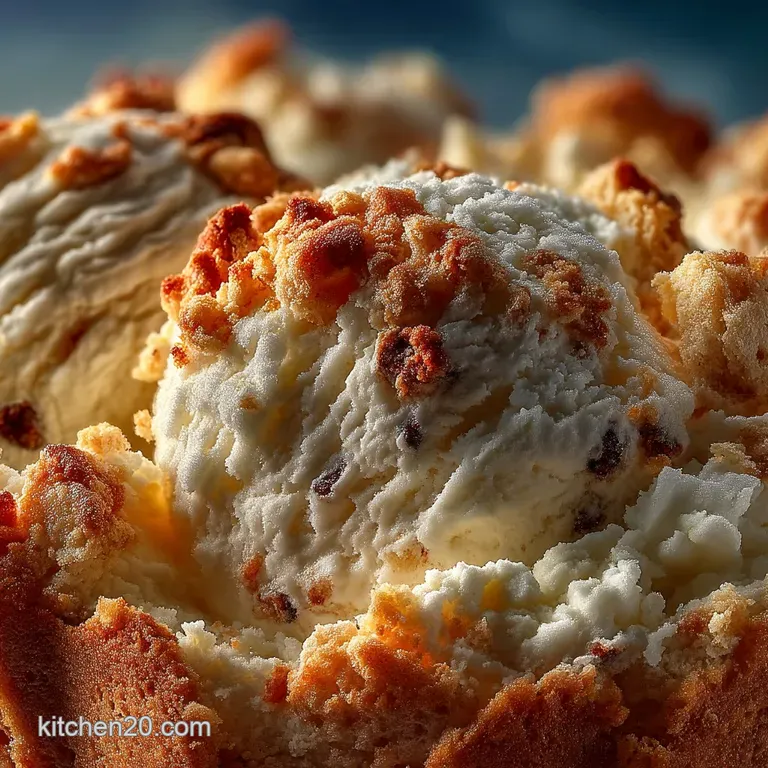
Since the wrapper is relatively mild, the filling shines. You need one pint of high-quality ice cream. The key here is temperature: the ice cream must be rock solid . If it’s slightly soft, it will melt into the warm dough before you can seal it, leading to immediate failure.
Crucial Kitchen Aids: Tools Beyond the Standard Utensils
Beyond the cooking apparatus, you must have ample Potato Starch or Cornstarch —about 1/2 cup (60g) for dusting. This is non-negotiable. This powder prevents the incredibly sticky cooked dough from adhering to every surface it touches.
A small cookie scoop, roughly 1.5 tablespoons in capacity, is extremely helpful for portioning the ice cream into uniform balls before freezing.
Optional Additions for Flavor Twists
If you wish to move beyond the vanilla standard, consider having matcha powder handy for a green tea flavour, or perhaps some quality cocoa powder if you plan on making chocolate wraps later on.
Stage One: Crafting the Pliable Mochi Wrapper
The preparation of the dough is where technique begins to matter. We begin by creating a smooth liquid base that will transform under heat.
Cooking the Glutinous Mix to Elastic Perfection
In your heatproof bowl, combine the sweet rice flour and sugar thoroughly. Gradually whisk in the cold water until you have a thin, completely smooth batter, perhaps adding 1-2 drops of food colouring now if you desire a pastel hue.
To cook this, you can either steam the covered bowl over simmering water for 15– 20 minutes until the mixture is completely translucent and pulls away from the sides, or you can use the quicker microwave method.
If microwaving, cook in 1-minute bursts, stirring vigorously with a wet spatula between each burst, until the mixture cohesively forms a thick, shiny mass. This cooking process gelatinizes the starch, creating the magic.
Handling and Rolling the Dough Without Sticking
Once cooked, immediately turn the hot dough onto a surface that has been generously dusted with your potato or cornstarch. Using a spatula initially, fold the dough over itself, gradually incorporating more starch underneath as it cools enough to handle.
You are aiming for a smooth, elastic ball that is no longer tacky to the touch. Cover this warm dough with a piece of lightly oiled plastic wrap while you work quickly. Roll this ball out to about 1/8 inch thickness, keeping your rolling pin and work surface heavily coated with starch. Cut 3.5 inch diameter circles.
Related Recipes Worth Trying
- Easy Keto Buffalo Chicken Casserole Recipe Low Carb Creamy — Whip up this incredibly creamy Keto Buffalo Chicken Casserole in under an hour A low carb bake that tastes just like your favourite wings So simple
- The 30Minute Marvel Creamy Instant Pot Beef Stroganoff — Need a fantastic weeknight hug in a bowl This Easy Instant Pot Stroganoff delivers rich tender beef flavour in under 40 minutes A foolproof classic dinner...
- Creamy Keto Egg Salad Recipe The Best Low Carb Lunch — Tired of watery low carb egg salad This easy Keto Egg Salad Recipe is wonderfully creamy and packed with flavour for a smashing simple keto lunch
Stage Two: The Delicate Art of Encasing the Frosty Centre
This stage requires speed, coordination, and very cold ice cream. Remember, we are aiming for Easy Japanese Snacks , but the assembly requires focus!
Portioning and Freezing Your Ice Cream Scoops Correctly
Before you even start the dough, your ice cream must be portioned and frozen solid. Use your small scoop to form about 12 uniform balls. Place these on a parchment lined tray and freeze them until they are nearly rock hard at least two hours, but preferably overnight.
This firmness is crucial for successful wrapping.
The Wrapping Technique: Achieving a Seamless Seal
Take one mochi circle and place one rock hard ice cream ball directly in the centre. Quickly but gently bring the edges of the dough up and around the ice cream. The natural stickiness of the dough (if not too heavily coated in starch) will help it adhere to itself.
Pinch the dough tightly at the top seam to create a neat seal. If you have excess dough bunching up, carefully trim it away with kitchen shears or a knife before pinching. Flip the assembled Mochi Ice Cream so the seam rests on the bottom against a fresh sheet of parchment paper.
Putting It All Together: Final Touches for Ready-to-Eat Mochi Ice Cream
Once all your individual pieces are wrapped, they need a final chill to stabilize completely.
Place the assembled mochi seam side down on a parchment lined tray. Dust very lightly with any residual starch if they feel tacky. They must now be returned to the deep freeze for a minimum of one hour before they are ready to serve.
This ensures the filling is perfectly solid and the wrapper has set into its final, chewy texture.
Troubleshooting Common Mochi Ice Cream Hurdles
Even experts face challenges when making How To Make Snacks At Home , and mochi is notoriously temperamental.
Fixing Dough That's Too Sticky or Too Stiff
If your dough is so sticky it’s ripping your spatula, you simply need more starch incorporated during the kneading stage. Work it in gently until it yields. Conversely, if the dough becomes stiff or tears easily when you try to roll it out, it has likely dried out or cooled too much.
Cover it immediately and place it near, but not in, a very low oven for just a minute or two to gently warm it up, restoring its pliability.
Creative Fillings: Beyond Vanilla and Chocolate
Once you master the basic shell, the possibilities for Mochi Ice Cream Flavors explode! Try folding a teaspoon of high-quality matcha powder into the dry ingredients for a gorgeous green wrapper.
Alternatively, consider adding a small cube of fresh, ripe mango or a sliver of candied ginger alongside your ice cream core for an exciting textural surprise.
Storage Secrets: Keeping Your Wraps Supple and Cold
Mochi is best eaten the day it is made, but proper storage allows you to enjoy your efforts for longer.
Best Practices for Long Term Freezing Success
Because the mochi dough is water based, freezer burn is a risk. Once your mochi balls have frozen solid after their initial final chill, transfer them immediately to an airtight container. To prevent sticking between layers, place small squares of parchment paper between each piece.
Stored this way, they will maintain excellent quality for up to two weeks.
Serving Suggestions: Perfect Pairings for Your Homemade Treat
When serving your Mochi Ice Cream , remember they are best enjoyed when they have been out of the deep freeze for just 5 to 8 minutes long enough for the wrapper to lose its rock hard quality but not long enough for the ice cream to melt.
They pair wonderfully with a hot cup of Hojicha tea, whose roasted, earthy notes beautifully complement the sweet chewiness of the wrapper.
Recipe FAQs
My Mochi Ice Cream dough keeps sticking to everything! What’s the trick to stopping it from becoming a complete sticky mess?
Ah, the notorious sticky situation! This is the most common beginner’s woe. You must be incredibly generous with your dusting starch potato starch or cornflour is your absolute best mate here. Ensure both your work surface and rolling pin are thickly coated before you even touch the dough.
How far ahead of time can I make Mochi Ice Cream, and how should I store the leftovers?
These are best enjoyed within a week for peak texture, but they can last up to a month in the freezer if wrapped tightly. Ensure each piece is wrapped individually in plastic wrap first, then placed in an airtight container; this prevents freezer burn and keeps them from sticking together like long lost relatives.
Can I use regular flour instead of sweet rice flour (Mochiko) for the Mochi Ice Cream dough?
Sadly, no, regular wheat flour simply won't cut the mustard. The secret to that signature stretchy, chewy texture is the high amylopectin content in sweet rice flour. Using standard flour will result in something that bakes more like a heavy paste rather than elastic mochi.
My ice cream balls melt almost instantly when I try to wrap them. What’s the secret to a quick seal?
This is all about temperature control your ice cream needs to be nuclear frozen, practically rock solid, like a little granite orb! Work quickly and efficiently, keeping your wrapper dough pliable but not warm. If you get too slow, just pop the tray of unwrapped balls back in the freezer for ten minutes.
I want to try a different flavour. What are the easiest ways to flavour the mochi dough itself?
The easiest route is adding flavourings directly to the liquid mixture before steaming, provided they are potent. Try whisking in a teaspoon of high-quality matcha powder or a few drops of natural peppermint extract.
If you want a richer flavour, swirl a little cooled, melted chocolate into the dough right after it comes out of the steamer.
Homemade Mochi Ice Cream