The Emergency Chocolate Fix Oneminute Molten Mug Cake
- Ditching the Oven: Why This Chocolate Mug Cake is Your New Emergency Protocol
- Gathering Your Arsenal: Essential Ingredients for Deep Chocolate Flavour
- Necessary Equipment: Choosing the Right Mug for Microwaving
- Step-by-Step Mastery: Crafting the Ideal Single-Serving Chocolate Mug Cake
- Troubleshooting and Expert Tips for the Ultimate Chocolate Mug Cake
- Recipe FAQs
- 📝 Recipe Card
Ditching the Oven: Why This Chocolate Mug Cake is Your New Emergency Protocol
There are cravings, and then there are emergencies . When a serious need for rich, deep chocolate strikes, waiting thirty minutes for the oven to preheat is simply not an option.
This chocolate mug cake recipe microwave method is the ultimate culinary solution, providing instant, gratifying satisfaction with zero fuss and minimal cleanup. It is the definition of a Mug Cake For One —a perfectly portioned dessert that delivers all the warmth and flavour of a traditional bake, but ready in mere minutes.
Forget baking sheets and cooling racks; your entire operation starts and ends in a single vessel, transforming a handful of pantry staples into an intensely moist and flavourful single serving cake.
The 120-Second Dessert: Setting Expectations for Speed
The sheer speed of this recipe is its greatest asset. Unlike conventional baking where the clock ticks relentlessly, the timeline here is entirely forgiving. Active preparation time runs about three to four minutes enough time to measure flour, sugar, and cocoa and the cooking phase requires only 60 to 90 seconds in the microwave, depending on your wattage.
This is why we call it the Instant Cake In A Cup : the total process, from cabinet to couch, requires less than six minutes. Mastery here means understanding your microwave’s power and trusting the process a genuine, high-quality chocolate dessert achieved in the time it takes to brew a cup of tea.
Defining the 'Molten' Center: The Science of Quick Steaming
What distinguishes a truly great mug cake from a mediocre one is its texture, specifically the lush, slightly gooey core. Achieving this texture relies on the rapid, aggressive cooking method employed by the microwave.
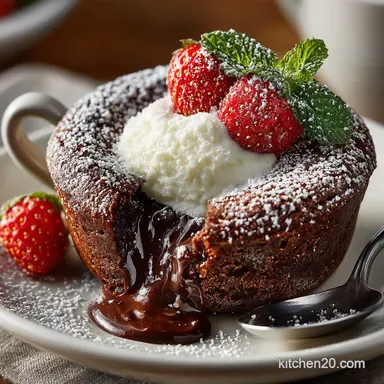
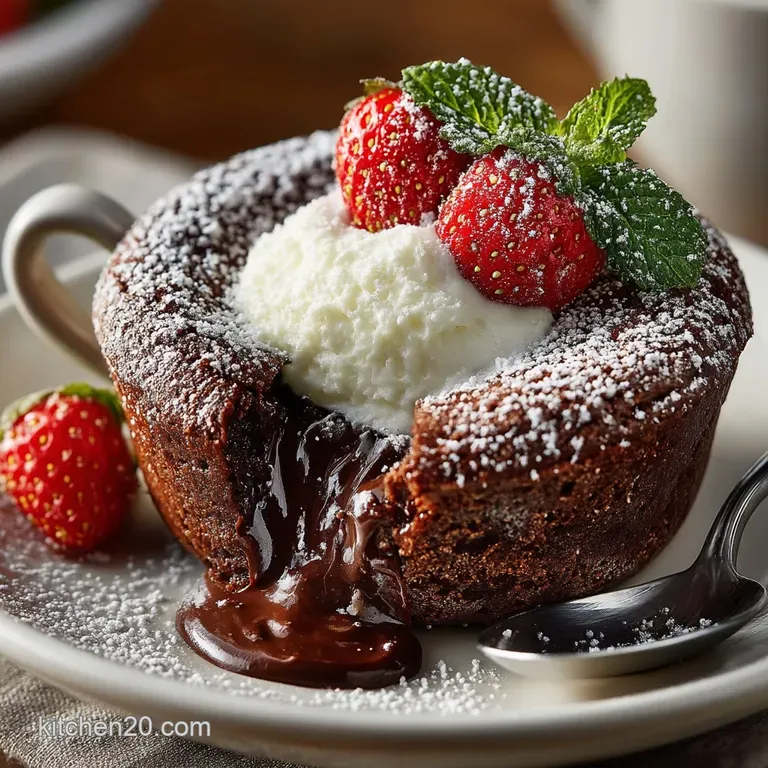
Microwave energy superheats the liquids in the batter, creating intense internal steam pressure that causes the cake to rise quickly and set the edges. To guarantee that sought after Mug Brownie Recipe Microwave consistency, we strategically embed semi sweet chocolate chips directly into the center of the batter before cooking.
Because the cooking time is precisely calibrated to stop just as the edges set, the chips at the core melt into a pocket of molten richness, without allowing the entire cake structure to dry out.
Is This Mug Cake Actually Worth the Calories? (Addressing Quality)
Absolutely. While the convenience of a speedy recipe sometimes implies a compromise on quality, that is not the case here. We employ high-quality ingredients, particularly unsweetened cocoa powder, and introduce a secret weapon: espresso powder.
This addition doesn’t make the cake taste like coffee; rather, it profoundly intensifies the natural cocoa notes, boosting the perceived depth of the chocolate flavour exponentially.
The resulting cake is not just edible it is intensely satisfying, rich, and truly feels like an indulgence baked for much longer than 90 seconds.
Gathering Your Arsenal: Essential Ingredients for Deep Chocolate Flavour
Creating this indulgent single serving dessert relies on a precise balance of standard baking ingredients combined directly in the mug. For the foundation, you will need 4 tablespoons of all-purpose flour and 4 tablespoons of granulated sugar.
The chocolate punch comes from a generous 3 tablespoons of high-quality unsweetened cocoa powder. To ensure proper lift and texture, a quarter teaspoon of fresh baking powder is essential, paired with a pinch of fine salt to cut through the sweetness.
The wet elements are minimal but crucial: 3 tablespoons of whole milk (or a preferred non-dairy alternative) for moisture, 1 tablespoon of neutral cooking oil to keep the crumb soft, and half a teaspoon of vanilla extract.
For that signature molten core, be sure to have about 1 tablespoon of chocolate chips or chunks ready to embed in the batter. This recipe is naturally a delicious chocolate mug cake no egg , relying solely on the freshness of the baking powder for its structure.
Related Recipes Worth Trying
- The Moist Layered Carrot Cake with Tangy Cream Cheese Frosting — This is a proper champion Our layered Carrot Cake recipe delivers a spectacularly moist crumb thanks to pineapple topped with the tangiest cream cheese...
- The Ultimate Brown Butter Chocolate Chip Cookies Recipe — Elevate your baking with this ultimate recipe for chewy chocolate chip cookies featuring rich nutty brown butter The perfect crisp edge awaits
- The Perfect Easy Fluffy Pancakes From Scratch Ready in 25 Mins — Forget flat flapjacks Master these incredibly easy fluffy pancakes using simple pantry staples Get that tall buttery diner texture today
Necessary Equipment: Choosing the Right Mug for Microwaving
While the ingredients are important, the choice of vessel the humble mug is paramount. The ideal mug must be microwave safe, sturdy, and possess sufficient capacity. We recommend a standard 10 12 ounce (300 350 ml) mug.
This size ensures there is ample headroom for the batter to rise dramatically during the cooking process. Attempting to use a mug that is too small risks an overflow disaster, resulting in chocolate batter spilling over your microwave plate.
Beyond the mug, you will need accurate measuring spoons and cups, and a small fork or miniature whisk, which is ideal for incorporating the ingredients directly in the confined space.
The Perfect Batter Ratio: Achieving Maximum Moisture
The key to preventing the most common mug cake fail a dry, crumbly texture lies in the ratio. We utilize an equal measure of flour to sugar (4 Tbsp each), which works in synergy with the fat component (1 Tbsp oil or melted butter) to retain moisture.
The cocoa content is also crucial; the 3 tablespoons ensures the cake is robustly chocolatey, while the 3 tablespoons of liquid provides just enough hydration without making the batter soupy. This specific balance is designed to steam perfectly in the microwave.
Upgrading Your Cocoa: Selecting the Right Quality Powder
The quality of your cocoa powder directly dictates the flavour profile of the final chocolate mug cake . Avoid using dusty, low-quality cocoa. Instead, opt for a high-quality, Dutch processed variety.
Dutch processing neutralizes the acidity in the cocoa, yielding a richer, darker colour and a smoother, less bitter flavour, making your quick dessert feel incredibly luxurious.
Beyond the Basics: Quick Fix Substitutions and Variations
This core recipe is inherently versatile. Because it is a chocolate mug cake no egg , it’s very easy to adapt. If you require a chocolate mug cake no milk solution, simply substitute the whole milk with an equal amount of oat, almond, or soy milk; neutral tasting plant based alternatives work seamlessly.
For those exploring a slightly lighter alternative, reducing the sugar or using a small amount of whole wheat flour can make it a chocolate mug cake healthy option, though be aware that whole wheat will result in a denser crumb.
For those who prefer a traditional bind, you could adapt this into a chocolate mug cake with egg by replacing the oil and milk with one beaten small egg and 1 tablespoon of milk, though the texture will be slightly less tender than this oil-based recipe.
Size Matters: Why Not All Mugs Are Created Equal
As noted previously, the 10-12 oz capacity is non-negotiable. During the 60-90 second microwave blast, the cake batter will rapidly increase in volume, potentially doubling its height.
A mug that is too wide will result in a flatter, tougher cake, while one that is too narrow and tall will almost certainly overflow when the steam rapidly expands the baking powder.
Step-by-step Mastery: Crafting the Ideal Single Serving Chocolate Mug Cake
The process begins by ensuring all dry ingredients the flour, sugar, cocoa powder, baking powder, espresso powder, and salt are measured precisely and added directly into your chosen mug. This saves on bowls and maximizes speed.
Mixing Technique: Avoiding Pockets of Dry Flour
The mixing phase requires dual techniques. First, use a small fork to aggressively whisk the dry ingredients together within the mug. This step is non-negotiable as it evenly disperses the baking powder, preventing the cake from becoming lopsided or having unappetizing pockets of bitter cocoa.
Once the dry components are homogenous, pour in the milk, oil, and vanilla extract. Switch to gentle stirring. You must mix only until the last streak of dry flour disappears. Overmixing develops the gluten structure, which is the chief cause of a rubbery cake texture.
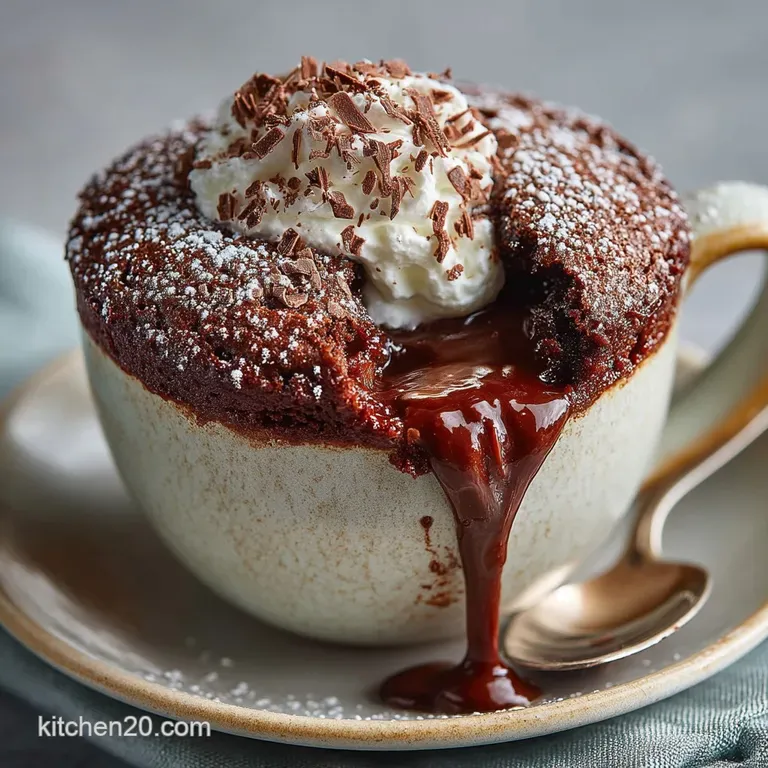
Once mixed, push half of your chocolate chips into the centre of the batter for that molten surprise, scattering the remaining chips on top.
Precise Timing: The Microwave Cooking Sweet Spot
Microwave timing is the most critical element and depends on your appliance’s wattage. For powerful units (1000W+), start with 60 to 70 seconds. For lower wattage microwaves, you may need closer to 75 or 90 seconds. Place the mug in the centre and cook on high power (100%).
Watch carefully: the cake will puff dramatically. The goal is to stop the microwave when the cake's top looks set around the perimeter but still appears slightly damp in the very middle. A cake that looks entirely dry and firm is already overcooked.
The Resting Period: How to Achieve the Steamed Texture
Immediately upon removing the mug (use caution, it will be extremely hot!), allow the cake to rest undisturbed for a full 60 seconds. This brief cooling period is vital. The residual heat trapped within the cake finishes the internal cooking process gently, shifting the texture from a potentially raw centre to the desired soft, tender, and properly steamed crumb.
Skipping this step often leads to a less pleasant, slightly doughy result.
Troubleshooting and Expert Tips for the Ultimate Chocolate Mug Cake
Even a simple recipe benefits from expert knowledge. Always ensure your baking powder is fresh; if it’s more than six months old, the necessary lift simply won't happen. Treat the precise measurements in this recipe as gospel; approximations lead to inconsistency.
Addressing Common Errors: Why Is My Cake Rubber?
The most frequent complaint when making a chocolate mug cake is a tough or rubbery texture. This is nearly always attributable to one of two errors: overmixing or overcooking. Overmixing develops gluten, which tightens the cake structure. Stir gently and stop mixing the moment the flour disappears.
Overcooking evaporates too much moisture; if your cake consistently comes out dry, immediately reduce your microwave time by 10 to 15 seconds. It is always better to slightly undercook a mug cake than to overshoot the timing.
Nutritional Breakdown: Understanding the Per-Serving Metrics
While this recipe is designed for maximum flavour and speed, it is unequivocally an indulgent treat. Based on the use of whole milk and oil, this single serving cake typically ranges between 390 and 450 calories, with roughly 18-22 grams of fat and 30-35 grams of sugar.
These metrics serve as a helpful reminder that this dense dessert is truly optimized for a momentary, intense craving and not for daily consumption.
Making it Ahead: Prep Techniques for Instant Dessert
While you cannot bake the cake ahead of time, you can drastically cut down on the active preparation time. Measure out all the dry ingredients (flour, sugar, cocoa, baking powder, salt, and espresso powder) into small airtight containers or even into several mugs covered with cling film.
When the craving hits, you only need to pour in the wet ingredients, stir, and microwave, transforming the prep time into a true 30-second affair, reinforcing the Instant Cake In A Cup ideal.
Flavor Intensification: Using Salt and Espresso Powder
These two ingredients are the secret weapon against a flat, one-dimensional chocolate cake. The tiny pinch of fine sea salt enhances all the other flavours and prevents the cake from tasting overwhelmingly sweet.
Meanwhile, the quarter teaspoon of espresso powder (instant coffee granules also work) is essential for maximizing the flavour of the cocoa, providing a richness that elevates the resulting cake above any basic box mix.
From Ganache to Ice Cream: Perfect Serving Companions
This warm, rich chocolate mug cake demands a contrasting topping. For an ultra luxurious finish, consider a spoonful of homemade ganache or a sprinkle of flaky sea salt immediately after resting.
However, the perfect companions involve temperature contrast: a large dollop of high-quality vanilla bean ice cream that instantly begins to melt into the warm cake, or a spoonful of whipped cream.
For a touch of fruity acidity to cut the intense richness, fresh raspberries or a simple raspberry coulis are excellent choices.
Recipe FAQs
Why does my Chocolate Mug Cake keep turning out dry or rubbery? It’s a bit of a tragedy!
This is the biggest hurdle! A rubbery texture is usually caused by two common culprits: over mixing the batter (developing too much gluten) or, more often, overcooking in the microwave. Remember, every microwave is different some are proper powerhouses so always start with 60 seconds and check it.
If the centre looks fully dry and spongy, you've gone too far; aim for a slightly damp middle, as the residual heat will finish the cooking while it rests for that crucial minute. A little undercooked is far superior to a dry sponge!
I need a dietary swap! Can I make this Chocolate Mug Cake vegan or gluten-free?
Absolutely, this recipe is wonderfully forgiving for dietary swaps. For a gluten-free version, simply substitute the all-purpose flour with a good quality 1:1 gluten-free baking blend make sure it contains xanthan gum for structure.
For a vegan cake, ensure your chocolate chips are dairy-free, and use a neutral plant based milk (like oat or soy) instead of whole milk. Since we use oil instead of eggs, you’ve already skipped most of the substitution faff!
Why do you recommend adding instant espresso powder to a chocolate recipe?
Ah, the secret weapon! A pinch of instant coffee or espresso powder doesn't make the mug cake taste of coffee at all; instead, it acts as a phenomenal flavour enhancer for the cocoa. It massively deepens the chocolate notes, providing a dark, complex richness.
This is a classic baker's trick that ensures your emergency dessert tastes like a proper, indulgent pudding, rather than a dusty, quick fix cake.
Can I make the batter ahead of time, or save half for later?
Short answer: sadly, no. The whole point of the mug cake’s lift relies on the chemical reaction of the baking powder being activated by the wet ingredients and the heat.
If you let the batter sit in the fridge or on the counter for more than about 10 minutes, the leavening agent will lose its potency. You’ll end up with a disappointingly flat, dense disc, which is not the indulgent experience we’re aiming for.
Can I double or triple this recipe to make several servings at once?
That’s a brave notion, but mug cakes are stubbornly designed for single, quick servings! Doubling the ingredients usually requires a much longer microwave cook time, leading to seriously uneven heating you’ll get a dry, tough exterior and possibly still raw centre.
If you need a pudding for two or more people, your best bet is to make two separate mug cakes back-to-back, or switch to a traditional baked brownie recipe. It's often quicker than trying to wrestle with a scaled-up microwave bake.
5minute Molten Chocolate Mug Cake